
Sometimes, I find myself craving a little something sweet that doesn’t require turning on the oven. These no bake hazelnut bites hit that spot perfectly. They’re rustic, a bit messy, and honestly, a joy to make when I want a quick treat without fuss.
What I love most is how the roasted hazelnuts give a smoky crunch that makes each bite feel special. It’s a reminder that simple ingredients, when treated right, can create comfort in a few straightforward steps.
Plus, they’re just about foolproof—no baking, no melting, just mixing and chilling. Perfect for those days when I need a sweet fix but don’t want to mess around with complicated recipes.
This recipe is inspired by the idea of creating a simple, satisfying treat that combines the nostalgic crunch of roasted hazelnuts with the rich, gooey texture of a no-bake bite. It’s about turning humble ingredients into a moment of quiet joy, perfect for when you need a quick fix that feels indulgent but is honestly just about easy pleasure.
Turning humble ingredients into joy
- I love how these bites remind me of childhood afternoons filled with the smell of roasted nuts drifting through the kitchen.
- There’s a chaotic joy in crushing the hazelnuts by hand, feeling their oily richness burst through my fingertips.
- Making these has become my little therapy—simple, honest, and oddly satisfying to see them firm up in the fridge.
- Nothing beats that moment when I bite into one and get a perfect mix of crunchy hazelnut and sweet, sticky chocolate.
- These treats are my go-to when I want something quick but crave the comfort of familiar, honest ingredients.
Turning humble ingredients into joy
- This recipe came together one rainy afternoon when I needed something quick, comforting, and a little bit fancy without the fuss of baking. I was craving that smoky crunch of roasted hazelnuts mixed with something sweet and sticky, but I didn’t want to turn on the oven or mess around with melting chocolate on the stove. So I started experimenting with ingredients I always have around—nuts, honey, a dash of cocoa—and it clicked fast.
- What really pushed me to perfect this was remembering how my grandmother used to toss roasted nuts into her oatmeal, making a simple breakfast feel special. I wanted that same feeling—something honest, a bit rustic, and deeply satisfying. These bites are like a tiny, crunchy hug in each piece, meant for those in-between moments when you need a quick lift.
- heading: Turning humble ingredients into joy
Trivia and historical tidbits
- These bites draw inspiration from traditional European nut confections, reimagined in a no-bake, minimalist style.
- Historically, hazelnuts have been prized in Mediterranean and Middle Eastern desserts for their rich, smoky flavor, dating back centuries.
- The concept of no-bake treats gained popularity during wartime rationing, emphasizing simple ingredients and minimal equipment.
Ingredient breakdown
- Hazelnuts: I prefer roasted, unsalted hazelnuts for that smoky, oily crunch. If you only have raw, give them a quick toast to boost flavor.
- Honey: Adds sweetness and helps everything stick together. Use a mild honey if you want a subtle floral note, or a darker one for more richness.
- Dark chocolate: I like 70% for a bittersweet edge, but milk chocolate works if you want it sweeter and creamier. Melt gently to keep it smooth.
- Cocoa powder: Unsweetened, of course. It deepens the chocolate flavor and adds a slight bitterness. Sift before mixing to avoid clumps.
- Oats: Rolled oats give texture, but if you want a more refined bite, pulse them a few times in the food processor. They add a hearty, nutty base.
- Coconut oil: Just a touch helps the chocolate melt evenly and makes the bites glossy. Skip if you prefer a firmer, less shiny finish.
- Sea salt: A tiny pinch enhances the chocolate and nut flavors. Sprinkle on top after chilling for a little crunch and contrast.
Spotlight on key ingredients
Hazelnuts:
- I love the smoky aroma of roasted hazelnuts, which become oily and glossy when crushed. They add a rich, buttery crunch that’s hard to replicate with other nuts.
- Chocolate: I prefer dark chocolate with a slight bitterness that balances the sweetness. It melts into a smooth, shiny coating, and when cooled, it crackles satisfyingly when bitten.
Cocoa powder:
- Honey: It’s sticky and viscous, giving the bites their cohesive texture. The floral notes can vary from mild to intense, depending on the honey you choose.
- Unsweetened and deep, it intensifies the chocolate flavor and adds a slight bitterness. Sifting it helps avoid clumps and keeps the mixture smooth.
Notes for ingredient swaps
- Nuts: If hazelnuts aren’t available, almonds or pecans can work. They won’t have that smoky, oily richness, but still tasty.
- Sweetener: Maple syrup or agave nectar can replace honey for a different flavor profile. Expect a slightly different sticky texture.
- Chocolate: Use milk or white chocolate if you prefer sweeter, creamier bites. Keep in mind, the flavor will be milder and less bitter.
- Oil: Coconut oil can be swapped with a neutral oil like grapeseed or light olive oil. It won’t give that glossy finish but will blend well.
- Add-ins: Dried fruit pieces or toasted coconut flakes can add texture and flavor. Use sparingly to avoid overcrowding the bites.
- Oats: Rolled oats can be replaced with quick oats for a finer texture. For gluten-free options, try certified gluten-free oats.
- Salt: Sea salt flakes can be replaced with a pinch of flaky sea salt on top. It adds a nice crunch and contrast.
Equipment & Tools
- Mixing bowl: Combine ingredients evenly.
- Sturdy spoon: Mix and fold ingredients.
- Small saucepan: Gently melt chocolate.
- Baking sheet: Line for chilling bites.
- Parchment paper: Prevent sticking and for easy cleanup.
Step-by-step guide to hazelnut bites
- Equipment & Tools: Gather a mixing bowl, a sturdy spoon, a small saucepan, a baking sheet, and parchment paper. The bowl is for mixing, the saucepan melts the chocolate, and the sheet lines for chilling.
- Toast the hazelnuts: Spread 1 cup of raw hazelnuts on a baking sheet. Roast at 180°C (350°F) for 10 minutes. Cool until you can handle them comfortably.
- Chop or crush hazelnuts: Once cooled, roughly chop or crush the hazelnuts with your hands or a rolling pin for a rustic texture. Set aside.
- Melt the chocolate: Fill the saucepan with 100g (3.5 oz) dark chocolate. Melt gently over low heat, stirring constantly. When smooth and shiny, remove from heat.
- Combine ingredients: In the mixing bowl, stir together 1/4 cup honey, 2 tablespoons coconut oil, and a pinch of sea salt. Pour in the melted chocolate and mix well.
- Add hazelnuts and oats: Fold in the crushed hazelnuts and 1/2 cup rolled oats. Mix until evenly coated and sticky enough to form into bites.
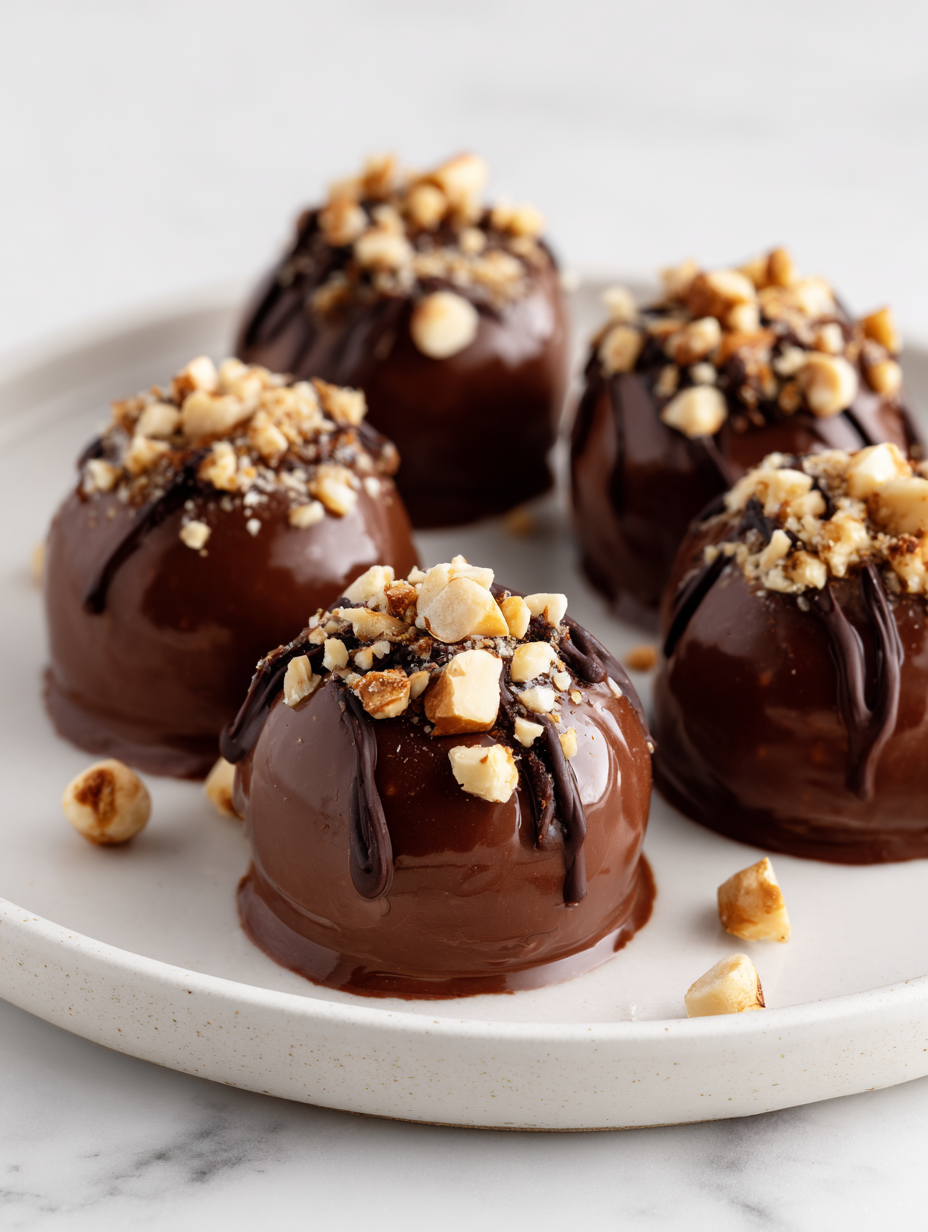
- Form the bites: Using a teaspoon or small scoop, portion out mixture. Roll between your palms into small, compact balls or press into mini molds. Place on parchment-lined tray.
- Chill to set: Refrigerate for at least 1 hour. The bites should firm up and become shiny on the surface.
- Finishing touches: Optionally, melt a little more chocolate to drizzle on top or sprinkle with sea salt. Return to fridge briefly to set if adding toppings.
- Serving: Keep chilled until ready to serve. Let sit at room temperature for a few minutes before eating for optimal flavor and texture.
Refrigerate the bites for at least an hour until firm. Serve directly from the fridge, letting them sit at room temp for 5 minutes before eating. Store in an airtight container in the fridge up to a week.
How to Know It’s Done
- Chocolate is fully melted and smooth, with a glossy finish.
- Bites hold their shape when formed, not crumbly or sticky.
- Bites are firm but give slightly when gently pressed, indicating proper setting.
No-Bake Hazelnut Bites
Ingredients
Equipment
Method
- Preheat your oven to 180°C (350°F). Spread the hazelnuts on a baking sheet and toast for about 10 minutes until fragrant and slightly browned. Let them cool completely.
- Once cooled, roughly chop or crush the hazelnuts with your hands or a rolling pin to create rustic pieces, leaving some larger chunks for crunch.
- Gently melt the dark chocolate in a small saucepan over low heat, stirring constantly until smooth and glossy. Remove from heat once melted.
- In a mixing bowl, combine the honey, coconut oil, and sea salt. Pour in the melted chocolate and stir until well combined and smooth.
- Fold in the crushed hazelnuts and rolled oats, mixing until everything is evenly coated and sticky enough to shape into bites.
- Using a teaspoon or small scoop, portion out the mixture and roll into small balls. Place them on a parchment-lined baking sheet.
- Refrigerate the bites for at least 1 hour until firm and glossy. This helps them set and develop a satisfying texture.
- Optionally, melt a little more chocolate and drizzle over the chilled bites or sprinkle with a pinch of sea salt for added flavor. Return to the fridge briefly to set.
- Serve the bites straight from the fridge or let them sit at room temperature for a few minutes for a softer, more fragrant bite.
Notes
Tips for perfect hazelnut bites
- Bolded mini-head: Use room temperature chocolate → Melts more evenly, avoiding lumps and shiny finish.
- Bolded mini-head: Toast hazelnuts thoroughly → Boost smoky aroma and crunchy texture, enhancing overall flavor.
- Bolded mini-head: Chill bites before adding toppings → Ensures they’re firm and won’t smudge when decorating.
- Bolded mini-head: Mix quickly but gently → Prevent melting chocolate from seizing and maintain a smooth consistency.
- Bolded mini-head: Use a silicone spatula → Gently fold ingredients without crushing the hazelnuts, preserving texture.
- Bolded mini-head: Let the mixture rest for 10 minutes → Helps oats and nuts absorb flavors and stick better.
- Bolded mini-head: Store in airtight container → Keeps bites fresh, crunchy, and prevents fridge odors from seeping in.
Common mistakes and how to fix them
- FORGOT to toast hazelnuts → Toast thoroughly for smoky depth.
- DUMPED chocolate too quickly → Melt slowly, stirring until smooth.
- OVER-TORCHED chocolate → Remove from heat immediately to prevent bitterness.
- SKIPPED chilling step → Chill until bites are firm and glossy to set properly.
Quick fixes and pantry swaps
- If/When chocolate seizes, splash in a bit of hot water to smooth it out.
- When nuts are too oily, toast longer to reduce excess moisture and deepen flavor.
- Splash cold milk if bites are too firm after chilling; soften slightly at room temp.
- Patch sticky mixture with a teaspoon of extra honey or oil to improve binding.
- Shield delicate toppings from cracking by chilling bites in a slightly warmer environment before serving.
Prep, store, and reheat tips
- You can prep the mixture a day ahead; keep covered in the fridge to preserve freshness and prevent drying out.
- Store the assembled bites in an airtight container in the fridge for up to a week, maintaining their firm, glossy texture.
- Refrigerated bites develop a richer chocolate aroma over time; let sit at room temperature for 5 minutes before serving to soften slightly.
- For longer storage, freeze the bites for up to a month; thaw in fridge and bring to room temp before eating for best texture.
Top questions about hazelnut bites
1. Can I use other nuts instead of hazelnuts?
Yes, you can swap hazelnuts with almonds or pecans, but the smoky flavor might be different.
2. How long do no bake hazelnut bites last?
Refrigerate for up to a week in an airtight container; they stay firm and shiny, but flavors deepen.
3. Can I melt chocolate in the microwave instead of on the stove?
Yes, melting chocolate gently over low heat prevents seizing. Stir constantly for a smooth coating.
4. How do I know when the bites are ready?
Chill the bites at least an hour until they’re firm and glossy. They should crackle slightly when bitten.
5. Can I customize the ingredients?
Yes, you can add dried fruit or coconut flakes for extra texture. Keep toppings minimal to avoid stickiness.
6. How should I crush the hazelnuts?
Use a sharp knife to chop the nuts for more control and rustic texture. Avoid pulsing too long.
7. My mixture is too sticky. What can I do?
If the mixture is too sticky, add a little more oats or honey to help form the bites.
8. How do I add chocolate drizzle without messing up the bites?
Chill the bites before adding toppings to prevent smudging. Use a spoon or piping bag for drizzle.
9. Can I freeze these bites?
Store in an airtight container in the fridge for up to a week, or freeze for longer storage.
10. How should I melt the chocolate?
Use room temperature chocolate for melting to get a smooth, glossy finish without lumps.
These no bake hazelnut bites are more than just a quick treat; they remind me of simple pleasures—crunchy, smoky, and just a little bit indulgent. Making them feels like a small act of self-care, especially when life gets busy.
Whenever I need a moment of honest comfort, these bites come to mind. They’re imperfect, satisfying, and a reminder that straightforward ingredients can create something truly memorable.

Hi, I’m Madison Lane, the cook, recipe creator, and heart behind this kitchen. Food has been part of my life for as long as I can remember. Some of my earliest memories are of standing beside my dad while he cooked, watching him move comfortably around the kitchen, tasting sauces, and explaining why patience mattered just as much as seasoning.
