There’s something about peas that feels like a little secret in the kitchen. When blended into a creamy sauce for pasta, they bring a fresh, almost spring-like brightness, even if it’s the middle of winter outside. It’s surprising how humble ingredients like frozen peas can transform a simple dish into something a bit more special, a bit more alive.
I love how this recipe doesn’t ask for fancy or hard-to-find ingredients. Just a handful of peas, some good pasta, and a few pantry staples. It’s the kind of meal that feels restorative—bright, comforting, and quick enough to toss together after a long day. Plus, the vibrant green makes the whole plate look like a little burst of spring on your table.
Focusing on how a simple, humble ingredient like peas can elevate a pasta dish into something unexpectedly bright and spring-like, even in the dead of winter.
The story behind this recipe
- This recipe came together during a chilly Sunday when I was craving something bright but simple. I had a bag of frozen peas in the freezer and some leftover pasta, so I started blending. The moment I tasted the creamy, sweet-green sauce, I knew I’d found a new quick favorite, especially for those days when I want fresh flavor without fuss.
- It reminds me of spring mornings spent wandering through farmers’ markets, the air filled with the scent of fresh produce. Even in winter, this dish brings that feeling home—bright, a little chaotic, and surprisingly satisfying. It’s one of those meals that makes me smile because it’s honest, accessible, and just plain good.
- heading: The story behind this recipe
Ingredient breakdown
- Frozen peas: I love how their sweet, fresh flavor pops once cooked and blended, giving the sauce that vibrant, almost grassy brightness. If you prefer a milder taste, try fresh peas when in season.
- Pasta: I usually go for a short, sturdy shape like rigatoni or penne because they catch the sauce nicely. For a lighter feel, whole wheat or gluten-free options work without losing too much creaminess.
- Cream: I favor heavy cream for richness, but coconut cream makes it dairy-free and still luscious. If you want a lighter option, a splash of milk plus a bit of butter can do the trick.
- Garlic: I add a couple of cloves—roasted for a sweeter note or raw for a sharper punch. Toasting garlic briefly in the pan can deepen its flavor and add a slight smoky edge.
- Lemon juice: Just a squeeze brightens everything up and enhances the pea sweetness. If you’re out of lemon, a splash of vinegar works but won’t have quite the same zing.
- Parmesan: I usually sprinkle plenty on top, but a bit of nutritional yeast can add a cheesy flavor without dairy if needed. For an extra salty kick, a pinch of flaky sea salt helps.
- Olive oil: I drizzle good-quality extra virgin to start the sauce, adding a fruity note that complements the peas. For a more robust flavor, try smoked olive oil.
Spotlight on key ingredients
Frozen peas:
- I love how their sweet, fresh flavor pops once cooked and blended, giving the sauce that vibrant, almost grassy brightness. If you prefer a milder taste, try fresh peas when in season.
- Pasta: I usually go for a short, sturdy shape like rigatoni or penne because they catch the sauce nicely. For a lighter feel, whole wheat or gluten-free options work without losing too much creaminess.
Lemon juice:
- Cream: I favor heavy cream for richness, but coconut cream makes it dairy-free and still luscious. If you want a lighter option, a splash of milk plus a bit of butter can do the trick.
- Just a squeeze brightens everything up and enhances the pea sweetness. If you’re out of lemon, a splash of vinegar works but won’t have quite the same zing.
Notes for ingredient swaps
- Dairy-Free: Swap heavy cream for coconut cream or cashew cream. Keeps it rich but with a subtle nutty sweetness.
- Vegan: Use nutritional yeast instead of Parmesan and plant-based butter or oil. Still cheesy, still creamy.
- Gluten-Free: Choose gluten-free pasta, like chickpea or rice-based options. Texture may vary slightly but still satisfying.
- Fresh Peas: Use fresh peas when in season for a brighter, more tender bite. Frozen works just fine in colder months.
- Lemon Juice: Swap for white wine vinegar or apple cider vinegar for a tangy kick, but use less to avoid overpowering the peas.
- Olive Oil: Try toasted sesame oil for a nutty note or avocado oil for a milder flavor. Both add depth to the sauce.
- Cheese: Nutritional yeast or a pinch of smoked paprika can add umami or smoky flavor if Parmesan isn’t available.
Equipment & Tools
- Large pot: Boil pasta efficiently in salted water
- Blender or immersion blender: Create a smooth, creamy pea sauce
- Skillet: Sauté garlic and finish the dish
- Measuring cups and spoons: Accurately measure ingredients
- Ladle or slotted spoon: Drain pasta and transfer to mixing bowl
Step-by-step guide to creamy pea pasta
- Gather your equipment: a large pot for boiling pasta, a blender or immersion blender for the sauce, and a skillet for finishing. Have your ingredients ready: pasta, frozen peas, garlic, cream, lemon, Parmesan, olive oil, salt, and pepper.
- Bring a large pot of salted water to a boil—about 4 liters (4 quarts), 100°C (212°F). Add pasta and cook until just al dente, about 1 minute less than package directions, usually 8-10 minutes. Save a cup of pasta water before draining.
- While pasta cooks, heat a tablespoon of olive oil in a skillet over medium heat (around 160°C/320°F). Add minced garlic, cook until fragrant—about 30 seconds to 1 minute—be careful not to burn. If garlic smells burnt, turn down the heat.
- In a blender, combine about two-thirds of the frozen peas, a splash of pasta water (about ¼ cup), and a few tablespoons of cream. Blend until very smooth, taste and adjust salt or lemon if needed. Set aside.
- Drain pasta, reserving more pasta water if needed. Return pasta to the pot or place in a mixing bowl. Pour the pea sauce over the pasta, add a squeeze of lemon juice, and toss gently. If sauce feels too thick, loosen with reserved pasta water, a tablespoon at a time, until silky.
- Taste and adjust seasoning—more lemon, salt, or pepper. Sprinkle generously with grated Parmesan or nutritional yeast. Drizzle with a little extra olive oil for sheen and flavor.
- Serve immediately, garnished with additional Parmesan if desired. Rest for 1-2 minutes to let flavors meld. Enjoy the bright, creamy bite of this simple dish.
Toss the pasta with the sauce while still warm. Rest for 1-2 minutes to allow flavors to settle. Serve immediately, garnished with extra cheese or herbs if desired.
How to Know It’s Done
- Pasta is al dente, with a slight bite in the center.
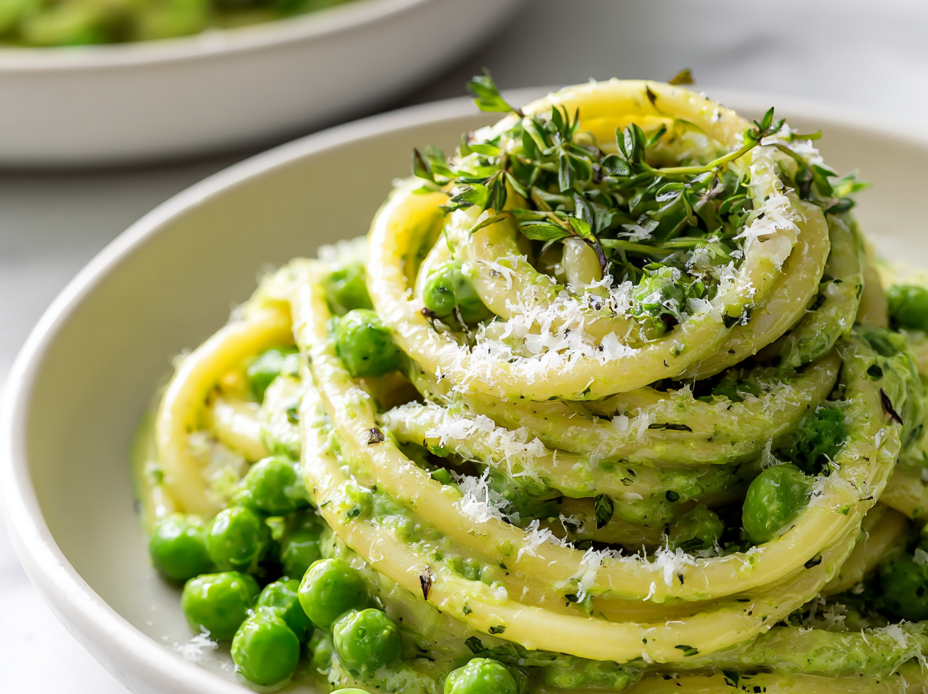
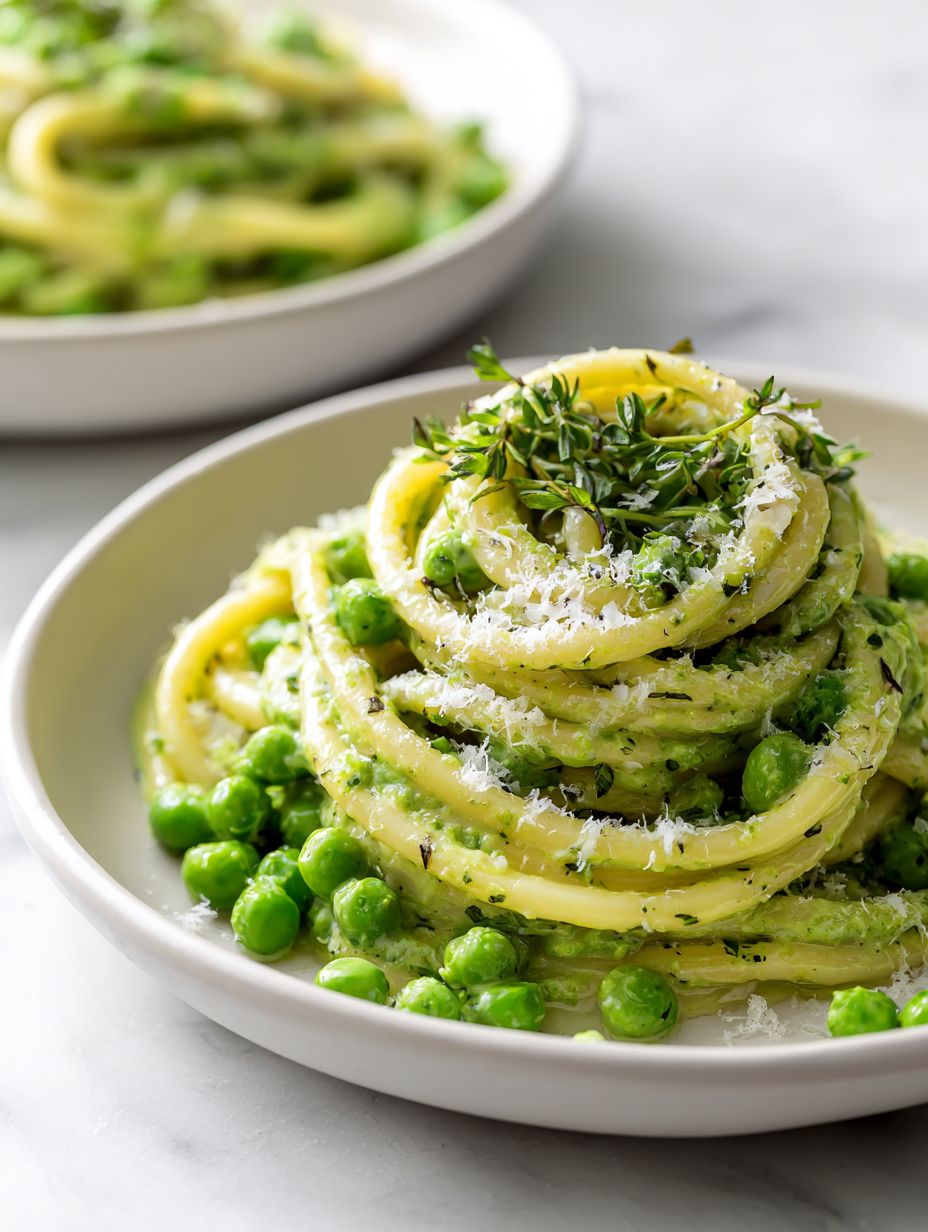
- Sauce is smooth, bright green, and coats the pasta evenly.
- Cheese is melted and integrated, with a fragrant lemon aroma.
Creamy Pea Pasta
Ingredients
Equipment
Method
- Bring a large pot of salted water to a rolling boil. Add the pasta and cook until just al dente, about 8-10 minutes. Reserve a cup of pasta water, then drain and set aside.
- While the pasta cooks, heat olive oil in a skillet over medium heat. Add the minced garlic and sauté for about 30 seconds until fragrant and just starting to turn golden, releasing a warm, aromatic smell.
- Transfer the thawed peas to a blender, add the sautéed garlic, heavy cream, and a splash of the reserved pasta water. Blend until smooth and vibrant green, tasting and adjusting salt or lemon if needed.
- Return the drained pasta to the pot or a large bowl. Pour the pea sauce over the pasta and toss gently to coat each piece evenly. If the sauce is too thick, add more reserved pasta water a tablespoon at a time until silky and smooth.
- Stir in the lemon juice for a fresh brightness, then sprinkle with grated Parmesan cheese. Toss again to combine all flavors and textures.
- Adjust seasoning with salt and pepper to taste, then serve immediately. Garnish with extra Parmesan or herbs if desired, and enjoy the creamy, vibrant bite of this simple, spring-inspired pasta.
Notes
Tips for perfect creamy pea pasta
- Use fresh or properly thawed peas for the most vibrant color and flavor, avoiding mushiness.
- Toast garlic briefly in oil until fragrant—just a quick crackle to deepen its sweetness without burning.
- When blending, start with a small amount of pasta water—add gradually until sauce is silky and coats the pasta evenly.
- For a brighter flavor, squeeze lemon just before serving; over-mixing can dull the citrus’s punch.
- Keep an eye on the pasta during the final seconds—al dente is key, or it turns mushy when coated with sauce.
- Drizzle olive oil last, off the heat, to preserve its fruity aroma and glossy finish.
- Taste and adjust seasoning after tossing—salty, lemony, and cheesy should be balanced for maximum brightness.
Common mistakes and how to fix them
- FORGOT to taste and adjust seasoning before serving. Always taste and tweak for balance.
- DUMPED in all peas at once. Add peas gradually for even blending and texture control.
- OVER-TORCHED garlic. Cook garlic over gentle heat until fragrant, not browned or burned.
- SKIPPED saving pasta water. Use reserved water to loosen sauce for perfect creaminess.
Quick fixes and pantry swaps
- When sauce looks grainy, splash in hot pasta water and blend again quickly.
- If sauce is too thick, add a few drops of lemon juice for brightness and loosen with pasta water.
- Splash olive oil on top if sauce separates or appears dull after sitting.
- Patch over salty flavor by stirring in a small amount of unsalted cream or a dash of water.
- Shield burnt garlic by removing from heat immediately and starting with lower heat next time.
Prep, store, and reheat tips
- Prep the sauce ingredients: blend peas and prepare garlic a day ahead. Keep in an airtight container in the fridge for up to 24 hours—watch for the bright green color fading slightly over time.
- Cook pasta ahead of time: drain, toss lightly with olive oil, and store in a sealed container in the fridge for up to 1 day. Reheat quickly in boiling water to regain some of its original texture.
- Reheating the sauce: gently warm in a saucepan over low heat, stirring often. The sauce may thicken—add a splash of hot pasta water or milk to loosen it and restore smoothness. It should shimmer and smell fresh—bright and inviting.
- Shelf life: both cooked pasta and sauce are best enjoyed within 24 hours. After that, the peas can lose their vibrancy and the sauce may become grainy or dull in flavor.
- Sensory notes on reheating: look for a creamy, bright green hue; smell should be fresh with a faint garlic aroma; texture should be velvety—if it’s grainy or sour, it’s time to toss.
Top questions about creamy pea pasta
1. Can I use fresh peas instead of frozen?
Use frozen peas straight from the freezer—they keep their sweetness and vibrant color well during blending.
2. Should I thaw the frozen peas before blending?
Yes, but fresh peas are less sweet and more delicate; cook them briefly before blending for best flavor.
3. How do I make the sauce more lemony?
Add a little lemon juice or vinegar to brighten the sauce; start with a teaspoon and adjust to taste.
4. How do I keep the pasta from getting mushy?
Cook the pasta until just al dente, then toss with the hot sauce to prevent it from becoming mushy.
5. What if the sauce feels too thick or gloopy?
If the sauce is too thick, stir in reserved pasta water or a splash of cream until it reaches your desired consistency.
6. Can I substitute the Parmesan cheese?
Use a good-quality olive oil and freshly grated Parmesan for the best flavor and aroma in your dish.
7. What are good dairy-free alternatives for cheese?
Yes, nutritional yeast or a pinch of smoked paprika can add a cheesy or smoky flavor when you skip cheese.
8. How smooth should the pea sauce be?
Blend the peas thoroughly to ensure a smooth, creamy texture—don’t leave chunks; it should coat the pasta evenly.
9. When should I add lemon juice?
Add the lemon juice at the end to preserve its bright, fresh flavor and avoid bitterness.
10. How do I reheat the leftovers?
Reheat gently over low heat, stirring often, and add a splash of water or cream to restore creaminess.
This creamy pea pasta is a reminder that simplicity often yields the most vibrant flavors. It’s a dish that feels fresh, honest, and surprisingly bright, even in the dead of winter. Sometimes, a humble ingredient like peas can turn a weekday dinner into something worth savoring.
In the end, it’s not just about the recipe but the small moments of satisfaction—those flashes of green, the silky texture, and that unexpected burst of brightness. It’s a meal that invites you to slow down and appreciate what’s in your pantry. And honestly, that’s what makes cooking still worth it.

Hi, I’m Madison Lane, the cook, recipe creator, and heart behind this kitchen. Food has been part of my life for as long as I can remember. Some of my earliest memories are of standing beside my dad while he cooked, watching him move comfortably around the kitchen, tasting sauces, and explaining why patience mattered just as much as seasoning.
