This butter garlic peas recipe is the kind of dish that sneaks into your weeknight rotation without fuss but still feels special. It’s a simple way to highlight fresh peas, letting their sweet, slightly grassy flavor shine through a glossy, buttery coat. I love how quick it comes together, making it perfect for those evenings when you want something satisfying but don’t want to spend ages in the kitchen.
Growing up, I remember my mom tossing peas in butter and garlic during busy weeknights, the smell filling the house and making everything feel a little more manageable. There’s something about that small ritual—just butter, garlic, and peas—that feels comforting, grounding, and a reminder that simplicity can be the best kind of delicious. It’s a humble dish, but one that always seems to brighten the table.
Now, I keep this recipe close for nights when I need a quick bite that feels like a little celebration—no complicated ingredients, no fuss. It’s a reminder to slow down for a moment, savoring the bright, buttery, garlicky notes that make peas feel like a real treat, even when they’re just a side.
Focusing on how the butter garlic peas can serve as a quick, comforting side that captures the essence of seasonal simplicity, reminding me of childhood dinners and the beauty of letting fresh ingredients shine with minimal fuss.
The story behind this recipe
- This recipe was born out of a lazy weekend afternoon when I had a handful of fresh peas and a craving for something rich but simple. I wanted to create a dish that captures the essence of early spring—bright, buttery, and with a punch of garlic. It’s become my go-to for quick lunch sides that feel indulgent without the fuss.
- Every time I make it, I think back to childhood summers, sitting in the garden, pulling peas straight from the pod, and feeling that burst of sweetness. The idea of transforming those fresh, slightly grassy peas into something savory and comforting with just butter and garlic feels like capturing a little piece of nostalgia. It’s a humble dish, but packed with honest flavor.
- heading: ‘The story behind this recipe’
Key ingredients and tips
- Frozen peas: I love the bright pop of sweetness they bring, but fresh peas taste even more vibrant—use what’s available, but aim for freshness. The texture should be tender, not mushy, with a slight snap when you bite in.
- Butter: I opt for unsalted for control over salt, but salted works if you want an extra layer of richness. Watch it melt into the pan, turning golden and fragrant—this is the base of all that garlicky goodness.
- Garlic: I prefer thinly sliced for more surface area and that beautiful, toasted aroma. It’s best to add it last, so it doesn’t burn and turn bitter—look for a gentle sizzle and a nutty, aromatic smell.
- Salt & Pepper: I keep it simple with sea salt and freshly cracked black pepper, but a pinch of red pepper flakes can add a spicy kick—season gradually and taste as you go to balance the flavors.
- Lemon (optional): A squeeze at the end lifts everything—aim for a bright, lemony aroma that cuts through the richness. Skip if you prefer a milder, buttery note, but it’s like a fresh breath for the dish.
- Olive oil (optional): A drizzle can add a fruity note if you like, but I mostly stick to butter for that creamy, velvety texture—use sparingly to avoid overpowering the butter’s richness.
- Herbs (like mint or parsley): Fresh herbs brighten the dish and add a pop of color—add just before serving to keep their bright, herbal aroma intact.
Spotlight on key ingredients
Peas:
- I love their sweet, grassy burst when fresh, and their vibrant color—use fresh if possible for best texture and flavor.
- Garlic: Thin slices toast quickly, releasing a nutty aroma. Watch it carefully so it doesn’t burn and turn bitter.
Garlic:
- Butter: Melts into a glossy, fragrant base that coats the peas—use good quality for richer flavor and a velvety mouthfeel.
- When sautéed, it transforms from sharp to golden and nutty, adding depth and scent to the dish.
Notes for ingredient swaps
- Dairy-Free: Swap butter for olive oil or coconut oil. Expect a lighter, slightly fruitier flavor with less richness.
- Vegan: Use plant-based butter or margarine. The flavor stays creamy, but the depth of butter might be missed.
- Fresh Peas: If you can’t find fresh, frozen peas work perfectly—just don’t overcook to keep that bright color and snap.
- Garlic: Roasted garlic can add a mellow, sweet note—add it after cooking the peas for a softer, caramelized punch.
- Herbs: Swap parsley for basil or mint—each brings a distinct aroma; mint adds a cool, bright freshness, basil offers warmth.
- Lemon Juice: Lime works as a tangy alternative, giving a slightly different, more floral brightness to the dish.
- Salt & Pepper: Sea salt and cracked black pepper are classic, but a dash of smoked paprika can introduce a subtle smoky depth.
Equipment & Tools
- Large skillet: For cooking the peas evenly and quickly.
- Spatula: To stir and toss the peas and garlic.
- Measuring spoon: To measure butter and seasonings accurately.
Step-by-step guide to butter garlic peas
- Gather your equipment: a large skillet, a spatula, and a measuring spoon. The skillet should be big enough to hold the peas comfortably without overcrowding.
- Heat the skillet over medium heat until hot, about 2 minutes at 160°C (320°F). Add 2 tablespoons of butter and let it melt, shimmering gently.
- Add 2 cups of peas (fresh or frozen, thawed if frozen) to the skillet. Stir to coat them in the butter. Cook for 2-3 minutes, until they start to turn bright green and slightly tender.
- While peas cook, thinly slice 3 cloves of garlic. When the peas are just beginning to soften and smell fragrant, add the garlic to the pan. Sauté for 30 seconds, until fragrant and toasted but not browned.
- Stir the garlic into the peas, then season with a pinch of salt and freshly cracked black pepper. Continue cooking for another 1-2 minutes, until peas are tender but still have a slight bite.
- Taste and adjust seasoning if needed. If using, squeeze a little lemon juice over the peas to brighten the flavor. Remove from heat and transfer to a serving dish.
- Rest for 1 minute to let flavors meld. Serve immediately, spooned onto a plate or as a side to your main dish.
Serve immediately while warm, garnished with a sprinkle of fresh herbs if desired. No resting needed, just a quick taste and adjust seasoning before plating.
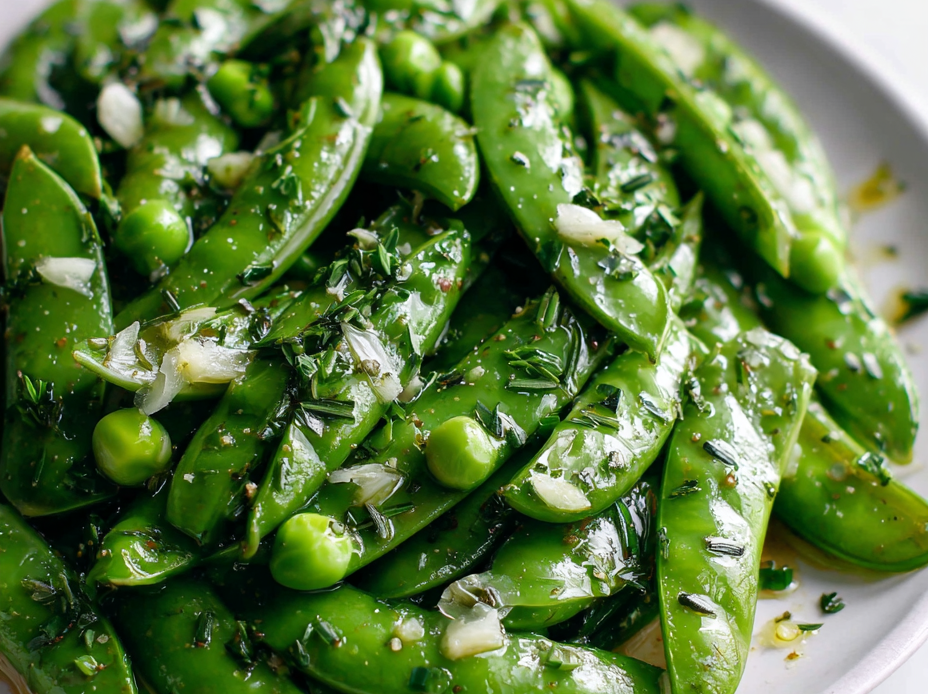
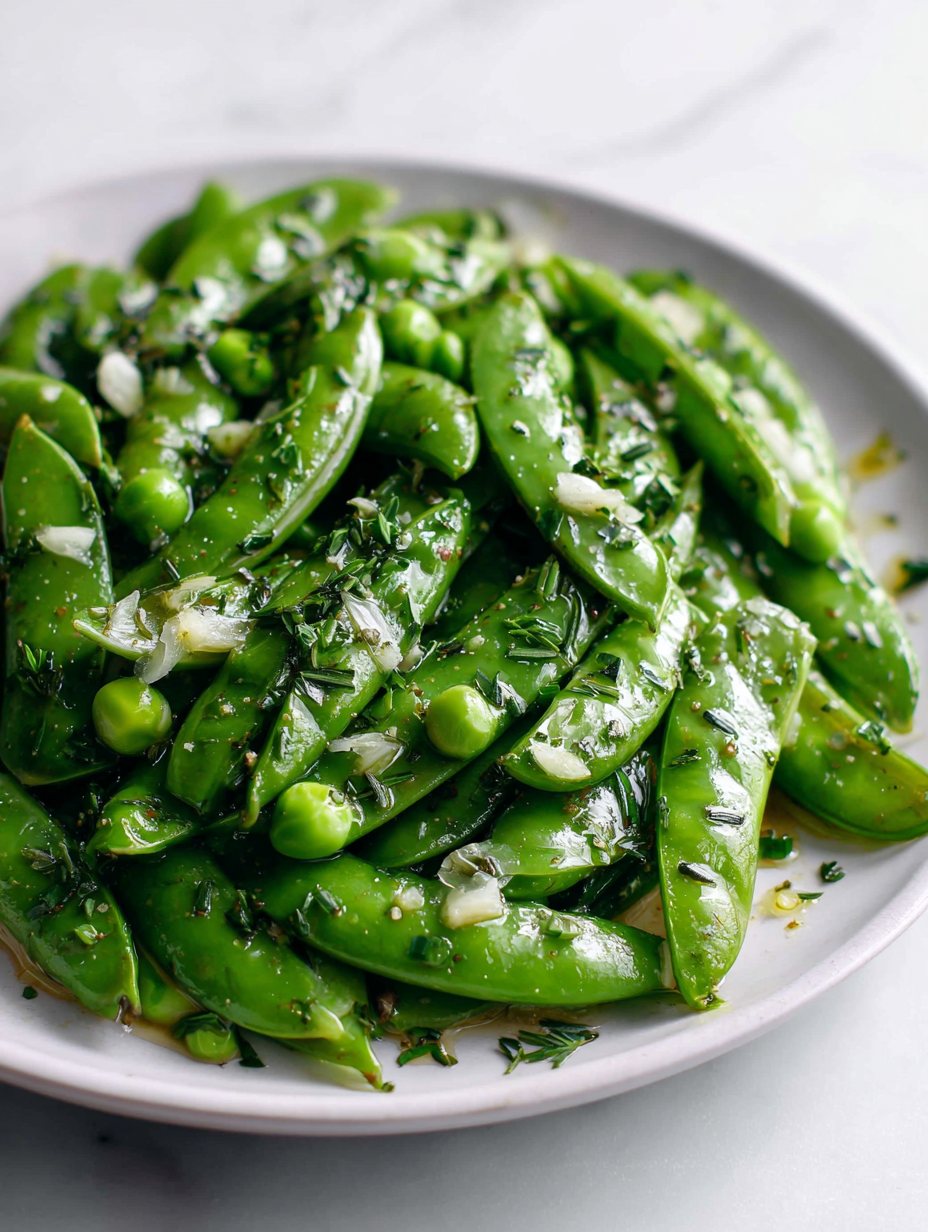
How to Know It’s Done
- Peas are bright green and tender but retain a slight crunch.
- Garlic is golden and fragrant, not burnt or bitter.
- Butter is melted and coats the peas evenly, with a glossy appearance.
Butter Garlic Peas
Ingredients
Equipment
Method
- Place a large skillet over medium heat and add the butter. Let it melt and shimmer, filling the kitchen with a fragrant, nutty aroma.
- Add the peas to the skillet, stirring gently to coat them evenly in the melted butter. Cook for 2-3 minutes until they turn bright green and start to soften.
- Carefully slide in the thinly sliced garlic, stirring constantly. Sauté for about 30 seconds until the garlic becomes fragrant and begins to toast to a light golden hue.
- Season with a pinch of salt and freshly cracked black pepper, stirring to distribute the seasonings evenly. Continue cooking for another 1-2 minutes until the peas are tender but still vibrant and slightly crisp.
- If desired, squeeze a bit of fresh lemon juice over the peas to brighten the flavors, then sprinkle with chopped herbs for a fresh, herbal finish.
- Remove from heat and transfer the peas to a serving dish. Serve immediately while warm, enjoying the fragrant, buttery, garlicky goodness.
Pro tips for perfect butter garlic peas
- Bolded mini-head: Use sliced garlic for quicker, more even toasting, releasing a nutty aroma.
- Bolded mini-head: Keep heat moderate when adding peas to prevent them from overcooking and losing color.
- Bolded mini-head: Stir constantly after adding garlic to avoid burning and bitterness.
- Bolded mini-head: Use fresh peas when possible for a brighter, more vibrant flavor and texture.
- Bolded mini-head: Finish with a quick squeeze of lemon to brighten the buttery richness.
- Bolded mini-head: Toast garlic just until fragrant—watch closely to prevent bitter, burnt bits.
- Bolded mini-head: For a richer flavor, swirl in a small extra knob of butter at the end.
Common mistakes and how to fix them
- FORGOT to watch garlic: Burnt garlic tastes bitter, fix by removing pan from heat immediately.
- DUMPED too much salt: Oversalting ruins the dish, fix by diluting with more peas or butter.
- OVER-TORCHED peas: Turn down heat if peas brown too quickly, preserve their bright color and snap.
- SKIPPED resting step: Resting allows flavors to meld, don’t skip for better taste and texture.
Quick fixes and pantry swaps
- If peas are overcooked, splash cold water to stop the cooking instantly.
- When garlic burns, dump it out and start fresh; burnt garlic turns bitter fast.
- Splash a little lemon juice if peas are bland or dull in color.
- Patch a salty dish by adding a few more peas or a dash of unsalted butter.
- Shield delicate peas from direct high heat to keep their vibrant color and crispness.
Prep, store, and reheat tips
- Prep the peas: shell fresh peas or measure out frozen peas ahead of time, keeping them in an airtight container in the fridge for up to 24 hours. The bright green color and sweet aroma stay vibrant when stored properly.
- Mince garlic in advance: peel and thinly slice garlic, then store in a small jar or container in the fridge. It retains its pungency and aroma, ready to be sautéed without delay.
- Refrigerate cooked peas: if you have leftovers, store them in an airtight container for up to 2 days. The flavor mellows slightly, so a quick reheat helps revive the buttery scent and fresh color.
- Reheat gently: warm leftovers in a skillet over low heat, stirring occasionally. The peas should shimmer and smell fragrant again within 2-3 minutes, without losing their bright hue or becoming mushy.
- Flavor development: the garlic and butter flavors deepen slightly after a day in the fridge, so expect a richer, more concentrated taste—perfect for a quick reheat and serve.
Frequently Asked Questions
1. Can I use frozen peas instead of fresh?
Fresh peas are sweeter and have a firmer, more vibrant texture, while frozen peas are convenient and still good if not overcooked.
2. Should I use salted or unsalted butter?
Yes, use unsalted butter if you want control over salt, but salted butter adds extra richness and flavor.
3. When do I add garlic?
Add garlic slices when the peas are just starting to soften and turn bright green, cook until fragrant but not browned.
4. How long should I cook the peas?
Cooking the peas for about 3-4 minutes until tender but still crisp ensures they retain color and texture.
5. Should I add lemon juice?
A squeeze of lemon right before serving brightens the dish and adds a fresh, tangy contrast to the buttery garlic flavor.
6. What if I burn the garlic?
If you burn the garlic, remove the pan from heat immediately to prevent bitterness, then start over if necessary.
7. How do I prevent garlic from burning?
Stir continuously after adding garlic to prevent burning, and cook over moderate heat to keep garlic golden and fragrant.
8. Can I prep ingredients beforehand?
You can prepare the garlic slices and measure the peas ahead, storing them in airtight containers to save time during cooking.
9. How do I reheat the dish?
Reheat leftovers gently in a skillet over low heat, adding a splash of water or butter if needed to revive flavor and shine.
10. My peas are mushy, what now?
If peas turn mushy, quick-cool with ice water then reheat carefully; adding a splash of lemon or fresh herbs can refresh the flavor.
This simple butter garlic peas dish is a reminder that quick, honest ingredients can create something memorable. It’s perfect for those busy nights when you want a bit of comfort without fuss. The bright aroma of garlic and the glossy butter coating make every bite feel like a small celebration.
Whenever I make this, I think about how food can be both nostalgic and effortless. It’s a little dish that’s rooted in seasonality and simplicity, yet somehow always feels special. Sometimes, the best ideas come from those humble moments in the kitchen.

Hi, I’m Madison Lane, the cook, recipe creator, and heart behind this kitchen. Food has been part of my life for as long as I can remember. Some of my earliest memories are of standing beside my dad while he cooked, watching him move comfortably around the kitchen, tasting sauces, and explaining why patience mattered just as much as seasoning.
