These no-bake peanut butter balls are my go-to for mornings when I need something quick and familiar. There’s something about the creamy peanut butter melting in your mouth that instantly brings back childhood mornings and lazy afternoons. Plus, they’re so simple — no oven, no fuss, just a handful of ingredients and a little patience in the fridge.
I love how these little bites come together with whatever peanut butter I’ve got on hand, sweetened just enough to satisfy that craving without overdoing it. They’re perfect for unexpected guests or a quick snack when the pantry feels a little empty but I still want something comforting and homemade. It’s that unpretentious, honest treat that feels like a warm hug in snack form.
Focusing on how these peanut butter balls serve as a nostalgic, no-fuss treat that’s perfect for busy mornings or unexpected guests, highlighting their simplicity and the comforting familiarity of peanut butter.
Nostalgic bites for busy mornings
- These peanut butter balls remind me of childhood afternoons, sticky fingers and all, but with a grown-up twist of richness.
- I love how they come together in minutes — perfect for those mornings when I’m rushing but still crave something sweet and satisfying.
- Making these is a small act of self-care; it’s comforting to know I can whip up something wholesome in no time, especially during busy weeks.
The story behind this recipe
- This recipe started from a messy kitchen experiment — I was craving something sweet, quick, and no-fuss after a long day. I reached for peanut butter, a forgotten bag of oats, and a pinch of chocolate chips. The result was so addictive I couldn’t keep it to myself, so I made a batch for friends and family to enjoy whenever a sweet craving hit.
- What I love most is how these little bites remind me of simpler times — no oven, no complicated steps, just honest ingredients coming together in a way that feels both nostalgic and satisfying. They’re like tiny, portable hugs for busy days or when I need a moment of comfort while juggling everything. Sometimes, the best recipes are born out of a need for quick, honest joy.
- heading: ‘The story behind this recipe’
Historical and Cultural Tidbits
- These peanut butter balls trace back to 1970s potlucks, where no-bake treats gained popularity for their simplicity.
- They are often called ‘energy bites’ in modern health circles, though originally they were just a quick sweet fix for busy families.
- The combination of peanut butter and oats was a pantry staple during wartime shortages, making this a comfort food rooted in frugality.
- In some regions, similar treats are linked to holiday celebrations, where no-cook, portable snacks were a must for gatherings.
Ingredient breakdown: key components
- Peanut Butter: I prefer a creamy, slightly salty variety that melts smoothly—your choice can change the richness entirely.
- Honey: Adds just enough sweetness and helps everything stick together; if you want less sweetness, cut back a bit.
- Oats: Old-fashioned rolled oats give the right chew and texture—skip instant oats, they’re too powdery for this.
- Chocolate Chips: I love semi-sweet, but dark or even white chocolate can give a different vibe—try what makes your heart happy.
- Coconut Flakes: Toasted for extra flavor, or leave raw for a softer bite—either way, they add a nice chew and aroma.
- Butter: A touch of melted butter makes the mixture richer and easier to roll—if you’re dairy-free, a neutral oil works, but it’s not quite the same.
- Vanilla Extract: Just a splash enhances the peanut flavor—don’t skip it unless you want a more neutral bite.
Spotlight on key ingredients
Peanut Butter:
- I prefer a creamy, slightly salty variety that melts smoothly—your choice can change the richness entirely.
- Honey: Adds just enough sweetness and helps everything stick together; if you want less sweetness, cut back a bit.
- Oats: Old-fashioned rolled oats give the right chew and texture—skip instant oats, they’re too powdery for this.
Chocolate Chips and Coconut Flakes:
- Chocolate Chips: I love semi-sweet, but dark or even white chocolate can give a different vibe—try what makes your heart happy.
- Coconut Flakes: Toasted for extra flavor, or leave raw for a softer bite—either way, they add a nice chew and aroma.
Notes for ingredient swaps
- Dairy-Free: Swap regular butter for coconut oil or a neutral plant-based butter. It won’t set quite the same but still adds richness.
- Sweetener: Use maple syrup or agave instead of honey for a different flavor profile and a slightly softer texture.
- Oats: Ground almonds or crushed graham crackers can replace oats for a different chew and flavor, especially if you want a gluten-free or more decadent version.
- Chocolate: White chocolate chips or carob chips make a good substitute, changing the sweetness and aroma subtly.
- Nut Butters: Almond or cashew butter can replace peanut butter, giving you a different nutty flavor but still creamy consistency.
- Add-ins: Dried cranberries, chopped nuts, or shredded coconut can replace or supplement chocolate chips for varied texture and flavor.
- Binding Agent: If you want a softer, more fudge-like bite, add a small squeeze of milk or a teaspoon of coconut milk to the mixture.
Equipment & Tools
- Mixing bowl: To combine all ingredients evenly.
- Spatula: For mixing and scraping down the sides.
- Baking sheet: To hold the formed balls while chilling.
- Parchment paper: Prevents sticking and makes cleanup easier.
- Microwave or double boiler: To melt chocolate for dipping.
Step-by-step guide to peanut butter balls
- Gather all your equipment: a mixing bowl, a spatula, a baking sheet, and parchment paper. No fancy tools needed, just the basics to keep things simple.
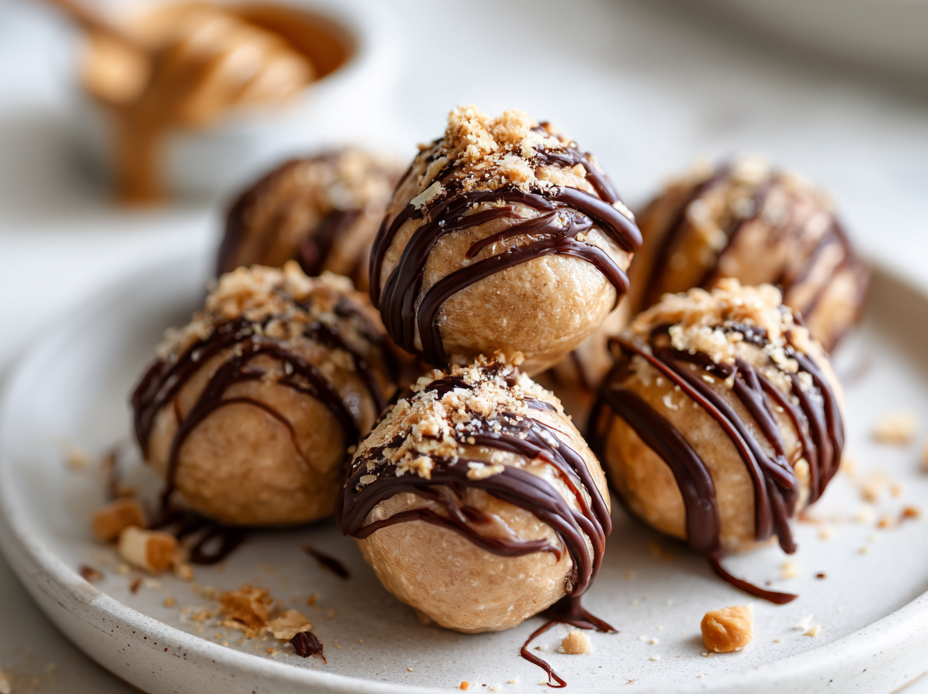
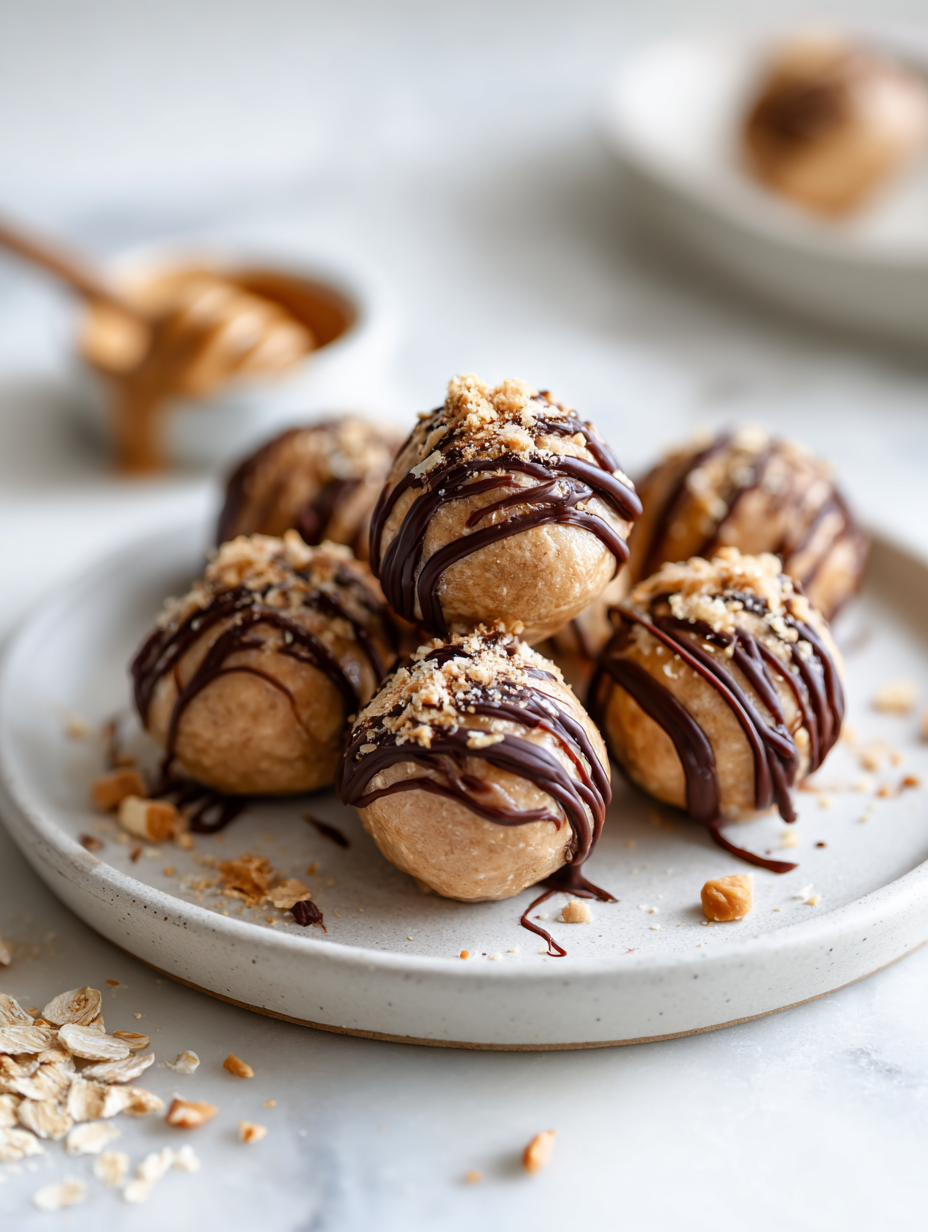
- In the mixing bowl, combine 1 cup of creamy peanut butter (about 250g) with 1/4 cup of honey (about 80g). Stir until smooth and slightly glossy, smelling rich and nutty.
- Add 1 1/2 cups of old-fashioned rolled oats (about 120g). Mix thoroughly until the oats are evenly coated and the mixture feels thick but pliable.
- Stir in 1/2 cup of chocolate chips (about 90g). They should distribute evenly, with a few bits peeking out, adding a sweet aroma.
- Using your hands or a small scoop, form the mixture into 1-inch balls. Place each ball on the parchment-lined baking sheet, spacing them about 1.5 inches apart.
- Once all balls are formed, refrigerate for at least 30 minutes. This helps them firm up and makes rolling easier if you need to reshape any.
- After chilling, if desired, melt 1/4 cup of chocolate chips (about 45g) and dip the peanut butter balls into the melted chocolate for a glossy finish. Let set for 10 minutes.
- For a quick fix, you can skip the chocolate dip and enjoy them straight from the fridge. They should be firm, with a slight give when pressed.
- Serve immediately or store in an airtight container in the fridge for up to a week. For longer storage, freeze for up to a month, letting them thaw slightly before eating.
Chill the balls for at least 30 minutes to set. For a glossy chocolate coating, dip and let set in the fridge. Serve straight from the fridge or at room temperature for softer bites.
How to Know It’s Done
- Mixture is thick, sticky, and holds shape when formed.
- Chocolate coating (if used) is firm and shiny after setting.
- Balls are uniform in size and slightly firm to the touch, not crumbly.
No-Bake Peanut Butter Balls
Ingredients
Equipment
Method
- Begin by placing your mixing bowl on the counter. Add the creamy peanut butter and honey, then stir them together with a spatula until smooth, fragrant, and glossy.
- Next, pour in the oats and fold them into the peanut butter mixture. Continue mixing until the oats are fully coated and the mixture begins to feel thick and slightly sticky.
- Stir in the chocolate chips, distributing them evenly throughout the mixture. This gives the bites a sweet surprise in every chew.
- Using your hands or a small cookie scoop, portion out the mixture and roll it between your palms into 1-inch balls. Place each ball on a parchment-lined baking sheet, spacing them evenly.
- Refrigerate the balls for at least 30 minutes to help them firm up and hold their shape.
- If desired, melt the additional chocolate chips in short bursts in the microwave or over a double boiler until smooth. Dip each chilled ball into the melted chocolate, then place back on the parchment to set.
- Let the coated balls set in the fridge for about 10 minutes until the chocolate is firm and shiny.
- Enjoy these soft, chewy treats straight from the fridge or at room temperature. Store leftovers in an airtight container in the fridge for up to a week.
Notes
Tips for perfect peanut butter balls
- Bolded mini-head: Chill the mixture before rolling — it firms up, making shaping easier and less sticky.
- Bolded mini-head: Use cold peanut butter — it’s firmer and helps the balls hold their shape better.
- Bolded mini-head: Add chocolate chips last — gently fold them in to keep their shape and prevent melting.
- Bolded mini-head: Dip in warm chocolate — a quick microwave burst (10-15 sec) keeps it smooth and glossy.
- Bolded mini-head: Avoid over-mixing — mix just until combined to prevent the mixture from becoming greasy or tough.
- Bolded mini-head: Refrigerate the finished balls — at least 30 minutes to set the shape and enhance flavor.
- Bolded mini-head: Use a small cookie scoop — ensures evenly sized balls for uniform bites and quick shaping.
Common mistakes and how to fix them
- FORGOT to measure ingredients precisely → Use exact measurements for consistent results.
- DUMPED in too much honey → Adjust sweetness to taste, start with less and add more if needed.
- OVER-TORCHED chocolate → Melt slowly over low heat or in short bursts to prevent burning.
- MISSED chilling time → Ensure refrigerate for at least 30 minutes for proper setting and firm texture.
Quick Fixes and Pantry Swaps
- If mixture is too sticky, splash in a little cold water and knead gently.
- When chocolate seizes, patch with a teaspoon of coconut oil for glossy smoothness.
- Splash a tiny bit of hot water if balls crack while rolling, for better cohesion.
- DUMPED in too much honey? Fix with a pinch more oats for balance.
- When chocolate crackles on dipping, shield with a brief warm-up to restore shine.
Prep, store, and reheat tips
- Prepare the mixture ahead of time and store in an airtight container in the fridge; the flavors meld better overnight, and it firms up nicely.
- You can make the peanut butter balls a day in advance; keep them in the fridge for up to a week, maintaining their soft, chewy texture.
- For longer storage, freeze the uncoated balls for up to a month; thaw in the fridge or at room temperature until soft enough to dip in chocolate.
- Refrigerated balls will be firm and slightly chewy, while bringing them to room temperature before serving softens them, enhancing flavor and texture.
- Reheat dipped chocolate briefly in the microwave (5 seconds) if it thickens or hardens during storage, ensuring a smooth, shiny coating.
Top questions about peanut butter balls
1. Can I use natural peanut butter?
Use natural peanut butter for a richer, more intense nutty flavor, but regular works fine too.
2. Can I use runny peanut butter?
Yes, if your peanut butter is very oily, stir in a little oats to absorb excess moisture.
3. Why is my mixture too sticky?
Chill the mixture for at least 30 minutes so it firms up enough to roll easily.
4. How do I get smooth chocolate coating?
Dip the balls in warm, melted chocolate for a shiny, smooth coating—about 15 seconds in the microwave.
5. How long do they last?
Store in an airtight container in the fridge for up to a week or freeze for a month.
6. How can I boost flavor?
Add a pinch of sea salt or a splash of vanilla extract to enhance flavor before forming into balls.
7. Can I customize the add-ins?
You can swap chocolate chips for chopped nuts, dried fruit, or shredded coconut for different textures.
8. My mixture is crumbly, what now?
If mixture is crumbly, add a tiny splash of milk or coconut oil to bring it together.
9. How do I shape uniform balls?
Use a small cookie scoop to make evenly sized balls quickly and consistently.
10. How do I set the chocolate coating?
Let dipped chocolate set in the fridge for about 10 minutes, until firm and shiny.
These peanut butter balls are more than just a quick treat; they’re a nostalgic reminder of simpler times, packed with honest ingredients and a comforting chew. When I make a batch, I think about how a handful of pantry staples can turn into something so satisfying in minutes.
They’re perfect for busy mornings, unexpected guests, or just when I need a little reminder that good things don’t have to be complicated. Sometimes, the simplest bites are the most memorable, especially when they come together with a little bit of love and a lot of peanut butter.

Hi, I’m Madison Lane, the cook, recipe creator, and heart behind this kitchen. Food has been part of my life for as long as I can remember. Some of my earliest memories are of standing beside my dad while he cooked, watching him move comfortably around the kitchen, tasting sauces, and explaining why patience mattered just as much as seasoning.
