There’s something irresistibly satisfying about pulling apart a rack of pork ribs and revealing that sticky, caramelized glaze. It’s all about that slow, gentle cook that transforms the meat into tender bites, while the sugary crust develops a deep, smoky richness. This recipe isn’t quick, but the result is worth every minute of patience, especially when that sweet-savory aroma starts filling the kitchen.
I’ve always loved the contrast in textures—crackly edges giving way to juicy, fall-off-the-bone meat. Achieving that perfect caramelization takes a bit of attention, but I find the process almost meditative. Plus, the sticky glaze clinging to the ribs is a reminder that sometimes, the best things in life are just a little messy and sweet.
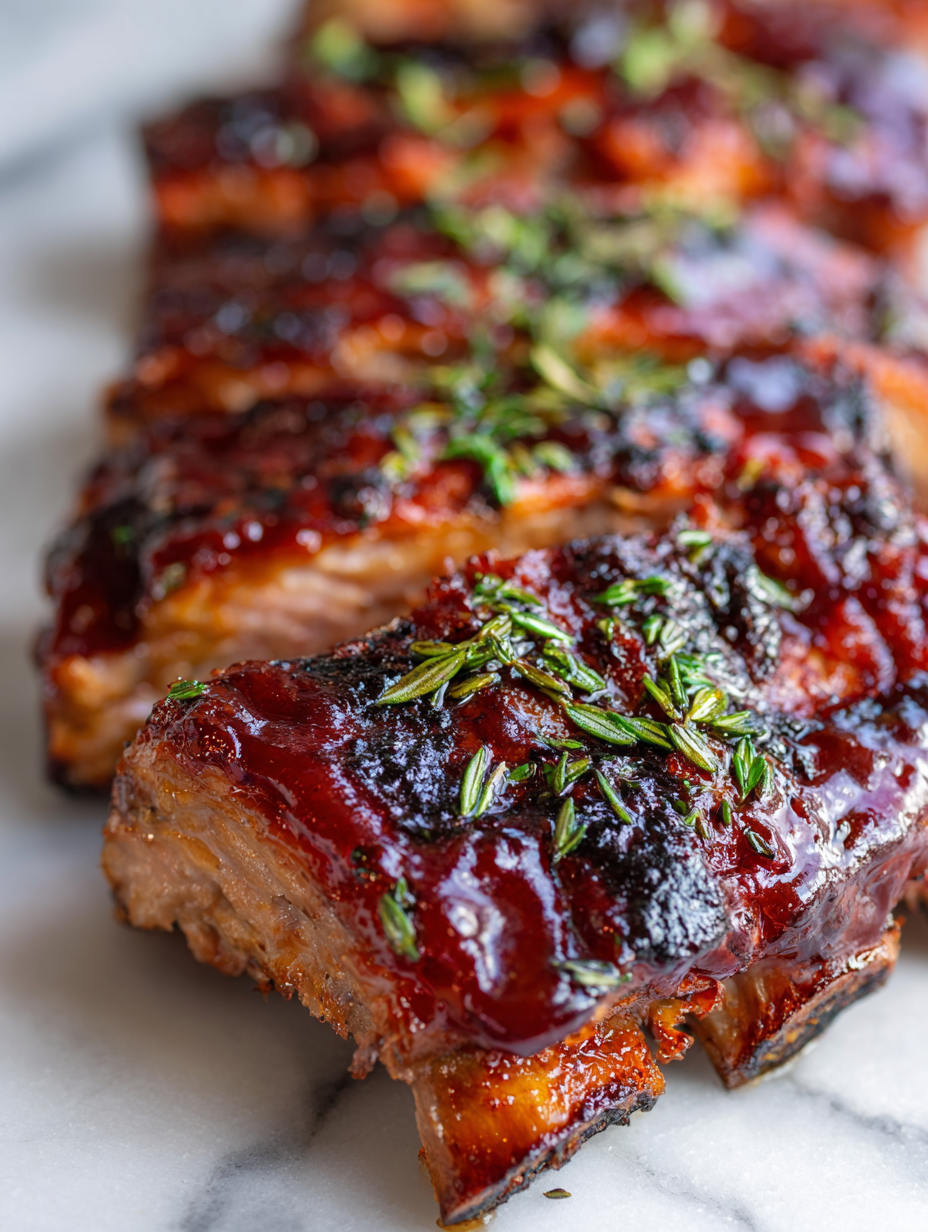
Focusing on the sticky, caramelized glaze that develops during slow roasting, emphasizing the textural contrast and deep flavor layers.
The magic of caramelized glaze
- Pulling apart the ribs and seeing that sticky, caramelized glaze never gets old.
- That moment when the smoky aroma hits the kitchen, and I know dinner’s almost there.
- There’s a quiet pride in mastering that perfect balance of tender meat and crispy edges.
- The messiness of sticky fingers and joyful bites reminds me why I love cooking so much.
- Sharing these ribs with friends, watching their faces light up at that first bite, is pure joy.
The spark behind this dish
- This recipe was born out of late-night cravings and a broken grill that refused to cooperate. Instead of giving up on smoky BBQ, I turned to my oven, experimenting with slow roasting and sticky glazes. The result was unexpectedly mesmerizing—a tender, caramel-coated rack that felt like a guilty pleasure I shouldn’t have discovered so easily.
- The first time I nailed that perfect sticky, sweet crust, I knew I’d stumbled onto something special. It’s become my go-to for cozy weekends or when friends drop by and I want to impress without fussing over complicated techniques.
- heading
- story_type
Trivia and history of sticky pork ribs
- Pork ribs have been a staple in barbecues worldwide, with origins tracing back to ancient grilling traditions in China and the American South.
- The sticky glaze likely evolved from centuries-old techniques of caramelizing sugars over open flames, creating that irresistible crust we love today.
- In some cultures, the sweet, sticky glaze is believed to symbolize prosperity and good luck, especially during festive gatherings.
- The use of honey and molasses in barbecue glazes became popular in the 20th century, adding depth and a richer caramelization.
- Modern recipes often incorporate Asian-inspired ingredients like soy sauce and five-spice to add layers of umami and complexity.
Ingredient breakdown: key components
- Pork ribs: I love using spare ribs for their meaty, juicy texture, but baby back ribs work too if you prefer leaner meat—just watch the cooking time. The fat renders beautifully, giving that rich flavor.
- Soy sauce: Adds a salty umami punch that deepens the glaze’s complexity. If you’re avoiding soy, try coconut aminos for a milder, slightly sweeter note, but skip the authentic savory depth.
- Honey: I rely on honey for that oozy, sticky sweetness that caramelizes into a glossy crust. Maple syrup can substitute, but it’s a bit thinner and less sticky—watch the glaze carefully.
- Garlic: Fresh garlic is a must for a pungent, aromatic backbone. If you’re in a pinch, garlic powder can work, but it won’t give you the same punch of aroma and flavor.
- Brown sugar: This adds a mellow caramel sweetness that balances the salty and smoky elements. White sugar can replace it, but expect a cleaner, less rounded flavor—reduce the quantity slightly.
- Apple cider vinegar: Brightens up the glaze with a tangy kick. Lemon juice can be a quick substitute, but it’ll be brighter and more citrusy—adjust to taste.
- Five-spice powder: I love the warm, aromatic depth it adds. If unavailable, a pinch of cinnamon and star anise can mimic the flavor profile, but don’t overdo it—less is more.
Spotlight on key ingredients
Soy Sauce:
- Pork ribs: I love using spare ribs for their juicy, meaty texture, but baby back ribs work too if you prefer leaner meat—just watch the cooking time. The fat renders beautifully, giving that rich flavor.
- Adds a salty umami punch that deepens the glaze’s complexity. If you’re avoiding soy, try coconut aminos for a milder, slightly sweeter note, but skip the authentic savory depth.
Honey:
- I rely on honey for that oozy, sticky sweetness that caramelizes into a glossy crust. Maple syrup can substitute, but it’s a bit thinner and less sticky—watch the glaze carefully.
- Garlic: Fresh garlic is a must for a pungent, aromatic backbone. If you’re in a pinch, garlic powder can work, but it won’t give you the same punch of aroma and flavor.
Notes for ingredient swaps
- Dairy-Free: Coconut aminos can replace soy sauce for a milder, sweeter umami hit, but it lacks the full depth of traditional soy. Adjust salt accordingly.
- Sweetener: Maple syrup offers a thinner, more floral sweetness than honey, which is thicker and caramelizes better under high heat. Use slightly less to avoid excess stickiness.
- Vinegar: Apple cider vinegar provides a mellow tang; lemon juice is a quick substitute but adds a sharper citrus note—use sparingly.
- Sugar: White sugar can replace brown sugar, but expect a cleaner, less complex caramelization. Reduce slightly and watch for quicker burning.
- Garlic: Fresh garlic is best for pungency and aroma. Garlic powder can work in a pinch but won’t give quite the same punch—use half the amount.
- Meat: Spare ribs deliver juiciness and fat; if using baby back ribs, reduce cooking time slightly and watch for leaner, less forgiving meat.
- Sticky glaze: Honey creates that oozy, caramel crust. Molasses can be a substitute, adding deep richness but a darker color and stronger flavor.
Equipment & Tools
- Oven: To slow roast and caramelize the glaze
- Baking sheet with foil: For easy cleanup and even heat distribution
- Roasting pan or dish with lid: To contain the ribs and keep them moist during baking
- Pastry brush: To apply the glaze evenly
- Aluminum foil: To cover the ribs during slow roasting
- Tongs: To handle the ribs and turn them during baking
- Meat thermometer: To check internal doneness
Step-by-step guide to sticky ribs
- Preheat your oven to 150°C (300°F). Line a baking sheet with foil for easy cleanup. Gather a large roasting pan or baking dish with a lid or foil to cover.
- Prepare the ribs: Remove the thin membrane from the underside of the ribs if it’s still attached. Use a paper towel to grip and peel it off gently. This helps the glaze penetrate better and keeps the ribs tender.
- Mix your glaze: In a bowl, combine soy sauce, honey, minced garlic, brown sugar, apple cider vinegar, and five-spice. Whisk until smooth. Taste and adjust for balance—sweet, salty, tangy.
- Apply the first coat: Place the ribs on the prepared baking sheet. Brush generously with the glaze, making sure to cover all surfaces. Let sit for 10 minutes to absorb some flavors.
- Bake covered: Cover the ribs tightly with foil. Bake in the preheated oven for 2 hours. The low heat will tenderize the meat and start building that sticky crust. Check periodically for moisture; if it looks dry, add a splash of water or more glaze.
- Uncover and baste: Remove the foil carefully. Increase oven temperature to 200°C (390°F). Brush the ribs with another layer of glaze. Bake for an additional 20-30 minutes, turning and basting every 10 minutes. The glaze should turn glossy and caramelized.
- Finish with high heat: For the final 5 minutes, turn on the broiler or raise the oven temp to max. Watch closely—this is when the glaze bubbles and becomes irresistibly sticky and charred in spots. Crackle and smell will tell you when it’s ready.
- Rest and serve: Let the ribs rest for 5 minutes out of the oven. Slice between the bones, plate, and spoon any remaining glaze over the top. The meat should be tender, juicy, with a crispy, caramelized crust.
Rest the ribs for 5 minutes after baking to let juices redistribute. Slice between bones, serve with extra glaze on the side or over the top. The crust should be crackly and sticky, with meat tender and juicy.
How to Know It’s Done
- Crust is deep amber, sticky, and slightly charred in spots.
- Meat easily pulls away from the bones with a gentle tug.
- Internal temperature reaches around 70°C (160°F) for safe, tender meat.
Sticky Oven-Roasted Pork Ribs
Ingredients
Equipment
Method
- Preheat your oven to 150°C (300°F). Line a baking sheet with foil for easy cleanup and set a roasting pan or dish nearby.
- Prepare the ribs by peeling off the thin membrane from the underside using a paper towel for grip. This step helps the glaze penetrate and keeps the meat tender.
- In a bowl, whisk together soy sauce, honey, minced garlic, brown sugar, apple cider vinegar, and five-spice until the mixture is smooth and fragrant.
- Place the ribs on the prepared baking sheet and brush generously with the glaze, covering all sides. Let them sit for 10 minutes to soak up the flavors.
- Cover the ribs tightly with aluminum foil and bake in the oven for about 2 hours. This slow cooking tenderizes the meat and starts building that sticky crust.
- Remove the foil carefully, increase oven temperature to 200°C (390°F), and brush the ribs with another layer of glaze.
- Bake uncovered for another 20-30 minutes, basting and turning every 10 minutes. The glaze will bubble and turn glossy and caramelized.
- For the final touch, turn on the broiler and keep a close eye; in about 5 minutes, the glaze will crackle and develop a deep, smoky crust.
- Remove the ribs from the oven and let them rest for 5 minutes. Then, slice between the bones, serve, and spoon any remaining glaze over the top for maximum flavor.
Notes
Top tips for sticky ribs
- BOLD GLAZE LAYER: Apply thin, even coats of glaze to prevent burning and build a sticky, glossy crust.
- SENSORY CHECK: Look for deep amber color and crackling sound to know when the glaze is caramelized perfectly.
- OVEN TEMPERATURE: Keep the oven steady at 150°C (300°F) for slow, tender cooking—don’t rush the process.
- BROILER WATCH: Stay close when broiling; the glaze can char quickly—less than 5 minutes is usually enough.
- REST BEFORE SERVING: Let the ribs rest for 5 minutes, so juices settle and the glaze firms up beautifully.
- BASTE OFTEN: Reapply glaze every 10 minutes during high-heat final stage for maximum stickiness and flavor.
- PEEL THE MEMBRANE: Gently peel off the silvery membrane for tender, easily shreddable ribs and better glaze penetration.
Common mistakes and how to fix them
- TOO MUCH SAUCE: Too much glaze causes burning—brush in thin layers and watch the oven carefully.
- UNDERCOOKED RIBS: Not enough time leaves meat tough—slow roast for at least 2 hours for tenderness.
- OVER-TORCHED GLAZE: Broil too long and glaze burns—remove when glossy and slightly charred, about 5 mins.
- NOT REMOVING MEMBRANE: Failing to peel it can make ribs tough—use paper towel for grip and peel off smoothly.
Quick fixes and pantry swaps
- When glaze burns quickly, splash a bit of water to cool the surface and save it.
- If ribs are tough, dump them back in the oven for 30 minutes at 150°C (300°F).
- Patch a sticky glaze that’s too thin by brushing on more and broiling briefly.
- Shield ribs with foil if they start to over-torch during broiling for an even finish.
- Rescue a five-second crackle by gently shaking the ribs over high heat to re-melt the glaze.
Prep, store, and reheat tips
- You can prep the glaze and marinate the ribs a day in advance; the flavors deepen overnight, and the meat absorbs more of that sweet and savory punch.
- Store cooked ribs in an airtight container in the fridge for up to 3 days. The glaze firms up, and the meat stays juicy—just reheat gently.
- For longer storage, freeze the ribs wrapped tightly in foil and a zip-top bag—best within 2 months. Thaw in the fridge overnight before reheating.
- Reheat ribs in a low oven at 150°C (300°F) for about 15-20 minutes, covered with foil. The smell of caramelized glaze keeps inviting you back, and the ribs should be hot and juicy.
Top questions about Sticky Pork Ribs
1. How do I know when the ribs are done?
Look for deep amber, sticky glaze with crackling edges. The meat should be tender and pulling away from the bones.
2. What’s the right internal temperature for perfect ribs?
Use a meat thermometer to check an internal temp of around 70°C (160°F). The meat should be juicy and tender, not tough.
3. How often should I baste the ribs?
Baste the ribs with glaze every 10 minutes during the final high-heat stage for maximum stickiness and flavor.
4. Should I remove the membrane from the ribs?
Remove the silver membrane from the underside of the ribs before cooking. Use a paper towel to grip and peel it off.
5. What if the glaze burns too quickly?
If the glaze starts to burn, quickly splash a little water or reduce broiling time. Keep a close eye during the final minutes.
6. How do I get that perfect sticky crust?
Apply thin, even coats of glaze to build a glossy, sticky crust without burning. Patience is key here.
7. How should I reheat leftover ribs?
Reheat ribs gently in a low oven at 150°C (300°F) covered with foil for about 15-20 minutes to keep them juicy.
8. How long can I keep cooked ribs?
Store cooked ribs in an airtight container in the fridge for up to 3 days. For longer storage, freeze wrapped tightly and reheat slowly.
9. Can I substitute honey in the glaze?
Using honey gives that oozy, caramelized crust. Maple syrup is a thinner alternative, but watch for more drips and less stickiness.
10. How long should I roast the ribs?
Slower roasting at 150°C (300°F) for about 2 hours ensures tender, fall-off-the-bone meat with a rich, caramelized crust.
Pulling apart these sticky ribs, feeling the crackle of caramelized glaze under your fingers, really captures the essence of slow, honest cooking. It’s a messy, joyful process that turns simple ingredients into something memorable and deeply satisfying.
And honestly, there’s a quiet triumph in mastering that perfect balance of tender meat and crispy edges. Sometimes, the best dishes are those that embrace their mess—just like these ribs, they’re a little messy, a little sweet, and totally worth the effort.

Hi, I’m Madison Lane, the cook, recipe creator, and heart behind this kitchen. Food has been part of my life for as long as I can remember. Some of my earliest memories are of standing beside my dad while he cooked, watching him move comfortably around the kitchen, tasting sauces, and explaining why patience mattered just as much as seasoning.
