Making no-bake oat squares feels like reaching back into a box of childhood favorites, but with a grown-up twist—simple, honest, and forgiving. It’s one of those recipes that’s more about the process than perfection, the kind that lets you get your hands sticky without much fuss. When I’m craving something sweet but don’t want to mess with the oven, this dish always comes to mind.
There’s a quiet pleasure in mixing oats, honey, and butter until everything sticks together just right, then pressing it into a pan and letting it set. No baking, no fuss, just a straightforward way to enjoy a chewy, nutty treat that’s perfect for lazy afternoons or spontaneous snack cravings. It’s one of those recipes that reminds me how satisfying simple ingredients can be, especially when they come together with a little patience.
Focusing on the nostalgic comfort of childhood snacks, this recipe turns a simple, no-bake treat into a mindful moment of slowing down and reconnecting with simpler times, using only basic pantry ingredients and a bit of patience to achieve that perfect chewy texture.
The story behind this recipe
- This recipe sprouted from a messy weekend when I was short on time but desperately needed a sweet fix. I remember rummaging through my pantry, eyes landing on oats, honey, and a chunk of butter—ingredients that have always been staples but rarely get the spotlight. I just wanted something that I could throw together quickly, no oven required, and that would still satisfy that lingering craving for something chewy and nutty.
- The first batch was a happy accident—an imperfect press into the pan, a little too much honey, and a bit of trial and error. But that slightly sticky, dense texture became my go-to for busy days or when I just needed to whip up something familiar and comforting. Over time, I realized how forgiving and adaptable this recipe can be, making it a real pantry rescue for those moments when sweetness feels urgent but time is tight.
Key ingredients explained
- Rolled oats: I like the natural chewiness they bring, but if you prefer softer squares, try quick oats—they absorb more moisture and get a bit creamier.
- Honey: It’s the glue that holds everything together and adds a caramel note. Swap in maple syrup if you want a different sweetness, but expect a slightly different sticky texture.
- Butter: I use unsalted for control over saltiness, but margarine works in a pinch—just watch for a slightly different richness and melt-in-your-mouth feel.
- Brown sugar: Adds a deep, molassy sweetness—if you want a less intense flavor, cut back or omit it, but it’ll lose some of that warm depth.
- Vanilla extract: A splash wakes up the whole mix with a subtle floral note. Skip it if you want a more straightforward oat flavor, but don’t skip the aroma.
- Chocolate chips (optional): I love the melty pockets, but chopped nuts or dried fruit work equally well—just consider the texture contrast you want.
- Salt: A pinch enhances everything, balancing the sweetness. If you’re making it savory or reducing sugar, tone it down or omit altogether.
Spotlight on key ingredients
Rolled oats:
- I love their hearty chew and nutty flavor, but quick oats can be a softer, less chewy alternative.
- Honey: It acts as the sticky binder and adds a caramel undertone; swap with maple syrup for a slightly different sweetness profile, but expect a thinner consistency.
Butter:
- Unsalted butter melts smoothly, giving richness and a slight saltiness that balances sweetness; coconut oil can replace it for a dairy-free version with a mild coconut scent.
- Brown sugar: It deepens the flavor with a molassy warmth; using coconut sugar results in a slightly darker, less sweet outcome, but still delicious.
Ingredient swap notes
- Dairy-Free: Swap butter for coconut oil or a neutral oil. Expect a slightly different richness and a hint of coconut aroma.
- Sweetener: Use agave syrup or maple syrup instead of honey. These will alter the flavor slightly, with maple adding warmth and smokiness.
- Nuts & Seeds: Omit or replace with dried fruit or coconut flakes. Keep in mind, this changes texture and moisture content.
- Brown Sugar: Replace with coconut sugar or maple sugar for a less molasses-heavy sweetness with a caramel note.
- Add-ins: Chocolate chips are optional; replace with dried cranberries or chopped dried apricots for a chewy, fruity contrast.
- Oats: Quick oats can be used for a softer texture; they absorb moisture faster and make the squares less chewy.
- Salt: Reduce or omit if you want a less sweet, more neutral flavor, especially when using sweeter add-ins.
Equipment & Tools
- Baking pan: To hold and shape the mixture into a square slab.
- Mixing bowl: To combine and coat the oats with melted mixture.
- Spatula: To fold ingredients and press the mixture into the pan.
- Parchment paper: To prevent sticking and make removal easy.
- Sharp knife: To cut the set slab into squares.
Step-by-step guide to no bake oat squares
- Gather your equipment: a 20cm (8-inch) square baking pan, a mixing bowl, a spatula, and parchment paper to line the pan.
- Line the pan with parchment, leaving some overhang for easy removal. Set aside.
- In a medium bowl, combine 2 cups rolled oats and 1/2 cup chopped nuts or seeds if using. Mix well.
- In a small saucepan over low heat, melt 1/2 cup butter, 1/3 cup honey, and 1/4 cup brown sugar. Stir until smooth and warm (about 3-4 mins).
- Once melted, remove from heat and stir in 1 teaspoon vanilla extract. The mixture should be fragrant and slightly bubbly.
- Pour the warm mixture over the oats and nuts. Use a spatula to fold and coat everything evenly. It should be sticky and fragrant—sweet caramel aroma.
- Transfer the mixture to your prepared pan. Use the back of the spatula or your fingers (damp if sticky) to press down firmly and evenly. Aim for a compact, even layer.
- Set the pan aside at room temperature for at least 30 minutes to let it firm up. For a quicker set, refrigerate for 15-20 mins.
- Once set, lift the slab out using the parchment overhang. Place on a cutting board and slice into squares or rectangles with a sharp knife.
- Serve immediately or store in an airtight container. For best texture, keep at room temperature for up to 3 days, or refrigerate for up to a week.
Let the squares rest at room temperature or in the fridge until firm. Slice with a sharp knife, then serve or store in an airtight container at room temperature for up to 3 days or refrigerated for longer.
How to Know It’s Done
- The mixture should be sticky and hold together when pressed.
- The pressed oats should look evenly compacted with no loose crumbs.
- The squares should be firm but chewy after resting, with a golden hue on the edges.
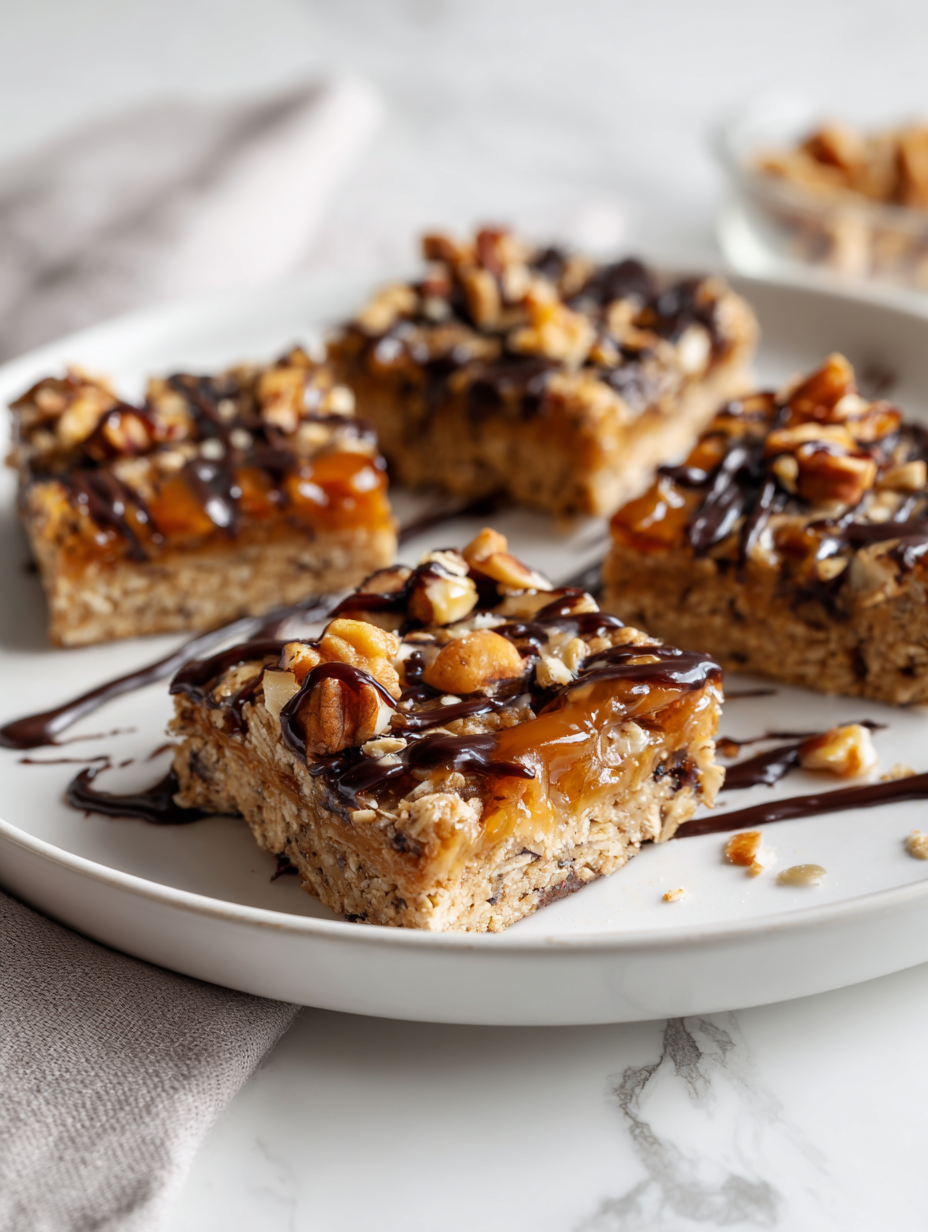
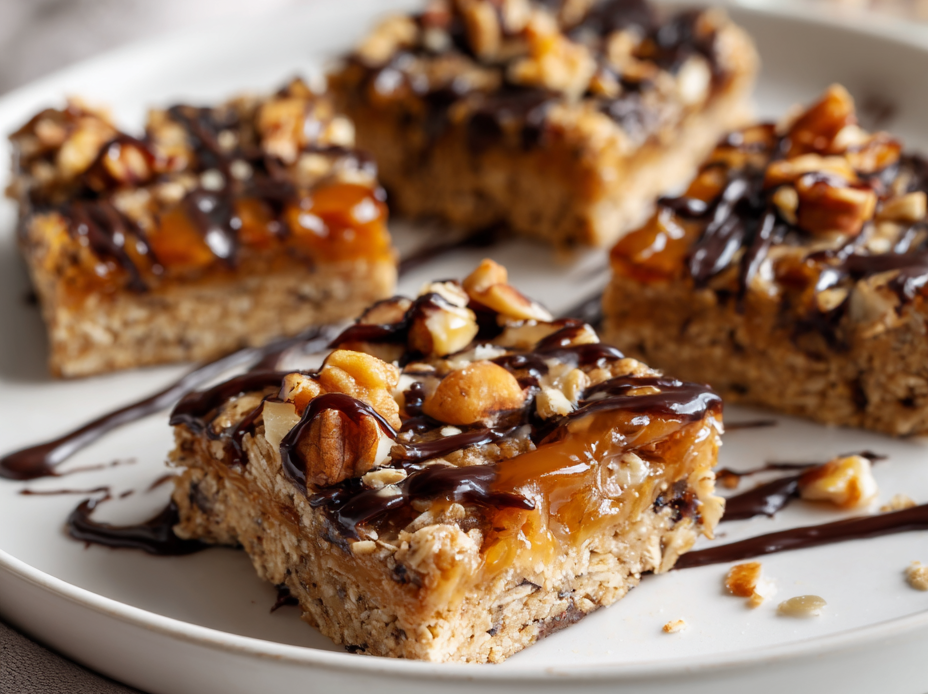
No-Bake Oat Squares
Ingredients
Equipment
Method
- Line your baking pan with parchment paper, leaving overhang on the sides for easy removal.
- In a mixing bowl, combine the rolled oats and chopped nuts if using, stirring to distribute evenly.
- In a small saucepan over low heat, melt the butter with honey and brown sugar, stirring constantly until the mixture is smooth and fragrant, about 3-4 minutes.
- Remove the saucepan from heat and stir in vanilla extract to enhance the aroma.
- Pour the warm, sticky mixture over the oats and nuts, folding gently with a spatula until everything is coated and sticky.
- Transfer the mixture to the prepared pan and press firmly with the back of a spatula or your fingers to create an even, compact layer.
- Let the mixture rest at room temperature for at least 30 minutes to set, or refrigerate for 15-20 minutes for quicker firming.
- Once set, lift the slab out of the pan using the parchment overhang and place it on a cutting board.
- Use a sharp knife to cut the slab into even squares or rectangles, wiping the blade clean between cuts for neat edges.
- Serve immediately or store in an airtight container at room temperature for up to 3 days, or refrigerate for longer freshness.
Quick tips for perfect squares
- Bolded mini-head: Use parchment paper generously—prevents sticking and keeps cleanup quick.
- Bolded mini-head: Slightly warm melted honey and butter—easier to mix, and helps coat oats evenly.
- Bolded mini-head: Press firmly into the pan—compacts the mixture so squares hold together well.
- Bolded mini-head: Chill or rest at room temp—sets the squares faster and prevents crumbling upon slicing.
- Bolded mini-head: Check for even pressing—look for a uniform surface with no loose crumbs or air pockets.
- Bolded mini-head: Add a pinch of salt to balance sweetness—brightens flavors and enhances overall taste.
- Bolded mini-head: Use a sharp knife for slicing—clean cuts prevent squishing and keep edges neat.
Common mistakes and how to fix them
- FORGOT to level ingredients → Use a scale for accuracy.
- DUMPED excess honey → Measure carefully to avoid overly sticky mixture.
- OVER-TORCHED during melting → Keep heat low, stir constantly.
- MISSED pressing firmly → Apply even pressure for consistent squares.
Quick fixes and pantry swaps
- When mixture is too sticky, splash in a little warm water to loosen it.
- If squares fall apart, patch with a tiny bit of melted chocolate or honey to bind.
- Splash a few drops of vanilla extract if the aroma feels flat after mixing.
- Shield overbrowned edges by tenting with foil halfway through chilling.
- When in doubt, swap oats with crushed cereal for a quick pantry rescue.
Prep, store, and reheat tips
- You can prepare the mixture a day ahead; keep it covered in the fridge. The flavors meld and the texture becomes even more cohesive.
- Store the cut squares in an airtight container at room temperature for up to 3 days, or in the fridge for up to a week. Expect a firmer, chewier bite after refrigeration.
- For longer storage, wrap the squares tightly in plastic wrap and freeze for up to 1 month. Thaw at room temperature for about 10 minutes before serving.
- Reheat? Not really needed. If the squares feel a bit too firm, warm them slightly in a low oven (about 150°C/300°F) for 3-5 minutes until the aroma warms up and they soften just a touch.
Top questions about no bake oat squares
1. Can I substitute quick oats for rolled oats?
Yes, you can use quick oats for a softer, less chewy texture. Just keep in mind they absorb more moisture.
2. Can I use maple syrup instead of honey?
Absolutely. Use maple syrup or agave syrup instead of honey. Expect a slightly different sticky consistency and flavor.
3. Can I replace butter with a dairy-free option?
Yes, coconut oil is a good dairy-free alternative. It melts smoothly and adds a subtle coconut aroma.
4. How long should I chill the mixture before cutting?
Refrigerate for 15-20 minutes to speed up setting. The squares will firm up and become chewy, ready to cut.
5. How do I cut neat squares?
Use a sharp knife to get clean slices without squishing the squares. Warm the blade slightly if needed.
6. How should I store leftover squares?
Store at room temperature in an airtight container for up to 3 days, or refrigerate for longer freshness.
7. My mixture is too sticky, what can I do?
If mixture is too sticky, add a bit more oats or press firmly to help it hold together better.
8. My edges are too dark, how can I fix it?
When overbrowned on edges, tent with foil or reduce oven time if baking (though these are no-bake).
9. Can I add dried fruit or nuts?
Add-ins like dried fruit or nuts can be mixed in before pressing for extra texture and flavor.
10. Can I freeze these squares?
Yes, you can freeze the squares for up to a month. Thaw at room temperature for a quick snack.
These no-bake oat squares are a quiet reminder that simple ingredients, when handled with a bit of care, can turn into something genuinely satisfying. They’re perfect for when time’s tight but you still want something homemade and comforting. Plus, the nostalgic scent of oats and honey filling the kitchen is a small, sweet victory in itself.
Whenever I make these, I remember that sometimes the best recipes are the ones that require the least fuss but give the most warmth and familiarity. They’re a little pantry hug, a quick fix that tastes like a bit of childhood wrapped in today’s simplicity. No matter the season, they feel like a small, honest treat.

Hi, I’m Madison Lane, the cook, recipe creator, and heart behind this kitchen. Food has been part of my life for as long as I can remember. Some of my earliest memories are of standing beside my dad while he cooked, watching him move comfortably around the kitchen, tasting sauces, and explaining why patience mattered just as much as seasoning.
