These no bake fudge bars are my go-to when I need a quick fix for sweet cravings that hit unexpectedly. I love how they come together without turning on the oven, which is a relief during hot summer days or when the kitchen’s already busy. It’s that kind of recipe that feels like a little secret—simple, satisfying, and just a bit indulgent.
I remember the first time I made these with my grandma, who kept a stash of chocolate and condensed milk in her pantry for when the mood struck. We’d sit at her messy kitchen table, laughing and cracking jokes while the mixture set in the fridge. That nostalgic feeling of creating something delicious from just a few pantry staples keeps me coming back to this recipe, especially when I want comfort fast.
This recipe is inspired by childhood memories of sneaking into the kitchen late at night, drawn by the smell of melting chocolate and butter, craving something sweet and instant. It’s about embracing the chaos of last-minute cravings and the simplicity of no-bake magic—no oven required, just good old-fashioned fuss-free comfort.
The story behind this recipe
This recipe came about one hectic afternoon when I was rummaging through my pantry, desperate for a sweet treat that wouldn’t require turning on the oven. I’ve always loved the idea of a fudge that’s crunchy on the outside but still soft and melt-in-your-mouth inside. It’s a no-fuss way to satisfy a chocolate craving without the mess or time commitment. Plus, I love how it feels like a little rebellious act—making something rich and indulgent in just a few minutes, no baking required.
Key ingredients and tips
- Butter: I use unsalted butter for that rich, creamy base that melts smoothly. For a slightly nuttier flavor, try browned butter—just watch it carefully so it doesn’t burn.
- Chocolate chips: I prefer semi-sweet chocolate for a balanced sweetness, but dark or milk works too. Use good quality chips—they melt better and taste richer. Expect a glossy, oozy finish.
- Sweetened condensed milk: It’s the glue that holds everything together, giving that luscious, sticky texture. If you want less sweetness, try evaporated milk with a touch of honey or maple syrup.
- Vanilla extract: Just a splash adds depth and warmth. For a twist, add a tiny bit of espresso powder or cinnamon—your call, but keep it subtle to not overpower the fudge.
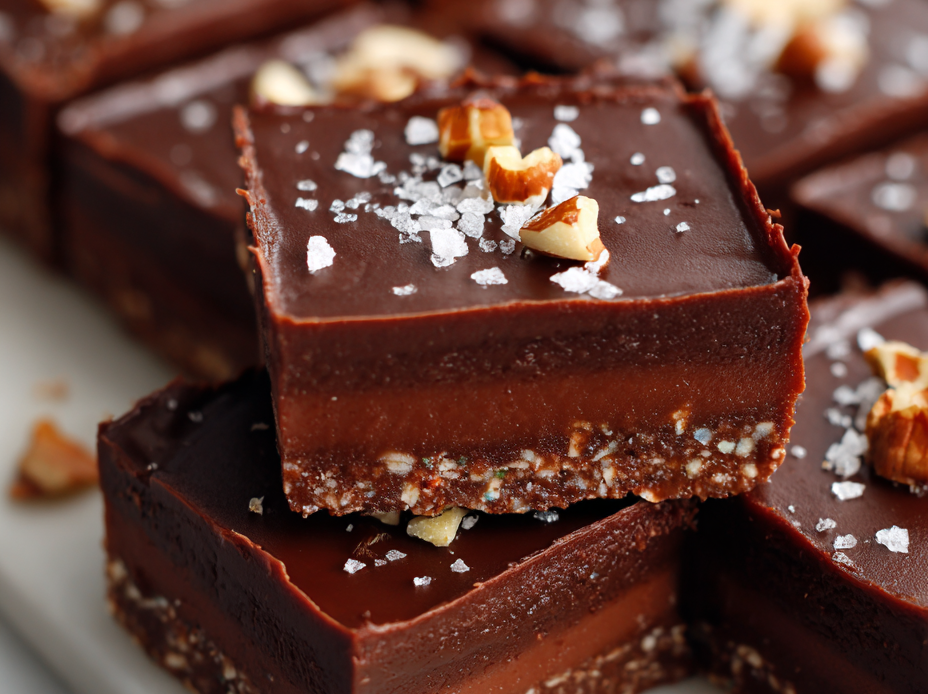
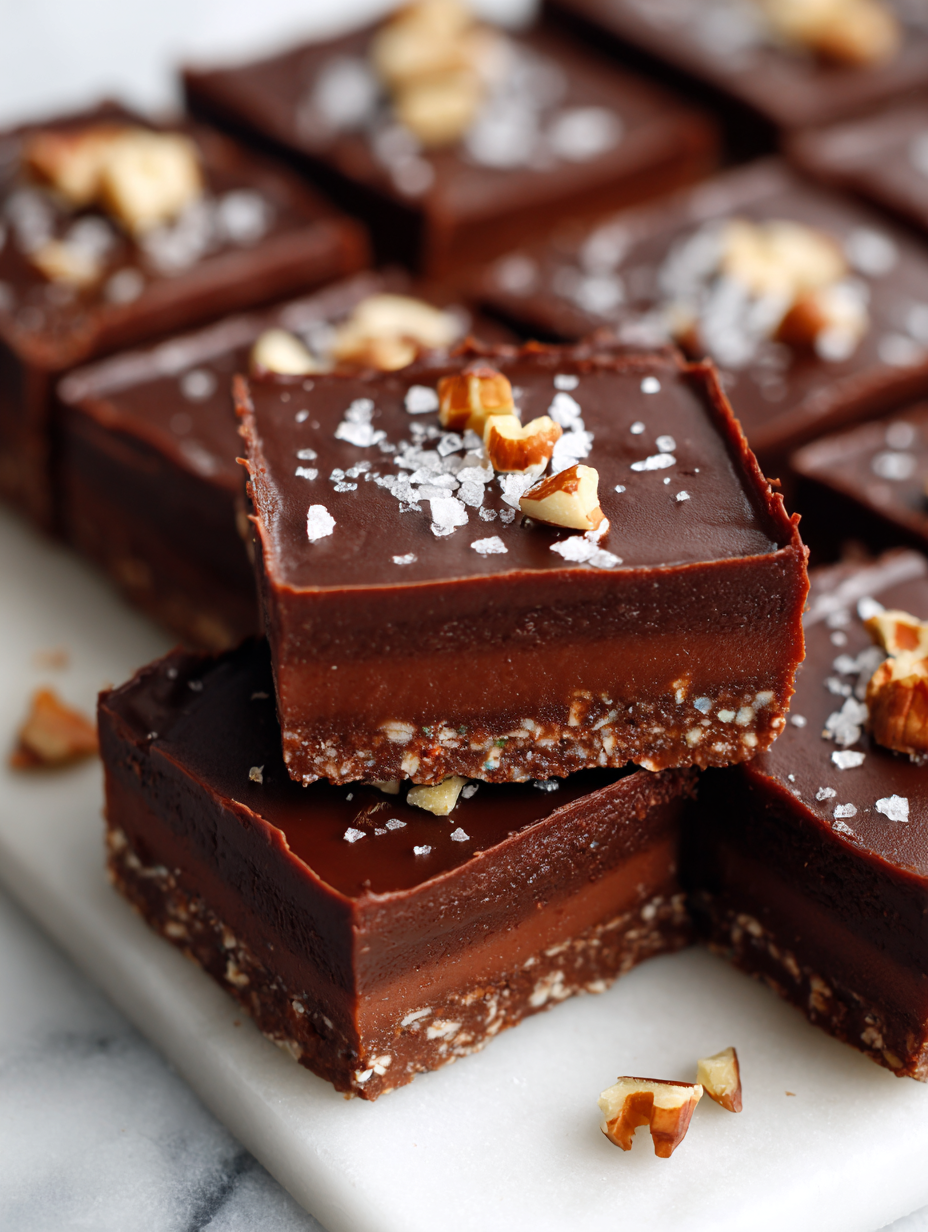
- Optional toppings: I love sprinkling sea salt or chopped nuts on top while still warm. It adds a crunch and a burst of flavor—don’t skip the contrast if you want that perfect bite.
- Oats or graham cracker crumbs: Sometimes I mix in a handful for texture—think of it as a crunchy surprise. Use gluten-free if needed, but keep an eye on the moisture level so it doesn’t get crumbly.
Spotlight on key ingredients
Chocolate chips:
- I love the way semi-sweet chips melt into a glossy, oozy layer that’s rich but not overly sweet. Use good quality for the best flavor and smooth melting.
- Sweetened condensed milk: It’s the sticky glue that makes these bars so luscious. Expect a sweet, sticky texture that helps everything come together, with a subtle milky aroma.
Butter and vanilla:
- Butter: I prefer unsalted for that creamy, melt-in-your-mouth base. Browning it adds a nutty, smoky depth that’s irresistible—just keep an eye so it doesn’t burn.
- Vanilla extract: Adds warmth and a faint floral note. A splash enhances the chocolate’s richness and rounds out the flavor profile.
Notes for ingredient swaps
- Dairy-Free: Swap butter for coconut oil or vegan butter. Expect a slightly different richness and a hint of coconut aroma.
- Vegan Chocolate: Use plant-based chocolate chips or cacao nibs mixed with coconut cream for a similar melt and flavor.
- Sweetened Condensed Milk: Try canned coconut milk with a touch of maple syrup or agave, for a dairy-free, sweet, sticky alternative.
- Nuts and Toppings: Use dried fruit or seeds instead of nuts for a chewy or crunchy texture, adding a different flavor burst.
- Flavor Variations: Add a dash of peppermint extract or orange zest to the chocolate mixture for a personalized twist.
- Sweetener Adjustments: Substitute honey or agave syrup for condensed milk, but watch the moisture levels to keep the fudge firm.
- Salt and Seasonings: Use smoked sea salt or flaky sea salt on top for an unexpected savory contrast that enhances the chocolate.
Equipment & Tools
- 20cm (8-inch) square baking dish: Holds the fudge mixture and shapes it evenly.
- Parchment paper: Prevents sticking and makes removal easy.
- Microwave-safe bowl: Melts the chocolate and butter evenly.
- Spatula or spoon: Stirs the mixture and spreads it smoothly.
- Sharp knife: Cuts the fudge into neat squares.
Step-by-step guide to fudge bars
- Prepare a 20cm (8-inch) square baking dish by lining it with parchment paper, leaving extra overhang for easy removal.
- In a medium microwave-safe bowl, combine 1 cup (225g) semi-sweet chocolate chips, 1/2 cup (115g) unsalted butter, and 1/2 cup (160g) sweetened condensed milk.
- Microwave on 50% power for 30 seconds, then stir. Repeat in 15-second bursts until smooth and glossy, about 1-2 minutes total.
- Add 1 teaspoon vanilla extract to the melted mixture and stir well, releasing a rich, chocolaty aroma.
- Pour the mixture into your prepared dish, spreading evenly with a spatula or the back of a spoon. Tap gently to settle.
- Sprinkle a pinch of sea salt or chopped nuts on top if desired. Press lightly into the surface for even distribution.
- Refrigerate uncovered for at least 2 hours, or until the fudge is firm and set. For quicker setting, pop in the freezer for 1 hour.
- Once firm, lift the fudge out using the parchment overhang. Cut into 16 squares or rectangles with a sharp knife, wiping the blade between cuts.
- Arrange on a plate or store in an airtight container. For best texture, consume within 3-4 days if kept at room temperature, longer in the fridge.
Refrigerate uncovered until firm—about 2 hours or freeze for 1 hour. Slice into squares and serve directly or store in an airtight container in the fridge for up to 4 days.
How to Know It’s Done
- The chocolate mixture is smooth, glossy, and fully melted before pouring.
- The surface is set and firm after refrigeration, with no sticky or soft spots.
- The cut edges are clean and sharp, not crumbly or melting.
No-Bake Fudge Bars
Ingredients
Equipment
Method
- Line your baking dish with parchment paper, leaving some overhang for easy removal.
- Combine the chocolate chips, butter, and sweetened condensed milk in a microwave-safe bowl.
- Microwave the mixture on 50% power for 30 seconds, then stir until smooth. Repeat in 15-second bursts until fully melted and glossy, about 1-2 minutes total.
- Stir in the vanilla extract until fragrant and well combined.
- Pour the melted mixture into your prepared dish and spread evenly with a spatula. Gently tap the dish to settle the mixture and remove air bubbles.
- If desired, sprinkle a pinch of sea salt or chopped nuts on top while the mixture is still warm. Press lightly to embed.
- Refrigerate uncovered for at least 2 hours, or until the fudge is firm and set. For quicker results, freeze for about 1 hour.
- Once set, lift the fudge out of the dish using the parchment overhang and place on a cutting board.
- Cut the fudge into 16 neat squares with a sharp knife, wiping the blade between each cut for clean edges.
- Arrange the fudge bars on a plate or store in an airtight container in the fridge. Serve chilled or at room temperature for a soft, melt-in-your-mouth experience.
Pro tips for perfect fudge bars
- Bolded mini-head: Use low heat → Melt chocolate slowly to prevent burning and achieve a silky texture.
- Bolded mini-head: Chill in stages → Refrigerate for 30-minute intervals to speed up setting without cracking.
- Bolded mini-head: Tap the dish → Gently tap to settle the mixture and eliminate air bubbles for a smooth top.
- Bolded mini-head: Add toppings early → Press nuts or sea salt onto warm fudge for better adhesion and flavor infusion.
- Bolded mini-head: Wipe the knife → Clean between cuts for sharp, clean edges without smudges or uneven squares.
- Bolded mini-head: Use parchment edges → Lift the fudge easily from the pan, preventing sticking and crumbling.
- Bolded mini-head: Use room temp ingredients → Ensure ingredients are not cold to promote smooth melting and mixing.
Common mistakes and how to fix them
- FORGOT to line the pan with parchment → Use parchment to prevent sticking and easy removal.
- DUMPED all ingredients into the bowl → Add ingredients in stages for better melting and mixing.
- OVER-TORCHED the chocolate → Melt slowly at 50% power, stir frequently to avoid burning.
- MISSED refrigerating time → Fully set the fudge before cutting, at least 2 hours for firm texture.
Quick fixes and pantry swaps
- If the mixture is too thick, splash in a bit of warm milk or cream to loosen it up.
- When the fudge is too soft, patch by refrigerating for another 30 minutes to firm up.
- Splash hot water on your knife if it’s sticking, for cleaner cuts and sharper edges.
- When chocolate seizes or becomes lumpy, restart with fresh melted chocolate and slowly re-incorporate.
- DUMPED too much salt on top? Shield with a light dusting of powdered sugar or cocoa powder to balance.
Prep, store, and reheat tips
- Prepare the fudge mixture up to a day ahead; just melt and mix, then cover and refrigerate overnight. The aroma of melting chocolate will fill your kitchen, and you’ll wake up with a head start.
- Store the finished fudge bars in an airtight container in the fridge for up to 4 days. The texture stays firm but remains luxuriously soft when chilled, with a rich, chocolatey smell that lingers pleasantly.
- For longer storage, freeze the bars wrapped tightly in plastic wrap and then in foil—good for up to a month. Expect a slightly firmer bite and a deeper cocoa aroma after freezing.
- Reheat slices briefly in the microwave at 20-30 seconds on medium power if you prefer a softer, melt-in-your-mouth experience. The smell of warm chocolate will invite you to indulge again, with a glossy, oozy finish.
Top questions about fudge bars
1. Can I use different types of chocolate chips?
Use semi-sweet or dark chocolate chips for a richer flavor, and melt slowly to avoid burning. The aroma should be warm and chocolatey, with a glossy finish.
2. Can I make these dairy-free?
Yes, you can substitute coconut oil or vegan butter for dairy butter. Expect a slightly different richness and a coconut aroma, but it still melts well.
3. How do I know when the fudge is ready to cut?
Refrigerate the fudge uncovered for at least 2 hours until firm. For quicker setting, pop it in the freezer for about an hour until it’s solid and you hear a satisfying crack when you tap the top.
4. What’s the best way to cut neat squares?
Use parchment paper to line your pan for easy removal. Wipe your knife with a damp cloth between cuts for clean, sharp edges.
5. How should I store the fudge?
Store leftovers in an airtight container in the fridge for up to 4 days. The fudge will stay soft and chocolatey, with the smell intensifying overnight.
6. My fudge mixture is too thick, what do I do?
If the mixture is too thick to pour, gently warm it in the microwave for a few seconds or add a splash of warm milk to loosen it up.
7. My chocolate is seizing, how can I fix it?
To prevent seizing, melt the chocolate slowly at low power, stirring frequently. If it lumps, start fresh and re-melt gently, then mix in gradually.
8. When should I add toppings?
Add toppings like chopped nuts or sea salt while the fudge is still warm for better adhesion and flavor contrast. Press gently to embed them.
9. How can I boost the chocolate flavor?
For a more intense chocolate flavor, use darker chocolate or add a pinch of espresso powder to the mixture before melting.
10. Can I use a different sweetener?
Yes, you can swap the condensed milk for coconut milk mixed with a little honey or maple syrup. Expect a slightly less sticky, more crumbly texture, but still delicious.
These fudge bars are more than just a quick treat; they carry the memory of late-night kitchen adventures and the thrill of making something rich and sweet with minimal fuss. Sharing them feels like passing on a little secret—one that never fails to bring a smile.
Whenever I reach for one, I’m reminded that simple ingredients can create something truly satisfying. They’re perfect for unexpected guests or a quiet moment of indulgence, especially when the house smells like warm chocolate and buttery dreams.

Hi, I’m Madison Lane, the cook, recipe creator, and heart behind this kitchen. Food has been part of my life for as long as I can remember. Some of my earliest memories are of standing beside my dad while he cooked, watching him move comfortably around the kitchen, tasting sauces, and explaining why patience mattered just as much as seasoning.
