This no bake chocolate peanut bars recipe is my go-to when I need something sweet and satisfying in a hurry. No oven, no fuss, just a few pantry staples thrown together into a crunchy, gooey, chocolatey treat. It’s the kind of dessert that feels like a little rebellion—quick, messy, and totally customizable.
I love how these bars can be whipped up in under 20 minutes, making them perfect for those moments when a craving hits unexpectedly. They remind me of childhood snack times, but with a grown-up richness from the peanut butter and dark chocolate. It’s a simple pleasure that’s hard to beat, especially during busy weeks or last-minute gatherings.
There’s something honest and unpolished about this recipe. It’s not about perfection, but about flavor and texture—crunchy edges, smooth chocolate, and that salty-sweet balance. Plus, they’re so versatile you can tweak the ingredients to suit whatever you’ve got on hand, making them a real lifesaver in the kitchen.
This recipe is inspired by my grandmother’s love for simple, no-fuss treats that come together in minutes, perfect for when you need a sweet fix without turning on the oven. It’s a reminder that sometimes, the best desserts are the ones you whip up with what’s in your pantry, no stress involved. I like to think of these bars as a nostalgic nod to childhood snack times, but with a grown-up twist—rich, crunchy, and just slightly messy in the best way.
The story behind this recipe
- This recipe came from a chaotic weekend when I was low on time but craving something sweet and satisfying. I remembered how my grandma used to throw together no-bake treats with whatever she had in the pantry, and I thought, why not try that approach? It turned into this messy, delicious experiment that stuck around as a go-to. Now, every time I make these bars, I think of those carefree afternoons and the simple joy of quick, homemade sweets.
- I needed a dessert that wouldn’t require turning on the oven—sometimes, you just want instant gratification. This recipe is my answer, especially in summer when the kitchen stays cool and the flavors stay fresh. It’s a little reminder that the best recipes are often the simplest, built on instinct and pantry staples. Plus, I love how adaptable it is—no two batches are exactly the same, which keeps it interesting.
Ingredient breakdown: key components
- Chocolate: I prefer a good quality dark chocolate, it melts smoothly and adds a rich, slightly bitter note that balances the sweetness. Skip the cheap stuff; it shows in the flavor and texture.
- Peanut Butter: Creamy, natural peanut butter gives these bars that luscious, slightly oily texture. If you want more saltiness, add a pinch of flaky sea salt on top before chilling.
- Honey or Maple Syrup: I use honey for a richer aroma and a bit of chew, but maple syrup keeps it vegan and adds a subtle smoky sweetness—try both and see which you prefer.
- Oats: Old-fashioned rolled oats give a satisfying bite and chewiness. Toast them lightly in a dry pan for a nutty aroma before mixing, if you have a few extra minutes.
- Butter or Coconut Oil: Butter adds richness, but coconut oil makes the bars vegan and gives a shiny, glossy finish. Melt it carefully so it doesn’t sputter—watch for that crackle.
- Salt: Just a pinch heightens all the flavors and prevents the bars from tasting flat. I like to sprinkle a little flaky sea salt on top right before chilling for that perfect salty-sweet crunch.
Spotlight on key ingredients
Chocolate:
- I prefer a good quality dark chocolate, it melts smoothly and adds a rich, slightly bitter note that balances the sweetness. Skip the cheap stuff; it shows in the flavor and texture.
- Peanut Butter: Creamy, natural peanut butter gives these bars that luscious, slightly oily texture. If you want more saltiness, add a pinch of flaky sea salt on top before chilling.
- Honey or Maple Syrup: I use honey for a richer aroma and a bit of chew, but maple syrup keeps it vegan and adds a subtle smoky sweetness—try both and see which you prefer.
Peanut Butter:
- Creamy, natural peanut butter gives these bars that luscious, slightly oily texture. If you want more saltiness, add a pinch of flaky sea salt on top before chilling.
- Honey or Maple Syrup: I use honey for a richer aroma and a bit of chew, but maple syrup keeps it vegan and adds a subtle smoky sweetness—try both and see which you prefer.
Notes for ingredient swaps
- Dairy-Free: Use coconut or almond butter instead of peanut butter. Expect a slightly different richness and nuttiness.
- Vegan Chocolate: Swap dark chocolate with dairy-free, vegan-friendly options. Keeps the bars plant-based, but may alter the depth of cocoa flavor.
- Sweetener Options: Maple syrup or agave can replace honey for a vegan or different flavor profile—less floral than honey, but still sweet.
- Oats: Gluten-free oats work if you need a gluten-free version, but check for cross-contamination if sensitive.
- Nut-Free: Sunflower seed butter or tahini can replace peanut butter. They add a different nutty or sesame flavor, less familiar but still tasty.
- Texture Boost: Adding toasted coconut flakes or chopped nuts brings extra crunch—modify according to your preference.
- Chocolate: Use milk or white chocolate instead of dark for a sweeter, creamier top layer—expect a softer, sweeter finish.
Equipment & Tools
- 20x20cm (8×8 inch) pan: Holds the mixture and shapes the bars.
- Parchment paper: Prevents sticking and makes removal easy.
- Microwave-safe bowl: Melts peanut butter and honey evenly.
- Spatula: Stirs ingredients and presses mixture into the pan.
- Sharp knife: Cuts the set bars into squares.
Step-by-step guide to no bake bars
- Gather your equipment: a 20x20cm (8×8 inch) square pan, a spatula, a mixing bowl, and a microwave-safe bowl for melting. Line the pan with parchment paper for easy removal.
- In the microwave-safe bowl, melt 1 cup (240g) of peanut butter and 1/2 cup (120ml) of honey or maple syrup. Microwave in 30-second bursts, stirring each time, until smooth and combined. This should take about 1-2 minutes total.
- In a large mixing bowl, combine 2 cups (150g) of rolled oats, 1/2 teaspoon of salt, and 1 cup (180g) of chopped dark chocolate or chocolate chips. Mix well.
- Pour the melted peanut butter mixture into the dry ingredients. Stir thoroughly until everything is evenly coated and sticky. The mixture should be easy to press but hold together.
- Transfer the mixture into your prepared pan. Use a spatula or the back of a spoon to press it firmly into an even layer. Make sure the surface is smooth and packed tight.
- Place the pan in the fridge for at least 2 hours, or until the bars are firm and set. If you’re in a rush, pop it in the freezer for about 1 hour. The bars should feel solid and slightly crack when pressed.
- Once set, lift the bars out of the pan using the parchment paper and cut into squares or rectangles. Serve immediately or store for later.
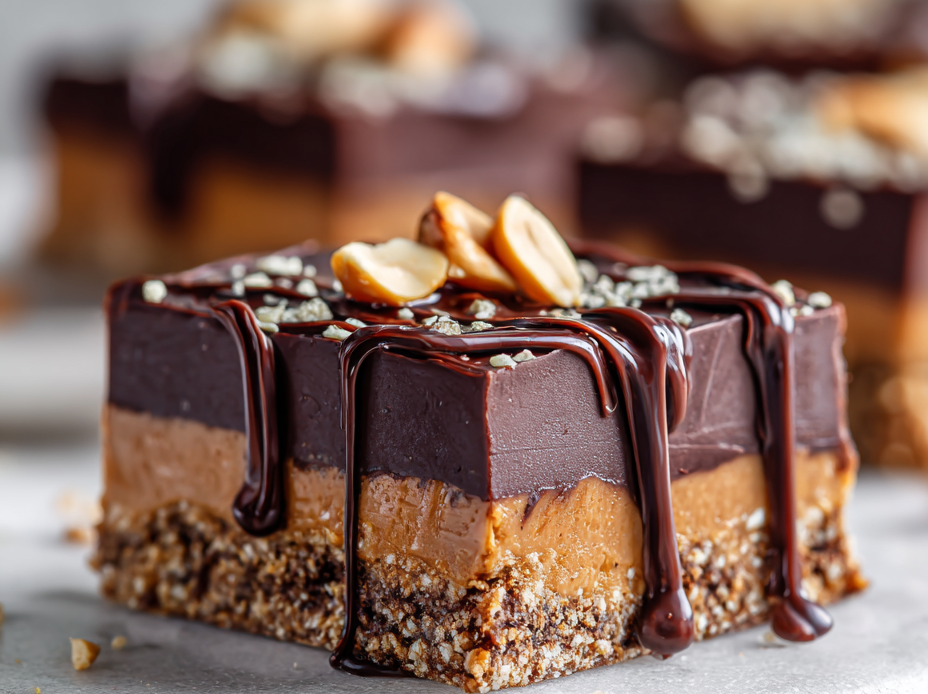
- For a glossy finish, melt an additional 1/4 cup (60ml) of chocolate and drizzle over the bars before chilling. This adds a shiny, chocolatey top layer.
Chill the bars until fully firm, about 2 hours in the fridge or 1 hour in the freezer. Once set, remove from pan, cut into pieces, and serve. Store leftovers in an airtight container in the fridge for up to a week.
How to Know It’s Done
- Chocolate is fully melted and smooth when stirred.
- Mixture holds together when pressed, but isn’t too sticky.
- Bars are firm and crack slightly when cut, indicating proper setting.

No Bake Chocolate Peanut Bars
Ingredients
Equipment
Method
- Line your pan with parchment paper to make removal easier, then set it aside.
- In a microwave-safe bowl, melt the peanut butter and honey together in 30-second bursts, stirring in between until the mixture is smooth, glossy, and well combined.
- In a large mixing bowl, combine the rolled oats and chopped dark chocolate, stirring to distribute evenly.
- Pour the melted peanut butter mixture over the dry ingredients, then fold everything together thoroughly until the oats and chocolate are coated and sticky.
- Transfer the mixture into your prepared pan and press it down firmly with the back of a spatula or your fingers, creating an even layer with a smooth top.
- Place the pan in the fridge and chill for at least 2 hours, or until the mixture is set and firm to the touch.
- While waiting, melt the additional chocolate for drizzling, if using, and set aside.
- Once the bars are fully chilled and firm, lift them out of the pan using the parchment paper and cut into squares or rectangles with a sharp knife.
- If desired, drizzle the melted chocolate over the cut bars for a glossy finish, then sprinkle a pinch of flaky sea salt on top for that perfect salty-sweet crunch.
- Return the bars to the fridge for about 30 minutes to allow the chocolate drizzle to set before serving.
- Enjoy these crunchy, gooey bars straight from the fridge or at room temperature for a satisfying treat that’s quick and customizable.
Pro tips for perfect bars
- Use high-quality chocolate for a rich, smooth melt that coats the palate.
- Slightly warm peanut butter helps it blend seamlessly into the dry ingredients, creating a cohesive mixture.
- Toast oats lightly beforehand for an added nutty aroma and crunch in every bite.
- Press mixture firmly into the pan to avoid crumbling when slicing—use the back of a spoon or spatula for even pressure.
- Chill the bars thoroughly—at least 2 hours—so they set properly and cut cleanly without sticking.
- Melt chocolate in short bursts in the microwave, stirring frequently to prevent overheating and burning.
- For glossy tops, drizzle melted chocolate over the set bars and let it firm up in the fridge for a shiny finish.
Common mistakes and how to fix them
- FORGOT to evenly spread the mixture → press firmly and use the back of a spoon.
- DUMPED hot ingredients directly into pan → cool slightly before mixing to prevent melting chocolate.
- OVER-TORCHED chocolate → melt in short bursts, stir until smooth, avoid direct heat.
- MISSED chilling time → ensure bars are fully set, or they’ll be too soft to cut cleanly.
Quick fixes and pantry swaps
- When mixture is too sticky, splash a little warm water to loosen it.
- If chocolate seizes, patch it with a teaspoon of vegetable oil and stir well.
- When bars crumble, refrigerate longer for extra firmness before slicing.
- DUMPED ingredients in the wrong order? Melt everything together again for smoothness.
- When mixture feels dry, open pantry swap: add a drizzle of honey or syrup for moisture.
Prep, store, and reheat tips
- Prepare the mixture and press into the pan up to a day ahead; keep covered in the fridge for fresh, firm bars.
- Store the finished bars in an airtight container in the fridge for up to a week, maintaining their chewy texture and chocolate shine.
- For longer storage, freeze the bars for up to a month; thaw in the fridge for a few hours for best texture.
- Reheat slices briefly in the microwave (10-15 seconds) until just warm and the chocolate shimmers—perfect for that gooey bite.
- Chilled bars develop a richer flavor over time, but extended storage may slightly dull the chocolate’s brightness.
Top questions about peanut bars
1. Can I use chunky peanut butter?
Yes, using natural peanut butter makes the bars richer and oilier, but creamy or chunky works fine too.
2. Is honey necessary?
Absolutely. You can substitute maple syrup or agave for honey for a vegan version, but expect a slightly different sweetness and texture.
3. My chocolate seized, what now?
If your chocolate seizes, add a teaspoon of vegetable oil and stir until smooth. It helps smooth out the texture.
4. How do I know when they’re ready to cut?
Chill the bars until they’re firm and have a slight crack when pressed, usually about 2 hours in the fridge.
5. How do I get clean slices?
Use a sharp knife warmed slightly in hot water for clean cuts without cracking the bars.
6. How long can I keep these?
Store in an airtight container in the fridge for up to a week. They’ll stay chewy and chocolatey.
7. Can I freeze them?
You can freeze the bars for up to a month. Let them thaw in the fridge for best texture before serving.
8. The mixture is too sticky, what do I do?
If mixture feels too sticky, sprinkle in a little extra oats or a splash of warm water to loosen it.
9. How do I get a shiny finish?
For a shinier top, drizzle melted chocolate over the set bars and chill until firm, about 30 minutes.
10. Can I add other ingredients?
Yes, toasted oats or chopped nuts can add extra crunch and flavor—just fold them into the mixture before pressing.
These no bake chocolate peanut bars are a little slice of chaos turned sweet relief, especially during busy weeks. They remind me that sometimes, the best treats come from improvisation and pantry staples, not perfection. Sharing them feels like passing on a secret—simple, messy, and utterly satisfying.
In the end, it’s about that crunch, the rich chocolate, and the salty peanut punch. They’re perfect for last-minute cravings or a casual get-together when you want something homemade without the fuss. Honestly, once you get the hang of it, they’ll become your go-to for quick, indulgent bites.

Hi, I’m Madison Lane, the cook, recipe creator, and heart behind this kitchen. Food has been part of my life for as long as I can remember. Some of my earliest memories are of standing beside my dad while he cooked, watching him move comfortably around the kitchen, tasting sauces, and explaining why patience mattered just as much as seasoning.
