This no-bake chocolate oat cookies recipe is my secret weapon for mornings when time is tight but I still crave something sweet and filling. There’s no need to turn on the oven, which means fewer dishes and less fuss—just mix, spoon, and chill. It’s a small victory that keeps me sane during hectic weekdays.
I grew up with these cookies, and they’ve stuck around because they’re honest, straightforward, and satisfy a sweet tooth without feeling heavy. They remind me of lazy afternoons in the kitchen, experimenting with whatever I had on hand. Plus, they’re a reminder that sometimes, the simplest ingredients make the best treats.
This recipe is a lifesaver on hectic mornings when I need a quick, satisfying treat that doesn’t require turning on the oven or complicated steps. It’s also a nostalgic reminder of how simple ingredients can come together into something unexpectedly indulgent, without the fuss.
Memories in Every Bite
- These cookies remind me of childhood summer afternoons, sticky fingers and all.
- I love how adaptable this recipe is—whatever chocolate or oats I have on hand works.
- There’s a weird comfort in how quickly these come together, especially when I need a sweet fix fast.
- Biting into one of these while the chocolate is still slightly gooey feels like a little rebellion against busy mornings.
- Every time I make these, I feel a tiny surge of pride—simple ingredients, delicious results.
Memories in Every Bite
- This recipe came together one rainy afternoon when I was rummaging through my pantry, looking for something quick to satisfy a chocolate craving without firing up the oven. I remembered how my grandmother used to make similar no-bake treats, mixing simple ingredients into little bites of comfort. That nostalgic impulse, combined with the chaos of a busy household, inspired me to perfect this straightforward recipe that’s become a staple for hectic days.
- Every batch reminds me that sometimes, the best desserts are the ones born from improvisation and a handful of pantry staples. It’s a recipe I turn to when I need a sweet fix that’s honest, fast, and genuinely satisfying—no fuss, no clean-up, just good, familiar flavors.
- heading: ‘Memories in Every Bite’
Historical and Cultural Tidbits
- These cookies likely originated during the Great Depression when families needed simple, inexpensive treats made from pantry staples.
- The no-bake method became popular in the mid-20th century, especially in busy households and schools, because it requires no oven and minimal effort.
- Chocolate and oats were a natural pairing in such recipes, as oats added texture and fiber, while chocolate made them indulgent without fuss.
Ingredient breakdown: key components
- Unsweetened cocoa powder: I love that deep, slightly bitter chocolate punch. If you prefer a milder flavor, try Dutch-processed cocoa, which gives a smoother, less acidic taste.
- Rolled oats: They give these cookies their chewy texture. For a nuttier flavor, try toasted oats beforehand, or use quick oats for a softer bite.
- Sugar: White granulated works best for a clean sweetness. If you want a richer, caramel-like note, swap in brown sugar—just expect a slightly softer set.
- Butter: I stick with unsalted so I can control the salt level, but salted butter works too—just cut back on added salt. The butter melts into the mixture, giving richness and helping it set.
- Chocolate chips: I prefer semi-sweet for balanced sweetness, but dark chocolate chips add a smoky depth, or use white chocolate for a sweeter, creamier contrast.
- Vanilla extract: It heightens all the other flavors and adds a subtle warmth. If you’re out, a splash of almond extract can give a nice twist, but use sparingly.
- Optional add-ins: Nuts or shredded coconut can add some crunch or chew, but I keep it simple—sometimes, less is more with these cookies.
Spotlight on key ingredients
Unsweetened cocoa powder:
- I love its intense, slightly bitter chocolate punch. When heated, it releases a rich aroma that fills the kitchen. If you prefer a smoother, less acidic taste, Dutch-processed cocoa is a good swap.
- Rolled oats: They give these cookies their chewy, hearty texture. Toasting them beforehand adds a warm, nutty aroma. Quick oats will soften faster, but may yield a slightly softer cookie.
Chocolate chips:
- Rolled oats: Their chewy bite is crucial. They absorb the chocolate mixture beautifully, becoming tender but maintaining some bite. For a nuttier flavor, try lightly toasting them before mixing.
- Semi-sweet chips balance sweetness with a hint of smoky richness. When melted, they create a glossy, fudgy coating. Dark chocolate chips deepen the flavor, while white chocolate offers a sweeter contrast.
Notes for ingredient swaps
- Dairy-Free: Use coconut oil instead of butter for richness, but expect a slightly coconutty flavor.
- Sweetener Swap: Maple syrup or honey can replace sugar, adding a different depth and moisture—reduce other liquids slightly.
- Chocolate: Dark chocolate chips for intensity, or white chocolate for a sweeter, creamy note—adjust sweetness accordingly.
- Oats: Gluten-free oats work fine if you need a gluten-free version, but they may alter texture slightly.
- Milk: Almond or oat milk can be substituted for regular milk—expect a nuttier, less creamy finish.
- Flavor Boost: Add a pinch of cinnamon or a splash of espresso to deepen the chocolate flavor—these enhance complexity.
- Add-ins: Nuts or dried fruits can be swapped in or omitted—use what you have, the texture will change but it’ll still be tasty.
Equipment & Tools
- Medium saucepan: To melt ingredients and bring to a boil.
- Spoon or spatula: For stirring and mixing ingredients thoroughly.
- Parchment paper: To prevent sticking and make cleanup easier.
- Baking sheet or flat surface: To hold and set the cookies as they chill.
Step-by-step guide to no bake cookies
- Gather your equipment: a medium saucepan, a spoon or spatula, parchment paper, and a baking sheet or flat surface for setting the cookies.
- Combine the wet ingredients: in the saucepan, melt 1/2 cup (115g) unsalted butter over medium heat (about 5 minutes until melted). Add 2 cups (150g) sugar, 1/2 cup (40g) unsweetened cocoa powder, and 1/2 cup (120ml) milk. Stir constantly until the mixture is smooth and begins to boil, about 2-3 minutes.
- Boil briefly: let it come to a gentle boil, stirring constantly. Once it reaches a rolling boil, set a timer for 1 minute. This ensures the sugars and cocoa meld properly and helps the cookies set well.
- Remove from heat and add the dry ingredients: immediately stir in 3 cups (240g) rolled oats, 1 teaspoon vanilla extract, and a pinch of salt. Mix thoroughly until the oats are evenly coated and the mixture is thick and fudgy.
- Prepare for shaping: spoon the mixture onto parchment-lined baking sheet in dollops or mounds. Use the back of the spoon to flatten slightly—these are no-bake, so shape is flexible. Work quickly to prevent the mixture from cooling and becoming difficult to handle.
- Chill and set: place the tray in the fridge for at least 30 minutes. During this time, the mixture firms up and the flavors meld. The cookies should be firm yet chewy when ready.
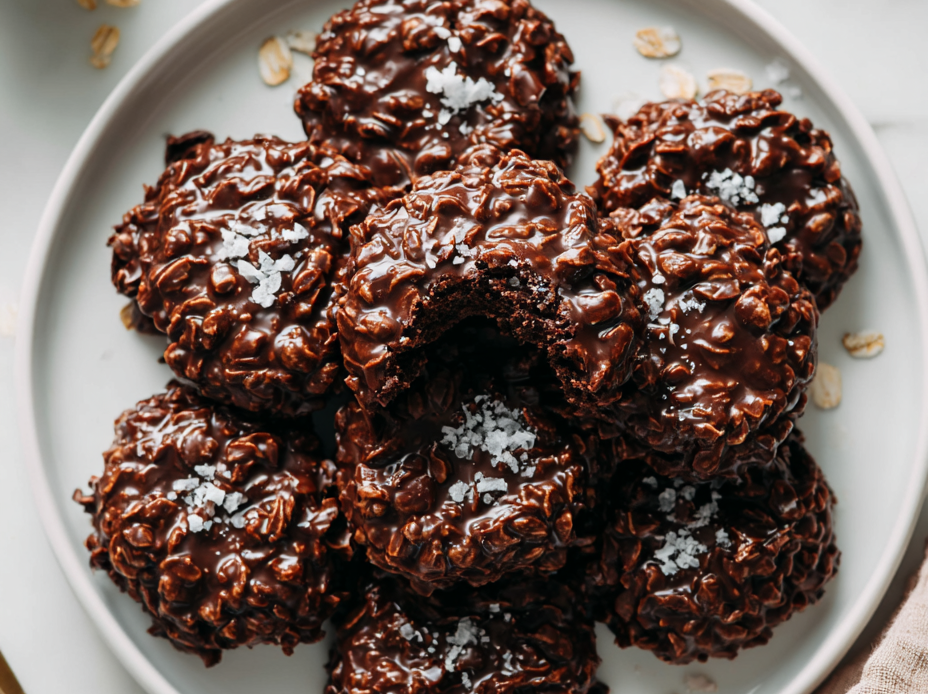
- Check for doneness: the cookies will be glossy, slightly crackled on top, and hold their shape when gently pressed. They should be set but still tender inside.
- Finish and serve: carefully peel the cookies from the parchment. For best flavor, let them rest at room temperature for 10 minutes before serving. They’re delicious slightly chilled, with a rich chocolate aroma that fills the air.
Let the cookies rest in the fridge for at least 30 minutes to set fully. Once firm, peel from parchment and serve directly or store in an airtight container at room temperature for up to 3 days or in the fridge for up to a week.
How to Know It’s Done
- The mixture reaches a full rolling boil before timers start.
- Cookies are glossy with crackled tops and hold their shape.
- They feel firm but give slightly when pressed, indicating proper setting.
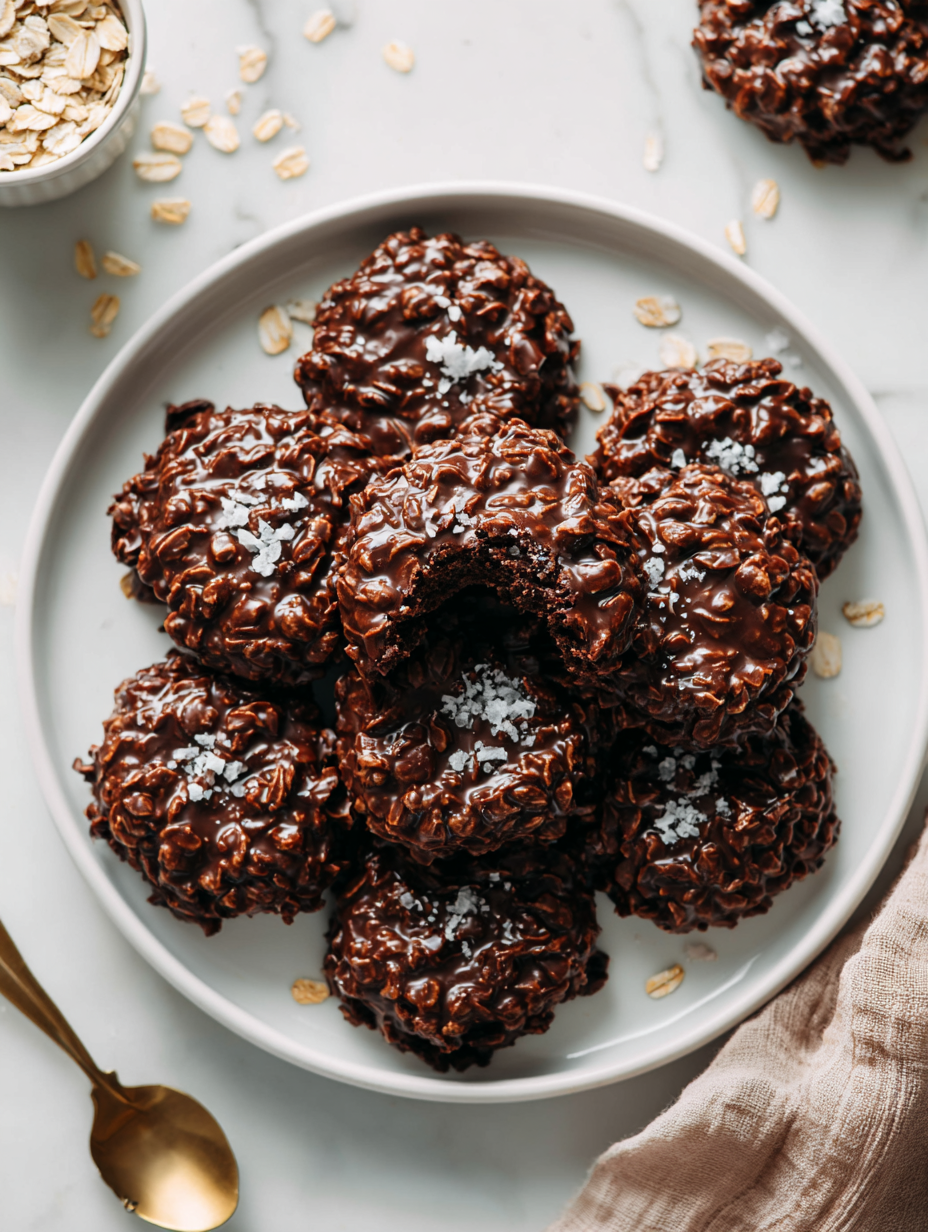
No-Bake Chocolate Oat Cookies
Ingredients
Equipment
Method
- Place a medium saucepan on the stove and melt the butter over medium heat, watching it turn silky and smelling rich as it melts completely.
- Add the sugar, cocoa powder, and milk to the melted butter. Stir constantly with a spatula until the mixture is smooth, glossy, and begins to bubble gently, about 2-3 minutes.
- Bring the mixture to a gentle boil and set a timer for 1 minute. Keep stirring during this time to help the sugars dissolve and the mixture thicken slightly.
- Remove the pan from heat and immediately stir in the vanilla extract. Then add the rolled oats and stir thoroughly until the oats are evenly coated and the mixture is thick and fudgy.
- Line a baking sheet with parchment paper. Use a spoon or cookie scoop to drop dollops of the mixture onto the parchment, spacing them about 2 inches apart. Gently flatten each dollop with the back of the spoon.
- Place the tray in the refrigerator and chill for at least 30 minutes, allowing the cookies to firm up and set with a shiny, crackled top.
- Once the cookies are firm, peel them gently from the parchment paper and serve immediately, or store in an airtight container for up to a week. These cookies are best enjoyed slightly chilled, with the chocolate aroma filling the room.
Pro tips for perfect cookies
- Use high-quality cocoa powder for a deep, rich chocolate flavor that really stands out.
- Toast your oats lightly before mixing for a warm, nutty aroma that enhances texture.
- Stir constantly while boiling to prevent scorching and ensure a smooth, glossy mixture.
- Chill the cookies thoroughly in the fridge—about 30 minutes—until they’re firm and set properly.
- Work quickly when spooning onto parchment to keep the mixture from cooling and becoming too stiff to shape.
- If your mixture feels too soft, add a little more oats to help it hold shape during setting.
- For extra shine, give the cooled cookies a quick dusting of cocoa powder or powdered sugar before serving.
Common mistakes and how to fix them
- FORGOT to stir continuously → Stir constantly to prevent burning and ensure even melting.
- DUMPED mixture too quickly → Drop spoonfuls gently for neat cookies, avoiding spreading mishaps.
- OVER-TORCHED the cocoa mixture → Remove from heat as soon as it boils to avoid bitterness.
- MISSED the cooling step → Chill thoroughly to set the cookies properly; skipping this makes them too soft.
Quick fixes and pantry swaps
- If mixture is too thick, splash in a little hot water to loosen it.
- When cookies stick to parchment, shield with a damp cloth and gently peel off.
- Splash a tiny bit of milk if chocolate is too stiff to stir smoothly.
- Patch cracked cookies with a tiny dab of melted chocolate for a seamless look.
- Shield your mixture from overcooking by removing from heat as soon as it boils.
Prep, store, and reheat tips
- You can prepare the cookie mixture in advance and refrigerate it for up to 24 hours; just give it a good stir before spooning out.
- Cookies should be stored in an airtight container at room temperature for up to 3 days, maintaining their chewy texture and rich chocolate aroma.
- For longer storage, freeze the cookies in a single layer, then transfer to a sealed bag; they’ll keep well for up to 2 months, and will develop a slightly deeper chocolate flavor after freezing.
- Reheat by letting them sit at room temperature for 5-10 minutes, or briefly microwave for 10-15 seconds for a warm, gooey bite—watch for melting chocolate to avoid mess.
Top questions about no bake cookies
1. Can I use quick oats instead of rolled oats?
Yes, you can use quick oats for a softer, more tender cookie. Just keep in mind they may blend more into the mixture, making the texture a bit different.
2. Can I swap out regular milk for plant-based milk?
Absolutely, substituting almond or soy milk won’t change the texture much, but might slightly alter the chocolate flavor. Use the same amount as in the recipe.
3. Can I add melted chocolate instead of chocolate chips?
Yes, you can melt the chocolate chips and mix them in. It makes the cookies extra fudgy and richer in chocolate flavor.
4. How long do no bake cookies last?
You can store these cookies in an airtight container at room temperature for about 3 days or in the fridge for up to a week. They tend to get chewier when chilled.
5. What if the mixture is too soft or too stiff?
If the mixture is too runny, add a few more oats gradually until it firms up. If too thick, a splash of hot water can loosen it.
6. Can I customize these cookies with add-ins?
Yes, you can add nuts, shredded coconut, or dried fruit for extra texture and flavor. Just fold them in after mixing the main ingredients.
7. How do I know when they’re ready?
Chill the cookies in the fridge for at least 30 minutes until they’re firm and set. This helps them hold shape and develop flavor.
8. Any tips for stirring the mixture?
Be sure to stir the mixture constantly while boiling to prevent burning and ensure a smooth, shiny finish.
9. What kind of cocoa should I use?
Using good quality cocoa powder really amplifies the chocolate flavor and aroma. Dutch-processed cocoa gives a smoother finish.
10. Can I make a bigger batch?
Yes, you can double the recipe if you have a large enough pan and plenty of space on your tray. Just keep the proportions the same.
These cookies are a quick, honest treat that brings back memories of lazy afternoons and simple joys. They remind me that sometimes, the best desserts are the ones made with just a few pantry staples, whipped together in a hurry but tasting like a little piece of comfort.
In the end, it’s about that satisfying moment when you take a bite—rich, chocolatey, chewy, and just a little messy. No matter the season or how busy life gets, these cookies stay a reliable go-to for a sweet fix that’s unpretentious and genuinely satisfying.

Hi, I’m Madison Lane, the cook, recipe creator, and heart behind this kitchen. Food has been part of my life for as long as I can remember. Some of my earliest memories are of standing beside my dad while he cooked, watching him move comfortably around the kitchen, tasting sauces, and explaining why patience mattered just as much as seasoning.
