This no bake chocolate oat bars recipe is my go-to when I need something sweet fast, and I don’t want to mess with the oven. It’s honest, straightforward, and a little bit rebellious—like sneaking an extra spoonful of chocolate before dinner. I love how flexible it is, too; you can swap ingredients based on what’s in your pantry, making it a perfect last-minute treat.
There’s something satisfying about mixing melted chocolate with oats and pressing it all into a pan—no fuss, no heat up your kitchen, just simple ingredients coming together. It’s the kind of dessert that feels like a small victory, especially after a busy day when I just want to cut myself a square and forget about complicated baking rules.
This recipe is about reclaiming those messy, spontaneous kitchen moments—when you just need something sweet and no-fuss, made with whatever you’ve got lying around. It’s the kind of treat that feels like a small rebellion against complicated baking, perfect for lazy weekends or quick fixes after a long day.
The story behind this recipe
- This recipe came together on a rainy weekend when I was low on energy but craving something sweet and satisfying. I had a handful of oats, a bit of chocolate, and no patience for baking. It was about making something quick, honest, and a little bit indulgent with whatever I had in the pantry.
- I remember the first time I pressed the mixture into the pan, feeling the texture with my fingers—sticky but firm, promising that good chocolatey crunch. That moment of simple creation, no oven needed, made me realize how often I overlook the beauty of straightforward, no-fuss treats. Now, it’s become my fallback for lazy Sundays and emergency sweet cravings, always comforting, always easy.
- heading: The story behind this recipe
Ingredient breakdown: key components
- Oats: I prefer rolled oats for that chewy, rustic texture. If you want them softer, pulse them a bit in a food processor.
- Dark Chocolate: I love a high cacao percentage for depth, but semi-sweet works too. Melt slowly over low heat to avoid burning that bitter edge.
- Butter: I use unsalted to control sweetness, but salted butter adds a subtle savory note—just be mindful of the salt in the recipe.
- Honey: Gives a nice sticky sweetness and helps everything hold together. Maple syrup can be a good swap, but it’s a bit thinner, so adjust the quantity.
- Vanilla Extract: A splash brightens all the rich flavors. Skip it if you want a more straightforward chocolate hit, but I think it lifts the whole thing.
- Optional Add-ins: Nuts or dried fruits add crunch and chew, but toast them lightly first for extra flavor and aroma.
- Salt: A pinch enhances the chocolate and oats—don’t skip this, even if it seems small. It makes everything pop.
Spotlight on key ingredients
Oats:
- I prefer rolled oats for that chewy, rustic texture. If you want them softer, pulse them a bit in a food processor.
- Dark Chocolate: I love a high cacao percentage for depth, but semi-sweet works too. Melt slowly over low heat to avoid burning that bitter edge.
- Butter: I use unsalted to control sweetness, but salted butter adds a subtle savory note—just be mindful of the salt in the recipe.
Dark Chocolate:
- Rich, oozing cocoa aroma when melting. It can seize if overheated—stir gently and low and slow.
- Butter: Melts into a glossy, smooth pool that coats everything. It helps bind and adds richness—don’t skip it for texture.
- Honey: Sticky, thick, with a floral sweetness. It gives the bars that slight chewiness and helps everything stick together.
Notes for ingredient swaps
- Dairy-Free: Use coconut oil or vegan butter instead of butter. It may alter the richness slightly, but keeps it plant-based.
- Sweeteners: Swap honey for maple syrup or agave nectar. Maple adds a more distinct flavor, while agave is milder and smoother.
- Chocolate: Try dark chocolate with 70% cacao or higher for a more intense flavor. Milk chocolate will soften the richness.
- Oats: Use quick oats for a finer texture or gluten-free oats if needed. The chewiness might change slightly.
- Add-ins: Nuts or dried fruits can be swapped for seeds, coconut flakes, or mini candies for variety and crunch.
- Salt: A pinch of sea salt enhances the chocolate’s depth. If avoiding salt, omit or reduce slightly, but it may dull the flavor.
- Binding agents: For extra stickiness, add a tablespoon of nut butter or coconut flakes—these boost flavor and texture.
Equipment & Tools
- 20×20 cm (8×8 inch) pan: Holds the mixture and shapes the bars.
- Spatula: Mixes ingredients and presses the mixture into the pan.
- Microwave-safe bowl: Melts the chocolate evenly without burning.
- Parchment paper: Prevents sticking and makes removal easy.
- Sharp knife: Slices the set bars into neat pieces.
Step-by-step guide to no bake bars
- Gather your equipment: a 20×20 cm (8×8 inch) square pan, a spatula, a microwave-safe bowl, and parchment paper. Line the pan with parchment for easy removal.
- Chop 200 g (7 oz) dark chocolate into small pieces. Microwave in 30-second bursts, stirring each time, until fully melted and smooth. Smell for that rich, cocoa aroma.
- In a separate large bowl, measure 2 cups (160 g) rolled oats. Add 1/2 teaspoon salt and toss to distribute. Feel the oats for a slightly chewy texture.
- Pour the melted chocolate over the oats. Add 1/4 cup (60 ml) honey and 1 teaspoon vanilla extract. Mix well with the spatula until everything is evenly coated and sticky.
- Transfer the mixture into the prepared pan. Use the spatula to press down firmly, creating an even layer. You should hear a slight crackle as you press.
- Place the pan in the fridge. Chill for at least 2 hours, or until the mixture is firm and set. The smell should shift to a deeper, chocolatey note as it cools.
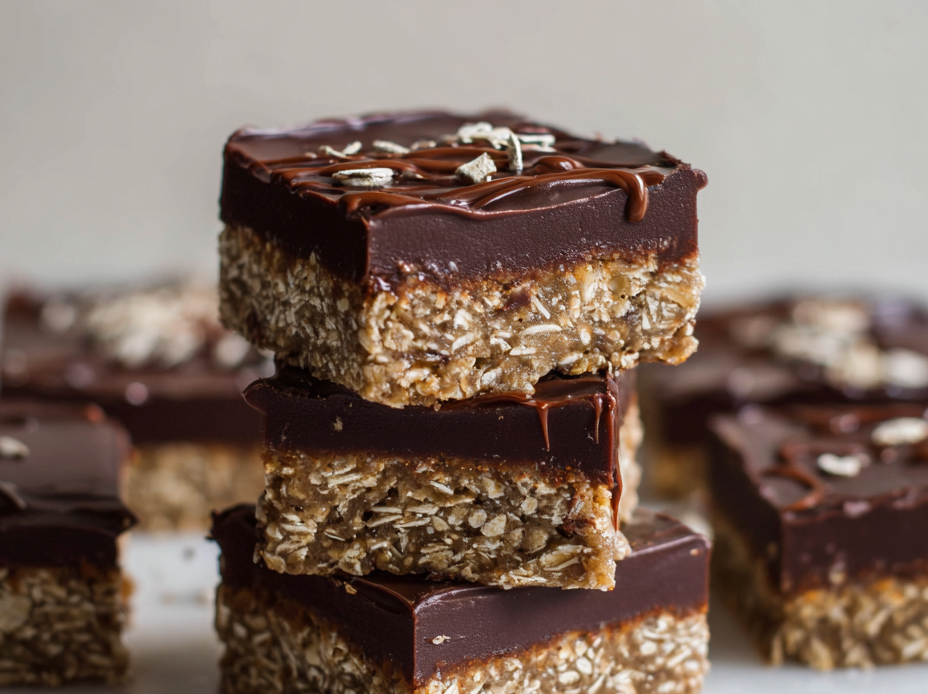
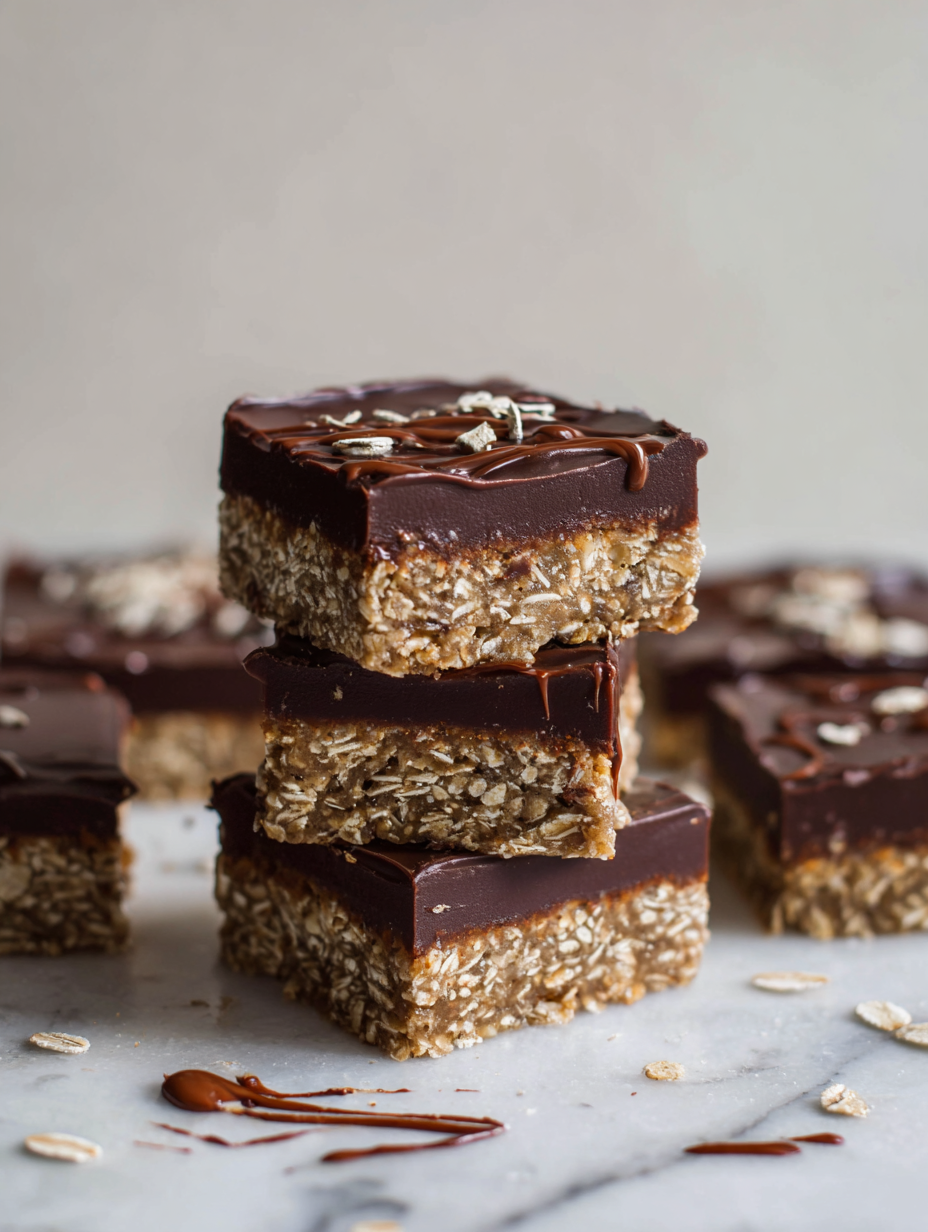
- Once set, lift the slab out using the parchment paper. Slice into 12 bars with a sharp knife. The edges should be clean, and the bars should hold together with a slight sheen.
- Finish by storing in an airtight container at room temperature for up to 3 days, or refrigerate for up to a week. Let them sit at room temp for a few minutes before serving for maximum chewiness.
Once sliced, let the bars sit at room temperature for five minutes to soften slightly. Serve directly or store in an airtight container. For a firmer bite, refrigerate for an additional hour before serving.
How to Know It’s Done
- Chocolate is fully melted and smooth, with no lumps or graininess.
- Mixture is firm, with a slight sheen, and holds together when pressed.
- Edges of sliced bars are clean, and the texture is firm but chewy.
No Bake Chocolate Oat Bars
Ingredients
Equipment
Method
- Chop the dark chocolate into small pieces and place in a microwave-safe bowl. Microwave in 30-second bursts, stirring between each, until smooth and glossy, and fragrant with cocoa aroma.
- In a large mixing bowl, combine rolled oats and salt, tossing to evenly distribute. Feel the oats for a slightly chewy, rustic texture.
- Pour the melted chocolate over the oats, then add honey and vanilla extract. Use a spatula to fold everything together until the oats are thoroughly coated and sticky, with a rich chocolate aroma filling the air.
- Line your pan with parchment paper, then transfer the mixture into it. Use the spatula to press firmly, spreading the mixture into an even layer and creating a slight crackle as you press down.
- Place the pan in the fridge and chill for at least 2 hours, or until the mixture is firm and set. During chilling, the chocolate deepens in aroma and the mixture becomes dense and chewy.
- Once set, lift the mixture out of the pan using the parchment paper and transfer to a cutting board. Use a sharp knife to slice into 12 bars, ensuring clean, neat edges with a slight sheen.
- Arrange the bars on a plate or store in an airtight container. For best texture, let them sit at room temperature for a few minutes before serving, allowing the chocolate to soften slightly and the chewiness to shine.
Pro tips for perfect bars
- Bolded mini-head: Use room temperature chocolate for smoother melting—avoid overheating to prevent seizing.
- Bolded mini-head: Stir continuously while melting chocolate—this keeps the heat even and prevents burn spots.
- Bolded mini-head: Press mixture firmly into the pan—listen for a slight crackle to ensure it’s compacted well.
- Bolded mini-head: Chill until just set—about 2 hours in the fridge for optimal firmness without drying out.
- Bolded mini-head: Slice with a warm, sharp knife—dip it in hot water and wipe for clean, even cuts.
- Bolded mini-head: Store bars in an airtight container—keeps them fresh and prevents the chocolate from blooming.
- Bolded mini-head: For extra shine, briefly warm the top before serving—just a quick 5-second microwave burst to shimmer.
Common mistakes and how to fix them
- FORGOT to level ingredients? Use a spoon for accurate measurements, avoid packed oats.
- DUMPED too much chocolate? Melt in small bursts, add a splash of cream to loosen if needed.
- OVER-TORCHED the chocolate? Lower the heat, stir constantly, and add a little butter to smoothen.
- MISSED the chilling step? Let bars set at least 2 hours, or they’ll be crumbly and difficult to cut.
Quick fixes and pantry swaps
- When chocolate seizes, splash in a teaspoon of oil and stir gently to smooth.
- If mixture feels too dry, add a drizzle of honey or a splash of melted butter.
- When bars crack when slicing, warm the knife slightly for clean cuts.
- Splash a bit of hot water on your spatula if mixture sticks, for easier spreading.
- Patch cracks by pressing a small amount of melted chocolate into them, then chill.
Prep, store, and reheat tips
- Prepare the mixture and press into the pan a day ahead—keeps things simple and speeds up serving. The aroma of chocolate will be inviting even before chilling.
- Store the bars in an airtight container at room temperature for up to 3 days, or refrigerate for up to a week. The chocolate firms up nicely, and flavors deepen overnight.
- For longer storage, freeze the bars wrapped tightly in plastic wrap and then in foil—best enjoyed within a month. Thaw at room temperature for 5–10 minutes, the texture remains chewy and chocolatey.
- Reheat slightly in the microwave at 10-second intervals—watch for a glossy, oozy texture and a warm, cocoa-rich smell. Perfect for a quick indulgence or serving slightly softened.
Top questions about no bake bars
1. Can I use peanut butter instead of butter?
Yes, using natural peanut butter gives a richer, slightly saltier flavor, but it might change the texture slightly.
2. Can I substitute coconut oil for butter?
Absolutely. Coconut oil melts just like butter and adds a subtle coconut aroma, but it can make the bars a bit softer.
3. What’s the best way to melt chocolate?
You can melt the chocolate in the microwave or over a double boiler, whatever you prefer, just keep an eye to avoid burning.
4. My mixture feels dry, what can I do?
If your mixture isn’t sticky enough, add a touch more honey or a splash of warm water to help it hold together.
5. How long should I chill the bars?
Chilling for at least two hours is key; it allows the bars to set and makes slicing easier without crumbling.
6. Can I freeze these bars?
Yes, you can freeze the bars in an airtight container for up to a month. Let them thaw for about 10 minutes at room temp before serving.
7. How should I store the bars?
Storing in an airtight container at room temperature keeps them good for about 3 days, but refrigeration extends freshness to a week.
8. My bars are cracking when I cut them, what do I do?
If the bars crack when slicing, warm your knife in hot water and wipe dry before cutting for cleaner edges.
9. Should I add salt?
Adding a pinch of sea salt enhances the chocolate flavor and balances the sweetness, but skip if you prefer sweeter bars.
10. Does the quality of chocolate matter?
Using high-quality dark chocolate makes a noticeable difference—richer, more intense cocoa flavor and better melt.
Making these no bake chocolate oat bars is a small act of rebellion against the busy, complicated world. There’s something honest and grounding about mixing simple ingredients into something that satisfies that sweet tooth without turning on the oven. They remind me that sometimes, the best treats come from just a handful of pantry staples and a little patience in the fridge.
Whenever I need a quick fix or a comforting, nostalgic snack, these bars are my go-to. They’re imperfect, a little messy, but always satisfying—like a little reminder that good things don’t need to be overthought.

Hi, I’m Madison Lane, the cook, recipe creator, and heart behind this kitchen. Food has been part of my life for as long as I can remember. Some of my earliest memories are of standing beside my dad while he cooked, watching him move comfortably around the kitchen, tasting sauces, and explaining why patience mattered just as much as seasoning.
