Sometimes, all I want is something sweet and satisfying, but I’m not in the mood to turn on the oven. These no bake chocolate coconut cookies hit that sweet spot—quick, simple, and packed with nostalgic vibes. They remind me of lazy afternoons when my mom would whip up a batch, no fuss, just good ingredients and honest comfort.
There’s a certain charm in how these cookies come together with just a few pantry staples—coconut, chocolate, and a dash of patience. They’re perfect for when you need a little treat without the hassle of baking, especially on busy days or when a craving sneaks up on you. Plus, they’re no mess, no oven, no problem, which makes them a go-to for spontaneous sweet tooth moments.
Focusing on how these cookies serve as a nostalgic, no-fuss comfort treat that’s perfect for busy days or when you crave something sweet without turning on the oven.
Nostalgic No-Bake Comfort
- Making these cookies always takes me back to childhood afternoons spent in my grandma’s kitchen—so simple, yet so satisfying.
- I love how quickly they come together, especially when I need a sweet fix but don’t want to wait around for the oven to heat up.
- There’s a quiet joy in biting into one of these and rediscovering that perfect balance of rich chocolate and toasted coconut.
- Sometimes, I stash a batch in the freezer—just in case I need a cool, fudgy treat that’s ready in minutes.
Inspiration Behind the Cookies
This recipe was born out of a lazy Sunday afternoon when I had a handful of coconut flakes and a bar of dark chocolate that needed using up. I wanted something quick, no fuss, that could satisfy a sweet craving without turning on the oven. The first batch was a happy accident—crunchy, fudgy, and totally addictive. Since then, I’ve kept it simple and made it a staple for those days when I need comfort fast.
Trivia and Historical Tidbits
- This no bake cookie method likely originated during wartime shortages when oven space and ingredients were limited.
- Coconut and chocolate combinations have been popular in tropical regions for centuries, often made into simple, portable treats.
- The concept of no bake cookies gained widespread popularity in the mid-20th century as a quick way to satisfy sweet cravings without heating up the kitchen.
Ingredient breakdown: key components
- Coconut flakes: I prefer toasted for extra crunch and nutty aroma—look for unsweetened, fresh flakes if possible. Skip the toasting if you want a softer texture.
- Dark chocolate: I love a high cocoa content for richness—around 70%. If you want sweeter cookies, go for milk chocolate, but beware it melts faster and can be cloying if overused.
- Butter: I use unsalted butter for control over salt levels—melt it gently to avoid seizing. For a dairy-free twist, coconut oil works but adds a different scent and slightly softer texture.
- Sweetener: I stick to honey or maple syrup for a natural touch—use a little less if your chocolate is very sweet. For a vegan option, agave syrup is a good swap, but it’s a bit thinner.
- Vanilla extract: I add a splash for depth—try a tiny pinch of sea salt instead if you want a more balanced flavor without extra sweetness.
Spotlight on key ingredients
Coconut flakes:
- I prefer toasted for extra crunch and aroma—look for unsweetened, fresh flakes if possible. Skip the toasting if you want a softer texture.
- Shredded coconut: I love the chewy, slightly caramelized bite of toasted flakes—adds depth and a bit of crunch to each bite.
Dark chocolate:
- I love a high cocoa content for richness—around 70%. If you want sweeter cookies, go for milk chocolate, but beware it melts faster and can be cloying if overused.
- Chocolate chips: They melt just enough during mixing, giving pockets of gooey richness—use good quality for the best flavor.
Notes for ingredient swaps
- Coconut Flakes: I prefer toasted for extra crunch and aroma—skip the toasting if you want softer cookies, or use shredded unsweetened coconut for a milder flavor.
- Dark Chocolate: I love 70% cocoa for richness—swap with milk chocolate if you prefer sweeter, but it melts faster and can be cloying if overdone.
- Butter: I use unsalted, melted gently—coconut oil is a good vegan swap, though it adds a coconut scent and slightly softer texture.
- Sweetener: Honey or maple syrup work well—I reduce the amount slightly if your chocolate is very sweet. Agave syrup is a vegan alternative, but it’s usually thinner.
- Vanilla Extract: I add a splash for depth—try a tiny pinch of sea salt instead for a more balanced flavor without extra sweetness.
Equipment & Tools
- Medium mixing bowl: For mixing ingredients thoroughly.
- Saucepan: To melt butter and sweetener gently.
- Spoon: For stirring and portioning the cookies.
- Parchment paper-lined baking sheet: To prevent sticking and ease cleanup.
- Spatula: For mixing ingredients and flattening cookies.
Step-by-step guide to no bake cookies
- Gather your equipment: a medium mixing bowl, a saucepan, a spoon, a baking sheet lined with parchment paper, and a spatula. The bowl is for mixing, the saucepan for melting, and the baking sheet for chilling.
- In the saucepan, combine 1/2 cup (120 ml) of honey or maple syrup, and 1/2 cup (115 g) of unsalted butter. Heat over low heat, about 60°C (140°F), stirring constantly until the mixture is smooth and just starting to bubble. This takes around 2-3 minutes.
- Remove from heat and stir in 1 teaspoon of vanilla extract. Let it cool slightly, about 1 minute, until it’s warm but not hot.
- Add 2 1/2 cups (200 g) of shredded coconut flakes and 1 cup (170 g) of chopped dark chocolate or chocolate chips. Mix thoroughly with the spatula until evenly coated and the chocolate begins to melt, about 2 minutes.
- Scoop out small spoonfuls (about a tablespoon each) and place them onto the prepared parchment-lined baking sheet. Press down gently to flatten slightly. Work quickly before the chocolate cools and hardens.
- Let the cookies rest at room temperature for about 30 minutes to set, or place in the fridge for 15-20 minutes if you want them firmer faster. The chocolate should be glossy and slightly firm to the touch.
- Once set, carefully peel the cookies from the parchment paper. They’re best enjoyed within 3-4 days if stored in an airtight container at room temperature, or up to a week in the fridge. For longer storage, freeze for up to a month, letting them thaw at room temp before eating.
Allow the cookies to rest at room temperature for half an hour or chill in the fridge for quicker setting. Once firm, carefully peel from parchment and serve. These cookies are best enjoyed fresh but keep well in an airtight container for several days.
How to Know It’s Done
- Chocolate is melted and glossy, not grainy or dull.
- Cookies are firm enough to hold shape when pressed lightly.
- Edges look slightly toasted, with a deep coconut aroma.
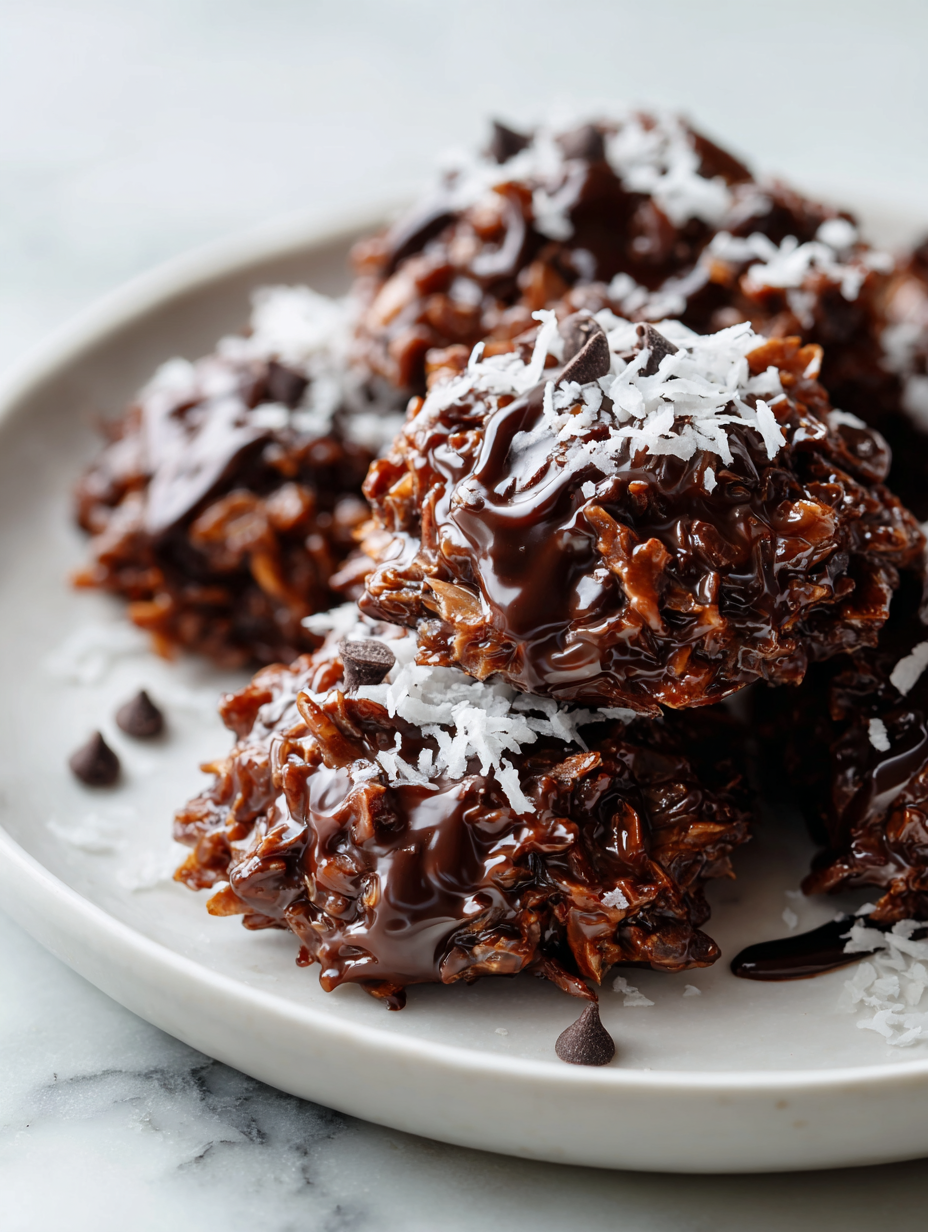
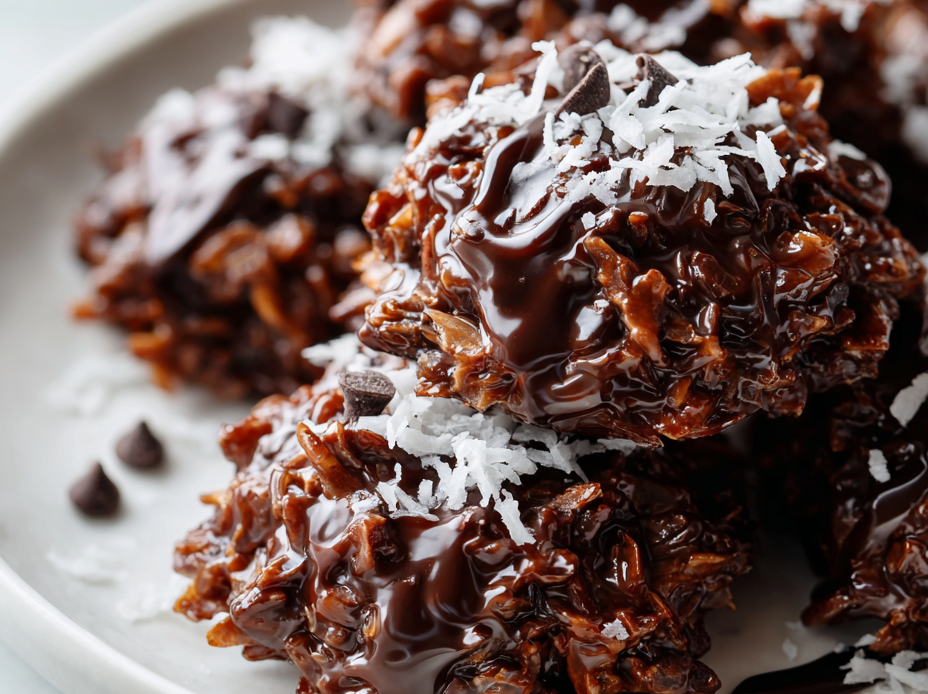
No Bake Chocolate Coconut Cookies
Ingredients
Equipment
Method
- Combine honey and butter in a saucepan and heat over low, stirring constantly until the mixture is smooth and just starting to bubble, about 2-3 minutes.
- Remove the saucepan from heat, then stir in vanilla extract. Allow the mixture to cool slightly, about 1 minute.
- Pour in the shredded coconut flakes and chopped chocolate, then stir vigorously with a spatula until the coconut is evenly coated and the chocolate begins to melt into the mixture.
- Using a spoon, scoop small dollops of the mixture onto your parchment-lined baking sheet, pressing down gently to flatten each cookie slightly.
- Let the cookies sit at room temperature for about 30 minutes or refrigerate for 15-20 minutes until the chocolate is glossy and the cookies are firm.
- Once set, carefully peel the cookies from the parchment paper and enjoy your rich, fudgy, toasted coconut treats—perfect for satisfying a sweet craving without turning on the oven.
Notes
Pro tips for perfect cookies
- Bolded Mini-Head: Use room temperature ingredients → Ensures smooth melting and even distribution in the mixture.
- Bolded Mini-Head: Toast your coconut flakes lightly → Adds a deeper, nutty aroma and crunch that elevates the texture.
- Bolded Mini-Head: Melt chocolate gently over low heat → Keeps the glossy finish and prevents seizing or burning.
- Bolded Mini-Head: Chill the mixture briefly before shaping → Firm enough for cleaner scoops and less sticking.
- Bolded Mini-Head: Flatten cookies with the back of a spoon → Creates a uniform, attractive shape and helps them set faster.
- Bolded Mini-Head: Store in airtight container at room temp → Keeps them chewy and preserves the chocolate’s shine.
- Bolded Mini-Head: If mixture is too sticky, refrigerate for 10 minutes → Makes shaping easier and prevents mess.
Common mistakes and how to fix them
- FORGOT to measure ingredients precisely → Use a scale for accuracy to avoid dry or greasy cookies.
- DUMPED hot mixture too quickly → Let it cool slightly to prevent chocolate from seizing and becoming grainy.
- OVER-TORCHED the chocolate → Melt on low heat or double boiler to keep it glossy and smooth.
- MISSED the cooling step before shaping → Cool mixture slightly for better handling and shaping consistency.
Quick fixes and pantry swaps
- If mixture is too sticky, splash in a little hot water and stir until smooth.
- When chocolate seizes, patch with a teaspoon of vegetable oil to restore gloss.
- DUMPED hot ingredients too quickly? Chill the mixture for 5 minutes first.
- Over-torched chocolate? Shield it with a double boiler at low heat for smooth melting.
- When cookies crackle and shimmer as they set, they’re perfectly done and ready to enjoy.
Prep, store, and reheat tips
- You can prepare the cookie mixture a day in advance; keep it covered in the fridge for easy scooping later.
- Store the finished cookies in an airtight container at room temperature for up to 3 days, keeping them chewy and chocolatey.
- For longer storage, freeze the cookies in a single layer, then transfer to a bag; they’ll keep for up to a month and can be thawed at room temp in 10 minutes.
- Reheat refrigerated or frozen cookies briefly in the microwave (about 10 seconds) until the chocolate just softens—watch for melting and aroma cues.
- As they sit, flavors meld and deepen; expect a slightly richer, more caramelized coconut aroma after a day or two.
Top questions about no bake cookies
1. Can I use shredded coconut instead of flakes?
Look for coconut flakes that are unsweetened and toasted for extra crunch. Skip toasting if you prefer softer bites.
2. Can I substitute chocolate chips for chopped chocolate?
Yes, chocolate chips work too. Use good quality chocolate for a richer flavor, and melt slowly over low heat.
3. Is there a dairy-free option for butter?
Use coconut oil or vegan butter if you want dairy-free cookies. They melt well but add a different scent and softer texture.
4. Can I use a different sweetener?
Honey or maple syrup are best natural sweeteners. Reduce slightly if your chocolate is very sweet, or try agave for vegan.
5. How do I prevent the chocolate from seizing?
Ensure the mixture cools just enough so the chocolate doesn’t seize and becomes grainy. It should be warm, not hot.
6. How long should I let the cookies set?
Chill in the fridge for 15-20 minutes for faster setting, or leave at room temperature for about 30 minutes.
7. What if the mixture is too sticky to handle?
If the mixture is too sticky, refrigerate for 10 minutes before shaping. It firms up and makes handling easier.
8. How do I store these cookies?
Store in an airtight container at room temp for up to 3 days or freeze for a month. Thaw at room temp.
9. Can I reheat these cookies?
Reheat in the microwave for about 10 seconds until the chocolate softens, just enough to enjoy a warm bite.
10. My chocolate looks dull or cracked—what now?
If chocolate cracks or looks dull, gently re-melt with a splash of oil or double boiler for shine and smoothness.
These cookies are a small act of rebellion against the busy, oven-heavy routines. They remind me that sometimes, just a handful of ingredients and a little patience can deliver a moment of simple joy.
Whenever I make a batch, I think about how they travel well and how easy they are to share. They’re not just treats—they’re a way to pause, savor, and remember that good things can come together without much fuss.

Hi, I’m Madison Lane, the cook, recipe creator, and heart behind this kitchen. Food has been part of my life for as long as I can remember. Some of my earliest memories are of standing beside my dad while he cooked, watching him move comfortably around the kitchen, tasting sauces, and explaining why patience mattered just as much as seasoning.
