There’s something almost alchemical about a chocolate fondant. The way a simple batter transforms into a molten centerpiece, revealing a warm, oozing core, feels like a secret only a handful of bakers truly master. It’s a dish that invites you to play with timing, to savor that fleeting moment when the outside is firm but the inside is still liquid, almost alive with chocolatey richness.
For me, each bake is a small experiment, a dance with the clock. Slight adjustments in baking time can turn a perfectly gooey fondant into a more set, cakey version, and I find that thrilling. It’s a dessert that rewards precision but also whispers that a little chaos in timing can produce the most memorable bites.
Focusing on how the gooey center of a chocolate fondant can reveal different textures and flavors depending on slight timing variations, making each bake a uniquely satisfying experiment.
The science of perfect goo
- There’s something wild about that first crack when you cut into a fondant—like breaking through a secret door to molten chocolate.
- I remember the chaos of my first attempt—overbaked, underbaked, but that moment of gooey perfection made me keep trying.
- Baking these feels like a quiet act of rebellion, a tiny reminder that patience and timing can produce pure, fleeting joy.
- When I get it just right, I feel a tiny thrill, knowing I’ve caught that perfect balance between firm and liquid.
- There’s a nostalgic comfort in this dessert—reminds me of cozy dinners and quiet moments shared over a warm plate.
The joy of imperfect timing
- This recipe was born out of a late-night craving for something intensely chocolatey but still elegant enough to serve at a dinner party. I wanted the kind of dessert that feels like a small, decadent secret—secret enough that each bite reveals a warm, molten center. It’s one of those dishes that feels like a proper act of chocolate rebellion, even if it’s just in your own kitchen.
- I remember the first time I tried to make it, fumbling through the oven timer and praying the center wouldn’t be undercooked. That moment of anticipation—when you cut in and the goo spills out—has haunted and delighted me ever since. Now, I see it as a little ritual, a test of timing and patience, that always leaves me a little breathless.
- heading”: “The joy of imperfect timing”
- story_type”: “bullets”
Chocolate Fondant Trivia
- Chocolate fondant, also known as molten lava cake, was popularized in French pâtisserie in the late 20th century, blending rich chocolate with a contrasting gooey center.
- The dish’s name hints at its origin—’fondant’ refers to the fondant icing, but in this context, it highlights the fondant-like, melt-in-your-mouth interior.
- Legend credits French chef Michel Bras with creating a version of this cake in the 1980s, though similar recipes appeared earlier in American and European kitchens.
- The secret to a perfect fondant lies in balancing baking time and temperature; too long, and it turns into a solid cake; too short, and it’s undercooked.
- In some regions, variations include adding a hint of chili or sea salt to elevate the chocolate’s richness, a quirky twist on the classic.
Ingredient breakdown: key components
- Dark chocolate: I love using a high cocoa percentage—around 70%. It melts beautifully, and that intense cacao aroma really shines through in the final fondant. Feel free to swap with a slightly lower cocoa if you prefer milder sweetness.
- Butter: I opt for unsalted butter, which gives the batter a rich, velvety texture. For a dairy-free version, coconut oil works but adds a subtle coconut note that’s quite charming.
- Eggs: Fresh eggs are key—large size, at room temperature. They help create that tender, slightly souffle-like rise. Skipping eggs or using egg substitutes changes the texture—probably more dense or crumbly.
- Sugar: Granulated white sugar keeps the structure stable, but I sometimes mix in a little brown sugar for deeper caramel notes and a hint of chewiness on the edges.
- Flour: Just a tablespoon or two of plain flour—enough to give a slight body but not turn it cakey. Almond flour can be a nice nutty tweak, if you want a different flavor profile.
- Cocoa powder: I sift in some unsweetened cocoa to intensify the chocolate flavor and ensure no lumps. Dutch-processed cocoa gives a smoother, less acidic taste, but natural cocoa works too for a more vibrant, tangy note.
- Salt: A pinch of flaky sea salt enhances the chocolate’s richness. If you’re feeling adventurous, a tiny pinch of chili powder can add a smoky kick that surprises the palate.
Spotlight on key ingredients
Dark chocolate:
- I love using a high cocoa percentage—around 70%. It melts beautifully, and that intense cacao aroma really shines through in the final fondant. Feel free to swap with a slightly lower cocoa if you prefer milder sweetness.
- Butter: I opt for unsalted butter, which gives the batter a rich, velvety texture. For a dairy-free version, coconut oil works but adds a subtle coconut note that’s quite charming.
Eggs and Sugar:
- Eggs: Fresh eggs are key—large size, at room temperature. They help create that tender, slightly souffle-like rise. Skipping eggs or using egg substitutes changes the texture—probably more dense or crumbly.
- Sugar: Granulated white sugar keeps the structure stable, but I sometimes mix in a little brown sugar for deeper caramel notes and a hint of chewiness on the edges.
Notes for ingredient swaps
- Dairy-Free: Swap butter for coconut oil or vegan margarine. Expect a slightly different richness and a hint of coconut aroma.
- Sugar Alternatives: Use honey or maple syrup, but reduce the liquid slightly. The texture may be a touch denser and the flavor more nuanced.
- Chocolate: Dark chocolate with at least 70% cocoa works best. For a milder taste, try milk chocolate, but it will be sweeter and less intense.
- Gluten-Free: Replace plain flour with almond flour or gluten-free baking mix. The batter will be slightly denser and nuttier.
- Eggs: Flaxseed meal mixed with water can substitute eggs for a vegan version. The fondant may be a bit less airy but still delicious.
- Cocoa Powder: Dutch-processed cocoa gives a smoother flavor, but natural cocoa adds brightness and more acidity.
- Salt: Fine sea salt enhances chocolate flavor. For a smoky twist, add a pinch of smoked sea salt or chipotle salt.
Equipment & Tools
- Ramekins: Baking individual portions with a perfect shape and height.
- Heatproof bowl: Melting chocolate and butter evenly without burning.
- Whisk: Combining eggs and sugar smoothly and aerating the mixture.
- Sifter: Ensuring cocoa powder and flour are lump-free, for a smooth batter.
- Spatula: Folding ingredients gently without deflating the batter.
- Oven: Baking at precise temperature for the perfect gooey center.
- Cooling rack: Allowing ramekins to rest briefly before unmolding.
Step-by-step guide to chocolate fondant
- Preheat your oven to 200°C (390°F). Grease 4 ramekins with butter and dust with cocoa powder. Set aside.
- Melt 200g dark chocolate and 100g unsalted butter together in a heatproof bowl over a simmering pot or in short bursts in the microwave. Stir until smooth.
- In a separate bowl, whisk 3 large eggs, 80g granulated sugar, and a pinch of salt until well combined and slightly frothy, about 30 seconds with a hand whisk.
- Pour the melted chocolate mixture into the egg mixture, folding gently with a spatula to keep it airy.
- Sift in 2 tablespoons of plain flour and 1 tablespoon of unsweetened cocoa powder. Fold gently until just combined. Do not overmix — preserve that airy texture.
- Divide the batter evenly among the prepared ramekins, filling each about three-quarters full. Smooth the tops with the back of a spoon.
- Bake in the preheated oven for exactly 12-14 minutes. The edges should be set and slightly firm, but the center still jiggly when gently shaken.
- Remove from oven and let sit for 1 minute. Then, carefully run a small knife around the edges of each ramekin to loosen.
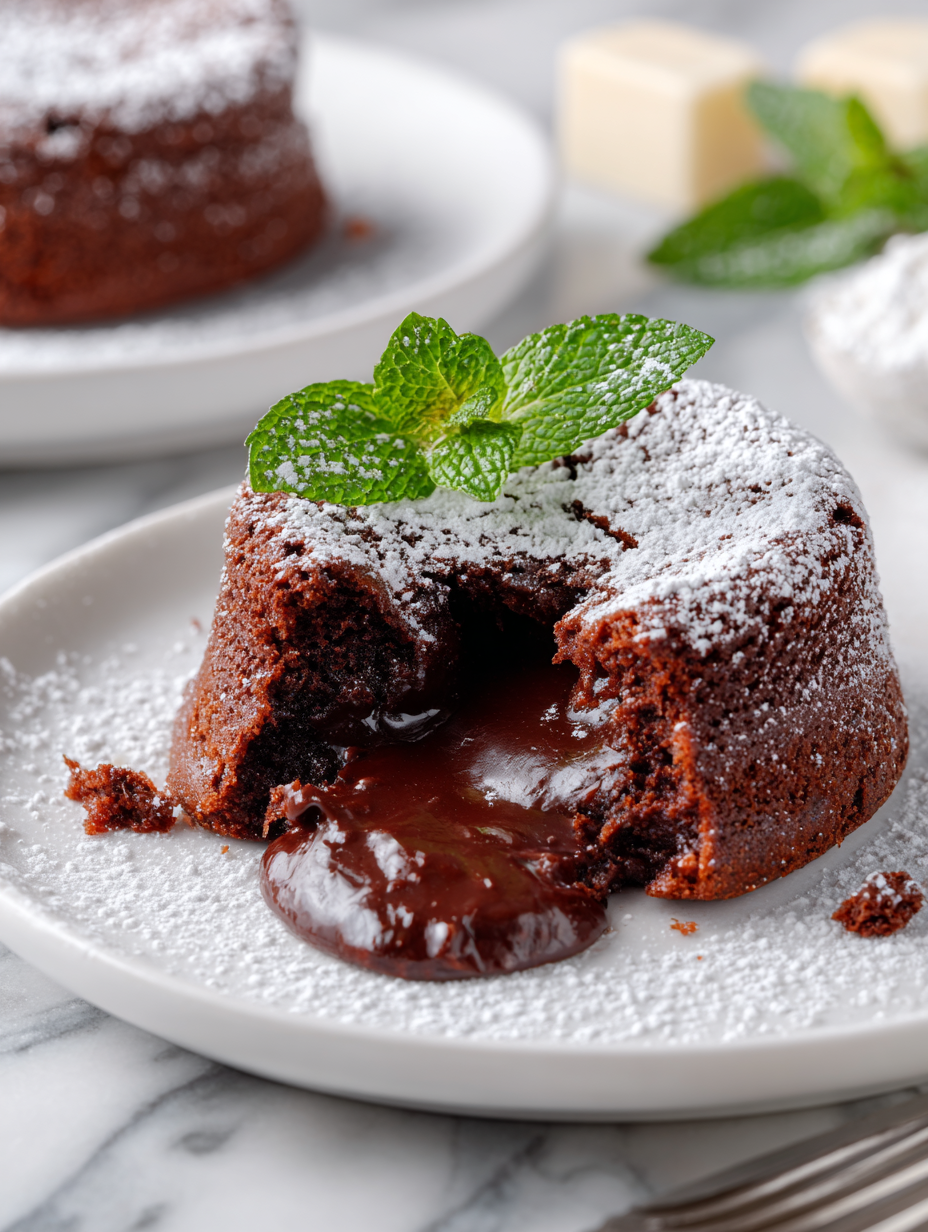
- Invert each ramekin onto a serving plate and gently lift off. The fondant should slide out easily, revealing a glossy, slightly cracked top.
- Serve immediately while warm. Optionally, dust with a little extra cocoa or powdered sugar, and pair with fresh berries or a dollop of cream.
Let the fondants rest for about 1 minute after baking, then invert onto plates. Serve immediately to enjoy the molten center. Add a dusting of cocoa or a sprig of mint for presentation.
How to Know It’s Done
- The edges are set and slightly firm, but the center jiggles when shaken.
- The top cracks gently, showing a shiny, slightly cracked surface.
- When cut, the inside flows out like molten lava, not solid.
Chocolate Fondant
Ingredients
Equipment
Method
- Preheat your oven to 200°C (390°F). Grease four ramekins with butter and dust with cocoa powder, tapping out any excess.
- Chop the dark chocolate and melt it together with the butter in a heatproof bowl set over simmering water or microwave in short bursts, stirring until smooth and glossy.
- In a separate bowl, whisk the eggs, sugar, and a pinch of salt until the mixture is slightly frothy and pale, about 30 seconds with a whisk.
- Pour the melted chocolate mixture into the egg mixture, gently folding with a spatula until fully combined and smooth.
- Sift in the flour and cocoa powder, then fold gently until just incorporated, taking care not to deflate the mixture.
- Divide the batter evenly among the prepared ramekins, filling each about three-quarters full and smoothing the tops.
- Bake in the preheated oven for exactly 12-14 minutes. The edges should be firm and set, while the center remains slightly jiggly when gently shaken.
- Remove the ramekins from the oven and let them rest for about 1 minute. Run a small knife around the edges to loosen the sides.
- Invert each ramekin onto a serving plate and gently lift off, revealing a glossy, cracked top with a slightly domed shape.
- Serve immediately while warm, optionally dusted with extra cocoa or powdered sugar, and pair with fresh berries or cream for an extra touch.
Pro tips for perfect fondant
- Bolded tip: Use room temperature eggs to ensure a smooth, airy batter, which helps achieve that perfect rise.
- Bolded tip: Sift cocoa powder and flour to prevent lumps and ensure an even, glossy finish in your batter.
- Bolded tip: Underbake slightly—center should be jiggly when you shake the ramekin, for that molten core.
- Bolded tip: Gently run a knife around the edge after baking to help release the fondant cleanly without cracks.
- Bolded tip: Rest the baked fondants for a minute before inverting—this helps set the shape and keeps the center molten.
- Bolded tip: Keep an eye on the clock—exact timing is key; even a minute too long can turn molten into cakey.
- Bolded tip: For extra shine, brush the surface with a little warm jam or chocolate glaze just before serving.
Common mistakes and how to fix them
- FORGOT to adjust baking time for different oven calibrations; do a test bake first.
- DUMPED the batter into ramekins without smoothing; use the back of a spoon for neat tops.
- OVER-TORCHED the fondants; check at 12 minutes, edges should be firm but center jiggly.
- UNDER-BAKED caused runny centers; extend baking by 1-minute increments, watch for cracks.
Quick fixes and pantry swaps
- When batter appears dry, splash in a teaspoon of warm water to loosen it.
- If center isn’t molten, increase baking time by 1-minute increments.
- DUMPED too much flour? Patch with a tiny bit of melted chocolate and remix gently.
- Overcooked and fondant is firm? Shield with a quick drizzle of warm chocolate sauce.
- When chocolate shimmers and cracks, it’s ready—avoid overbaking for molten perfection.
Prep, store, and reheat tips
- You can prepare the batter up to a day in advance; keep it covered in the fridge. The texture might be slightly thicker, but still workable for baking.
- Unbaked ramekins can be stored in the fridge for up to 24 hours. The batter will develop a richer chocolate aroma as it sits, so give it a gentle stir before baking.
- Baked fondants are best enjoyed fresh, but can be stored in an airtight container in the fridge for up to 2 days. Reheat gently in a warm oven for 4-6 minutes until just warmed through—look for a slight shimmer and soft center.
- Reheating too long will dry out the center or turn it cakey. Aim for a warm, gooey interior with a slightly crackled top, and avoid overheating to keep that molten core intact.
- For freezer storage, wrap baked or unbaked fondants tightly in plastic wrap and freeze for up to a month. Thaw in the fridge overnight, then reheat as above for that fresh-from-the-oven feel.
Top questions about chocolate fondant
1. How do I know when my fondant is perfectly molten?
A molten core is achieved by baking just until the edges are set but the center remains jiggly; usually around 12-14 minutes at 200°C. Keep a close eye to avoid overbaking.
2. What kind of chocolate is best for fondant?
Use high-quality dark chocolate with at least 70% cocoa for rich flavor and good melting consistency. Lower cocoa content can make the fondant less intense and more sugary.
3. My fondant is too firm inside, what can I do?
If the center isn’t gooey enough, bake in 1-minute increments until you reach the desired consistency. For a softer center, slightly underbake and serve immediately.
4. Should I let the fondant rest after baking?
Allow the baked fondant to rest for about 1 minute after removing from oven before inverting. This helps maintain the shape and prevents the molten center from spilling out prematurely.
5. How do I get my fondant to come out smoothly?
To prevent cracks when unmolding, run a small knife around the edge and invert gently. Serving immediately is best to enjoy the molten interior.
6. Can I make fondant batter in advance?
You can prepare the batter a day ahead, cover tightly, and keep it in the fridge. Bake straight from cold, but add an extra minute or so to the baking time.
7. How should I store and reheat fondant?
Baked fondants are best enjoyed fresh, but can be stored in the fridge for up to 2 days. Reheat in a warm oven for 4-6 minutes, looking for a glossy, soft center.
8. Quick fixes for appearance issues?
If the top cracks or looks dull, gently brush with warm chocolate or a quick glaze to restore shine. For minor cracks, a dusting of cocoa can help hide imperfections.
9. What are key tips for mixing the batter?
Use room temperature eggs to ensure a smooth, airy batter. Sift dry ingredients to avoid lumps and help the batter rise evenly during baking.
10. Troubleshooting under or overbaked fondant?
If the center isn’t molten, try increasing baking time by 1-minute increments. For overbaked fondant, a quick drizzle of warm chocolate can salvage the look and flavor.
Baking a chocolate fondant is like capturing a fleeting moment of perfection—just the right timing and a warm, gooey center. It’s a small act of patience that rewards you with rich, molten chocolate at each slice. No matter how many times I make it, that crack open and reveal the luscious interior never gets old.
In the end, it’s about enjoying the simple beauty of a warm dessert with a slightly messy, totally satisfying core. It’s a humble pleasure that feels just right for sharing, even if it’s just with yourself. That perfect balance of crispy top and molten heart keeps me coming back, time and again.

Hi, I’m Madison Lane, the cook, recipe creator, and heart behind this kitchen. Food has been part of my life for as long as I can remember. Some of my earliest memories are of standing beside my dad while he cooked, watching him move comfortably around the kitchen, tasting sauces, and explaining why patience mattered just as much as seasoning.
