There’s something about jalapeño poppers that takes me straight back to summer barbecues and messy backyard snacks. The way the spicy peppers meet that melting, gooey cheddar—it’s a flavor combo that’s both nostalgic and reliably satisfying. But I’ve always felt like they could use a little upgrade, a crispy edge or a richer cheese fill that makes each bite more memorable.
This recipe is about honoring those childhood memories while giving them a bit of a grown-up twist. I love the contrast of the smoky, spicy peppers with the creamy, sharp cheddar, and adding a crispy coating turns a simple snack into something you’ll want to serve at every gathering. It’s imperfect, a little chaotic, and totally addictive—the way good snacks should be.
Focusing on the nostalgic comfort of childhood snacks, this recipe elevates jalapeño poppers by emphasizing their messy, cheesy, smoky roots while adding a modern, crispy twist. It’s about capturing that perfect balance of heat and creamy richness, served with a side of imperfect, joyful chaos.
The story behind this recipe
- I first made these jalapeño poppers at a summer cookout when I was trying to impress some friends with my snack game. The peppers looked fierce with their vibrant green skins and fiery insides, but I was more interested in how the cheesy filling would melt and bubble under the grill. That day, I realized how a simple ingredient twist—like adding a touch of smoky paprika—can turn a familiar party snack into something memorable.
- Ever since, I’ve been obsessed with perfecting that balance of spice, cheese, and crunch. These poppers remind me of lazy weekends in the backyard, where chaos and messy bites are part of the fun. They’re imperfect, a little unruly, but always crowd-pleasers. Making them feels like a small rebellion—an ode to childhood snacks with a grown-up edge.
- heading”: “The story behind this recipe
Ingredient breakdown
- Cream cheese: I love how it becomes irresistibly gooey and smooth when softened; you want it silky and easy to pipe. Skip the fridge cold—let it warm up for better mixing.
- Cheddar cheese: Sharp, aged cheddar melts into a rich, smoky puddle—make sure to grate it fresh for the best flavor. Pre-grated tends to be drier and less flavorful.
- Jalapeños: I pick firm, bright green peppers with tight skins. Ripe ones have a good heat level, but if they’re too soft, they lose their snap and get mushy fast.
- Bacon (optional): Crispy bacon bits add smoky crunch—do a quick fry until golden, then crumble. For a milder flavor, use pancetta or ham instead.
- Spices & herbs: A pinch of smoked paprika or garlic powder elevates the filling—don’t be shy, but taste as you go to avoid overpowering the cheese. Fresh herbs like chives add a bright finish.
- Breadcrumbs: I toss in a handful for crunch, but if you prefer gluten-free, crushed cornflakes work surprisingly well and stay crisp longer.
- Oil or spray: Use a neutral oil or cooking spray to help the coating crisp up—don’t skip this step, or they might turn out soggy instead of crackly.
Key Ingredients Spotlight
Cheddar cheese:
- I love how it becomes irresistibly gooey and smooth when softened; you want it silky and easy to pipe. Skip the fridge cold—let it warm up for better mixing.
- Sharp, aged cheddar melts into a rich, smoky puddle—make sure to grate it fresh for the best flavor. Pre-grated tends to be drier and less flavorful.
Jalapeños:
- I pick firm, bright green peppers with tight skins. Ripe ones have a good heat level, but if they’re too soft, they lose their snap and get mushy fast.
- When sliced, they release a fiery aroma that’s both fresh and spicy. Removing seeds reduces heat, but I leave some for a warm kick.
Notes for ingredient swaps
- Dairy-Free: Swap cream cheese for cashew cheese or vegan cream cheese. It melts less smoothly but still creamy.
- Cheddar Cheese: Use Monterey Jack or Pepper Jack for a milder or spicier kick, respectively. They melt well and add flavor.
- Jalapeños: Serrano peppers are a good heat alternative; they’re slightly smaller but pack a punch.
- Bacon (optional): Smoked tempeh bits or crispy fried onions add smoky crunch without meat or dairy.
- Spices & Herbs: Paprika or cayenne can replace smoked paprika for heat, but flavor shifts—use sparingly.
- Breadcrumbs: Cornflake crumbs or crushed nuts give crunch and are gluten-free; they stay crisp longer.
- Oil or Spray: Use avocado or light olive oil for a richer flavor or coconut oil for a subtle sweetness.
Equipment & Tools
- Baking sheet: To hold the stuffed peppers during baking.
- Small spoon or piping bag: For filling the jalapeño shells precisely.
- Sharp knife: To halve and deseed the peppers cleanly.
- Mixing bowl: To combine cheese, spices, and optional ingredients.
- Grater: To shred the cheddar cheese fresh for maximum flavor.
- Spray bottle or pastry brush: To lightly coat the peppers with oil or spray for crisping.
Step-by-step guide to poppers
- Equipment ready: line a baking sheet with parchment, have a small spoon or piping bag ready, and a sharp knife for halving peppers. Preheat oven to 200°C (390°F).
- Wash the jalapeños thoroughly. Slice each pepper in half lengthwise. Use a small spoon to carefully scoop out seeds and membranes, leaving a hollow shell. Set aside.
- In a bowl, soften 200g cream cheese (about 30 minutes on the counter). Grate 150g sharp cheddar cheese. Mix together with a pinch of smoked paprika, garlic powder, and a pinch of salt. Stir in optional crispy bacon bits if using.
- Fill each jalapeño half generously with the cheese mixture. Use a small spoon or piping bag for neatness. Slightly overfill so cheese slightly oozes when cooked.
- Prepare the coating: in a shallow dish, combine 1 cup breadcrumbs with a teaspoon of smoked paprika and a pinch of black pepper. Lightly spray the filled peppers with cooking spray or brush with oil.
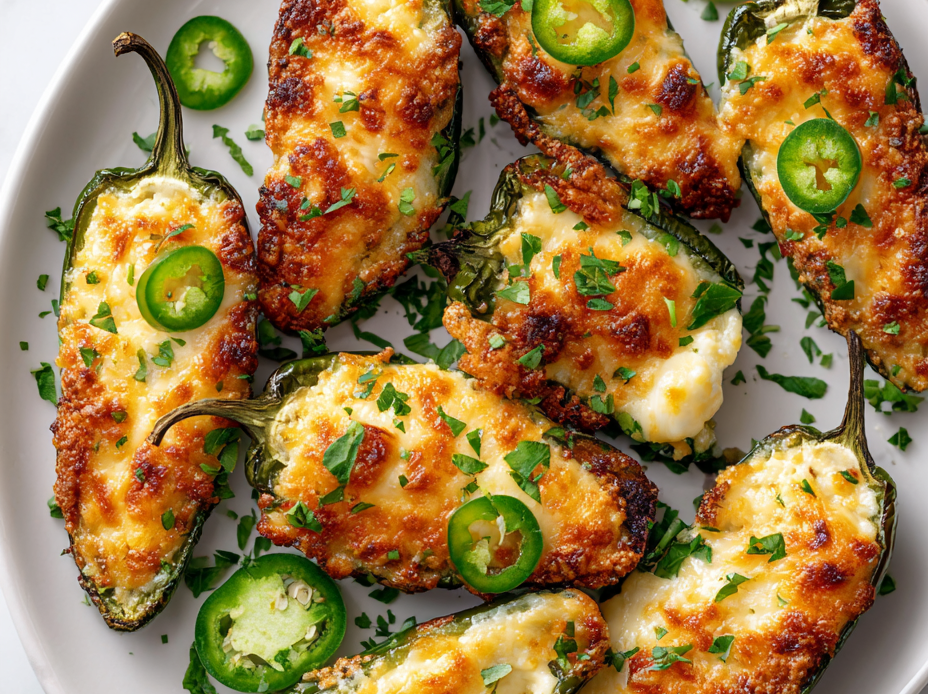
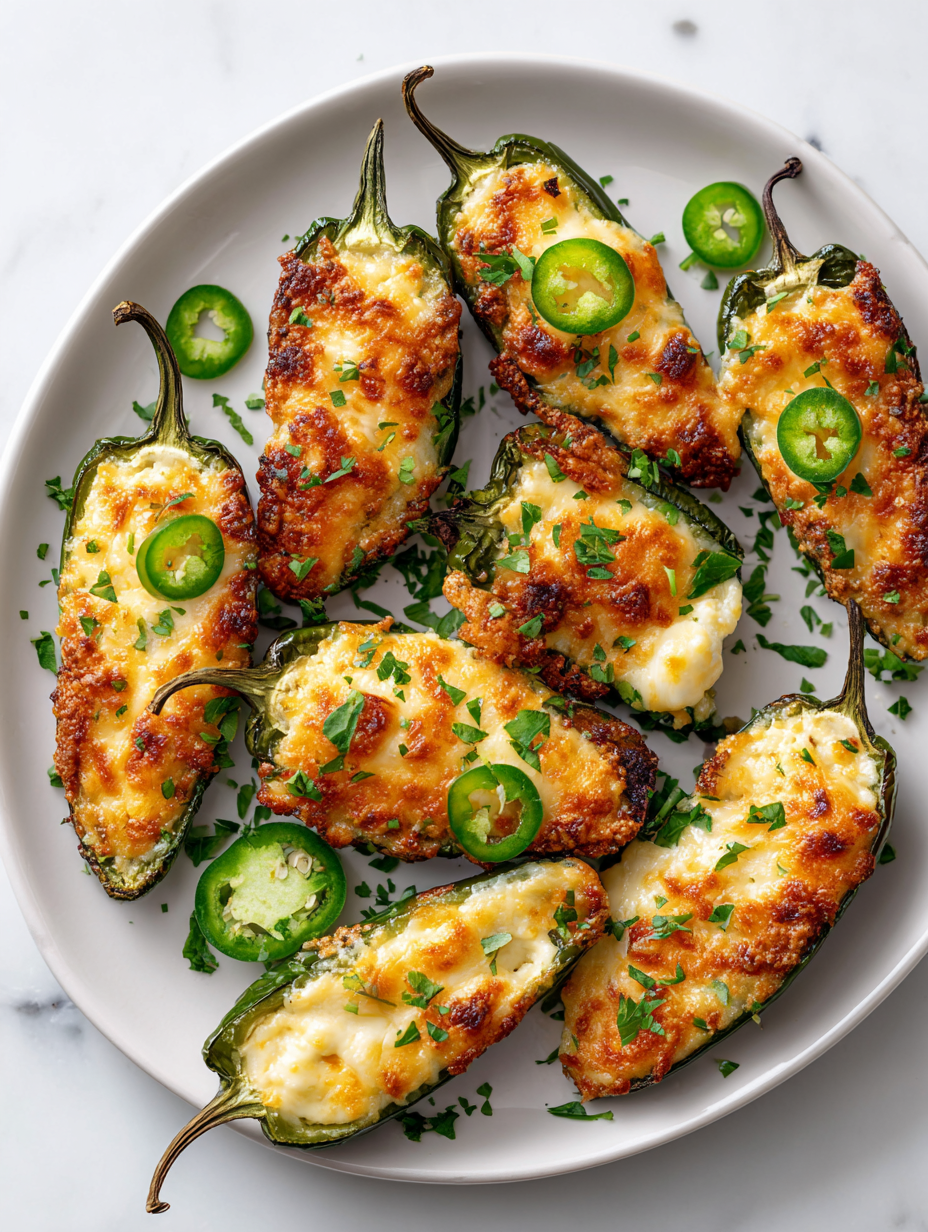
- Place the stuffed peppers on the prepared baking sheet. Bake in the preheated oven for 15–20 minutes. They should be golden, bubbly, and the cheese should have melted into a slight crackle on top.
- Check for doneness: the cheese should be bubbling and slightly golden around the edges. The peppers should be tender and the coating crispy.
- Remove from oven and let rest for 5 minutes. Serve warm, maybe with a squeeze of lemon or a dollop of sour cream if desired. Plate carefully—cheese will be hot and gooey.
Allow the poppers to rest on the baking sheet for about 5 minutes. Serve them warm, straight from the oven, with extra toppings or dips if desired. The cheese should be gooey, and the coating crisp and crackly.
How to Know It’s Done
- Cheddar cheese is melted and bubbling with golden edges.
- Peppers are tender but still hold their shape without collapsing.
- Crispy coating with a crackly texture that shatters when bitten.
Crispy Baked Jalapeño Poppers with Cheddar
Ingredients
Equipment
Method
- Begin by washing the jalapeños thoroughly. Slice each pepper in half lengthwise with a sharp knife, then carefully scoop out the seeds and membranes with a small spoon, creating hollow shells. Set aside.
- In a mixing bowl, combine the softened cream cheese and freshly grated cheddar. Add smoked paprika, garlic powder, salt, and pepper, then stir until the mixture is smooth and well blended. This creates a rich, cheesy filling with a hint of smoky spice.
- Use a small spoon or piping bag to fill each jalapeño half generously with the cheese mixture. Overfilling slightly is fine, as some cheese will melt and bubble during baking.
- Prepare a shallow dish with breadcrumbs, adding a pinch of smoked paprika and black pepper for extra flavor. Lightly spray or brush the stuffed peppers with oil or cooking spray to help the coating crisp up evenly.
- Place the filled jalapeños on a parchment-lined baking sheet, spacing them out to prevent sticking. Sprinkle additional breadcrumbs on top if desired for extra crunch.
- Bake in a preheated oven at 200°C (390°F) for 15–20 minutes, or until the cheese is bubbling and the breadcrumb coating is golden and crispy. Keep an eye on them to prevent burning.
- Once baked, remove the poppers from the oven and let them rest for about 5 minutes. The cheese will settle slightly, and the coating will become irresistibly crunchy.
- Serve the jalapeño poppers warm, straight from the oven, with a side of your favorite dip or a squeeze of fresh lemon for added brightness. Enjoy their smoky, spicy, cheesy bite with a crispy crunch!
Pro tips for perfect poppers
- Use room temperature cream cheese for smoother mixing and easier filling.
- Grate cheddar fresh for maximum melt and flavor, avoiding pre-shredded options that are drier.
- Slice peppers carefully and remove seeds gently to control heat and maintain shape.
- Coat stuffed peppers with oil or spray evenly to ensure a crispy, crackly coating.
- Bake until cheese is bubbling and peppers are tender, with a golden, crispy topping for perfect texture.
Common mistakes and how to fix them
- FORGOT to preheat oven → Always preheat to 200°C (390°F) before baking.
- DUMPED filling into peppers unevenly → Use a piping bag for neater, more even filling.
- OVER-TORCHED breadcrumbs → Keep an eye on breadcrumbs; toast until golden, not burned.
- MISSED sealing peppers completely → Seal with a small toothpick if needed to prevent cheese leaks.
Quick fixes and pantry swaps
- When cheese isn’t melting smoothly, splash a teaspoon of milk into the filling and stir.
- If breadcrumbs burn quickly, shield the peppers with foil midway through baking.
- DUMPED filling when overstuffed? Use a spoon to gently remove excess and prevent spillage.
- When peppers are too soft, reduce oven temperature to 180°C (350°F) and bake for less time.
- Splash a bit of lemon juice if cheese gets too greasy or bland during baking.
Prep, store, and reheat tips
- Prepping the filling ahead makes assembly faster—store it covered in the fridge for up to 24 hours, and it remains creamy and flavorful.
- You can prepare and stuff the jalapeños a day in advance, then keep them covered in the fridge for up to 12 hours. Just add the breadcrumbs and bake fresh.
- Store baked poppers in an airtight container in the fridge for up to 2 days. Reheat in a 180°C (350°F) oven until crispy and bubbly, about 10 minutes—watch the cheese melt and the coating crackle.
- For leftovers, reheat slowly to keep the cheese gooey and the coating crisp. Avoid microwave reheating, as it softens the crunch and makes the cheese rubbery.
Top questions about jalapeño poppers
1. How do I pick the best jalapeños?
Look for firm, bright green peppers with tight skins. Ripe ones have a fiery aroma and a good snap when bitten. Soft or wrinkled peppers won’t hold up well in baking.
2. How spicy will these poppers be?
To control heat, remove most seeds and membranes, but keep a few for extra spice if you like. Rinsing the peppers after deseeding can also reduce some heat.
3. Can I use different cheeses?
Use softened cream cheese and freshly grated cheddar for the best melt. Cold or pre-shredded cheese can be grainy and won’t blend smoothly.
4. How much filling should I use?
Fill the peppers generously, but avoid overstuffing to prevent cheese spilling out. A piping bag helps for neat, even filling.
5. How do I know when they’re done?
Bake at 200°C (390°F) for 15–20 minutes until the cheese bubbles and the coating turns golden and crispy. Check for tender peppers and crackly coating.
6. My poppers aren’t crispy enough, what can I do?
If the coating isn’t crisp enough, spray lightly with oil and bake a few extra minutes. For softer poppers, lower the heat slightly or extend baking time.
7. Can I prepare these in advance?
Prepping the stuffed peppers ahead of time is fine for up to 12 hours in the fridge. Add breadcrumbs just before baking to keep them crisp.
8. How do I reheat leftovers?
Reheat leftovers in a 180°C (350°F) oven for about 10 minutes until cheese is bubbly and coating is crisp again. Avoid microwaving to keep the crunch.
9. My cheese isn’t melting properly, what should I do?
When cheese isn’t melting smoothly, add a splash of milk or a little olive oil to the filling and stir well. For uneven baking, rotate the tray halfway through.
10. Any quick tricks for finishing touches?
Splash lemon juice over baked poppers for a bright, fresh contrast. Shield peppers with foil if breadcrumbs brown too quickly during baking.
These jalapeño poppers are a messy, cheesy celebration of childhood snacks with a grown-up twist. They remind me of summer nights filled with chaos and laughter, even if they’re a little unruly on the plate. Every bite delivers a smoky, spicy punch wrapped in crispy, cheesy goodness, making them perfect for sharing or just indulging yourself.
Once you get the hang of filling and baking them to that crackly perfection, they become an easy go-to for parties or quiet nights. There’s something satisfying about the balance of heat, cheese, and crunch—honest, imperfect, and totally crave-worthy. They’re not just snacks; they’re a little rebellion in each fiery, cheesy bite.

Hi, I’m Madison Lane, the cook, recipe creator, and heart behind this kitchen. Food has been part of my life for as long as I can remember. Some of my earliest memories are of standing beside my dad while he cooked, watching him move comfortably around the kitchen, tasting sauces, and explaining why patience mattered just as much as seasoning.
