
This no-bake chocolate oat slice is my kind of dessert—nothing fancy, just honest ingredients that come together in a messy, glorious way. It’s the kind of treat I reach for when I need something sweet but don’t want to turn on the oven or fuss around. Plus, it’s a kid-friendly project that actually tastes like a little piece of nostalgia, sticky fingers and all.
There’s something comforting about the simplicity here. The smell of melting chocolate mingling with toasted oats, the way it hardens into a firm, chewy slice—these are small kitchen joys that remind me of lazy weekend afternoons. It’s honest, unpolished, but so satisfying in its straightforwardness, especially when you need a quick fix of sweetness that’s easy enough for anyone to make.
This recipe is a nostalgic dive into my childhood, where simplicity in the kitchen meant no fuss, just easy ingredients coming together in a messy, sweet, chocolatey mess that kids and adults alike could make without turning on the oven.
The story behind this recipe
This recipe harks back to lazy weekends at my grandma’s house, where she’d toss together whatever was in the pantry—usually oats, cocoa, and a handful of chocolate chips. I loved how it felt like magic watching everything come together without the oven, just a quick melt and a firm press into a pan. It’s a reminder that simple ingredients, combined with a little patience, can turn into something unexpectedly satisfying. Now, I make this whenever I need a quick, no-fuss treat that sparks a little nostalgia and a lot of sweet rewards.
Ingredient breakdown
- Dark chocolate: I love the richness of good-quality dark chocolate; it melts smoothly and gives a deep, slightly bitter note. If you prefer sweeter, go for milk chocolate, but the flavor will be milder.
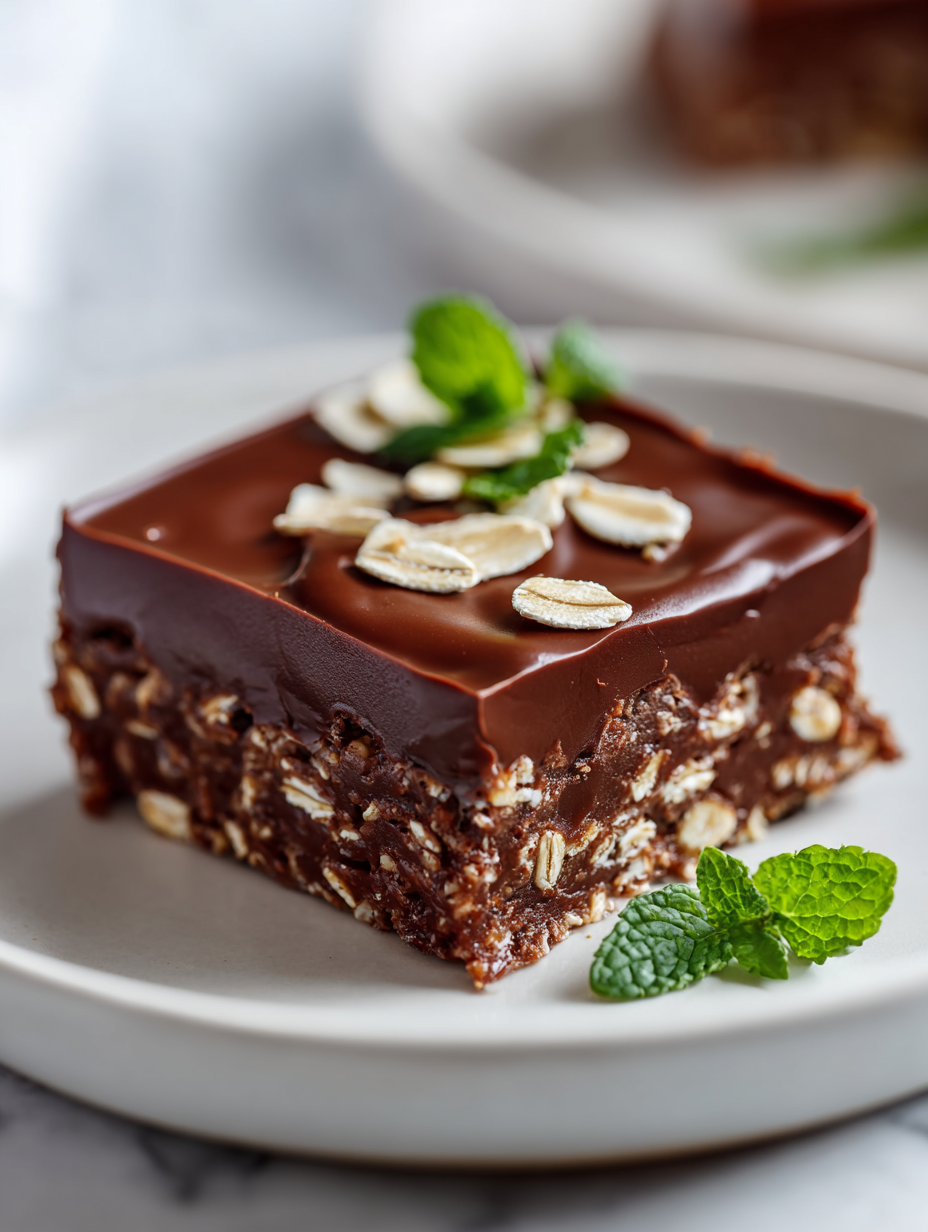
- Rolled oats: Toasted oats add crunch and a toasty aroma. If you’re in a rush, instant oats work, but they won’t have the same hearty texture.
- Butter: It helps everything bind together with a glossy finish. Use salted butter if you like a hint of saltiness, or unsalted if you want a cleaner chocolate flavor.
- Honey or golden syrup: Adds a sticky sweetness and a bit of shine. Swap with maple syrup if you want a subtle maple undertone, but reduce slightly as it’s thinner.
- Vanilla extract: Brightens the overall flavor with a warm note. If you don’t have vanilla, a pinch of almond extract can add a different depth, but keep it minimal.
- Optional add-ins: Nuts, dried fruit, or even mini marshmallows can be folded in for extra texture. Use what you love, just keep the ratio balanced so the slice holds together.
Spotlight on key ingredients
Dark chocolate:
- I love the richness of good-quality dark chocolate; it melts smoothly and gives a deep, slightly bitter note. If you prefer sweeter, go for milk chocolate, but the flavor will be milder.
- Rolled oats: Toasted oats add crunch and a toasty aroma. If you’re in a rush, instant oats work, but they won’t have the same hearty texture.
- Butter: It helps everything bind together with a glossy finish. Use salted butter if you like a hint of saltiness, or unsalted if you want a cleaner chocolate flavor.
Sweeteners and flavorings:
- Honey or golden syrup: Adds a sticky sweetness and a bit of shine. Swap with maple syrup if you want a subtle maple undertone, but reduce slightly as it’s thinner.
- Vanilla extract: Brightens the overall flavor with a warm note. If you don’t have vanilla, a pinch of almond extract can add a different depth, but keep it minimal.
Notes for ingredient swaps
- Dairy-Free: Use coconut oil or vegan butter instead of regular butter for a rich, dairy-free option that still melts beautifully.
- Sweetener Swap: Maple syrup can replace honey or golden syrup, adding a slightly woodsy aroma and a thinner consistency.
- Chocolate Variations: Swap dark chocolate with milk or white chocolate for a sweeter, creamier flavor profile.
- Oats: Use gluten-free oats if you need a gluten-free version; the texture remains hearty and chewy.
- Add-ins: Nuts or dried fruit can be replaced with seeds or mini marshmallows, but keep the ratio balanced to prevent the slice from becoming too loose.
- Sweet Boost: A pinch of sea salt or smoked salt can enhance the chocolate flavor and add a subtle savory counterpoint.
- Flavor Enhancers: A splash of espresso or coffee can deepen the chocolate intensity without overpowering the sweetness.
Equipment & Tools
- 20x20cm (8×8 inch) square pan: For setting and shaping the slice
- Spatula: To press and spread the mixture evenly
- Saucepan: For melting chocolate and butter
- Mixing bowl: To combine oats with melted mixture
- Parchment paper: To prevent sticking and for easy removal
Step-by-step guide to no bake slice
- Gather your equipment: a 20x20cm (8×8 inch) square pan, a heatproof spatula, a saucepan, and a mixing bowl. The pan is for setting the slice, spatula for pressing, saucepan for melting, bowl for mixing.
- Line the pan with parchment paper, leaving a little overhang for easy removal. This keeps things neat and prevents sticking.
- In the saucepan, melt 200g (7 oz) dark chocolate and 100g (7 tbsp) butter over low heat. Stir gently every minute, watching for a glossy, smooth mixture. It takes about 3-4 minutes.
- Once melted, remove from heat. Add 2 tbsp honey or golden syrup and 1 tsp vanilla extract. Mix until well combined and shiny.
- In the mixing bowl, combine 2 cups rolled oats. Pour the melted chocolate mixture over oats. Stir thoroughly until every oat is coated, and the mixture looks sticky but not greasy.
- Transfer the mixture into the prepared pan. Use the spatula to spread evenly, pressing down firmly so it’s compact. The surface should be even and slightly shiny.
- Place the pan in the fridge for at least 2 hours. If you’re in a rush, pop it in the freezer for 1 hour, but avoid rushing the setting process.
- After resting, lift the slice out of the pan using the parchment paper overhang. Trim the edges if needed for a cleaner look. Slice into squares or bars, about 2.5cm (1 inch) wide.
- For the best texture, let the slices sit at room temperature for 10 minutes before serving. The chocolate should be firm but still melt a little on the tongue.
- Enjoy your no-bake chocolate oat slice with a glass of milk or a cup of tea. It’s rich, chewy, and satisfying—no oven required!
Chill in the fridge for 2 hours or freeze for 1 hour until firm. Lift out using parchment overhang. Slice into bars or squares. Rest at room temperature for 10 minutes before serving for optimal texture.
How to Know It’s Done
- Chocolate is glossy and fully melted, no lumps remain.
- Mixture is evenly coated and sticky enough to hold together when pressed.
- Slice sets firm in fridge, with clean, crisp edges.
No-Bake Chocolate Oat Slice
Ingredients
Equipment
Method
- Line your square pan with parchment paper, leaving overhang on the sides for easy removal.
- In a saucepan over low heat, melt the dark chocolate and butter together, stirring gently until the mixture is glossy and smooth, about 3-4 minutes.
- Remove the saucepan from heat, then stir in honey (or golden syrup) and vanilla extract until fully incorporated and shiny.
- In a mixing bowl, toast the oats lightly in a dry pan until fragrant and golden, then transfer to a large mixing bowl.
- Pour the melted chocolate mixture over the toasted oats, then stir thoroughly until all the oats are coated and sticky.
- Transfer the mixture into your prepared pan, pressing down firmly with the spatula to create an even, compact layer.
- Place the pan in the fridge and chill for at least 2 hours until the slice is set and firm.
- Once chilled, lift the slice out of the pan using the parchment overhang. Slice into bars or squares, about 1 inch wide.
- Let the slices sit at room temperature for 10 minutes to soften slightly, then enjoy the chewy, chocolatey goodness.
Notes
Pro tips for perfect slices
- Bolded mini-head: Use a low, gentle heat when melting chocolate to avoid burning and ensure a glossy finish.
- Bolded mini-head: Toast oats slightly before mixing to deepen their nutty aroma and add crunch.
- Bolded mini-head: Chill the mixture in the fridge for at least 2 hours for a firm, sliceable texture.
- Bolded mini-head: Press the mixture firmly into the pan to prevent crumbling and ensure even slices.
- Bolded mini-head: Use parchment paper overhang for easy removal and clean edges, especially when slicing.
- Bolded mini-head: If mixture is too sticky, sprinkle in a little more oats to balance moisture and help set.
- Bolded mini-head: For a shiny finish, add a tiny pinch of sea salt on top before chilling for a flavor boost.
Common mistakes and how to fix them
- FORGOT to cool chocolate mixture → Chill longer if the slice doesn’t set.
- DUMPED too much oats → Adjust oats or press firmly to compact the mixture.
- OVER-TORCHED chocolate → Use low heat and stir constantly to prevent burning.
- MISSED the lining step → Always line your pan for easy removal and clean edges.
Quick fixes and pantry swaps
- When mixture is too sticky → Splash in a little more oats and press firmly.
- If slice doesn’t set → Chill longer or freeze for 15 minutes.
- Over-melted chocolate → Patch with a splash of warm cream and stir until smooth.
- When edges crack → Shield with a thin layer of melted chocolate for a clean look.
- When in doubt, swap dark for milk chocolate → Softer, sweeter, and still delicious.
Prep, store, and reheat tips
- Prepare the mixture the night before; it firms up better and saves time on the day of serving.
- Store the slices in an airtight container in the fridge for up to 5 days; they stay chewy and chocolatey.
- For longer storage, freeze the slices wrapped tightly in plastic wrap and foil; enjoy within 3 months.
- Reheat slightly in the fridge for 10 minutes or at room temperature for softer texture, with a rich aroma of melted chocolate.
- Sensory note: the chocolate aroma intensifies as it warms, and the texture softens slightly, making each bite feel indulgent.
Top questions about no bake chocolate oat slice
1. Can I make this vegan?
Yes, using dairy-free chocolate and coconut oil makes it suitable for vegans, but the texture may be slightly softer.
2. How long does it last?
Storing in an airtight container in the fridge keeps it fresh for up to 5 days; in the freezer, up to 3 months.
3. My slice isn’t firm enough, what can I do?
If it’s not setting properly, it might need more chilling time or the mixture was too wet—try pressing it down firmer or refrigerate longer.
4. Can I use instant oats instead?
You can swap rolled oats for instant oats, but expect a slightly different texture—less chewy, more crumbly.
5. Does the quality of chocolate matter?
Use good-quality dark chocolate for a richer flavor and better melt; cheaper chocolates may not melt smoothly or taste as deep.
6. Can I add other ingredients?
Yes, adding nuts, dried fruit, or mini marshmallows can enhance texture and flavor. Just keep the ratio balanced to prevent crumbling.
7. How do I prevent sticking?
Use parchment paper over the pan to make removal easier and keep the edges neat, especially when slicing.
8. When should I chill the slice?
Chill the mixture for at least 2 hours in the fridge or 1 hour in the freezer for best firmness before slicing.
9. How do I melt the chocolate properly?
If the chocolate melts unevenly, melt it slowly over low heat and stir frequently to avoid burning and achieve gloss.
10. What if my mixture is too sticky?
When mixture is too sticky, sprinkle in a little more oats and mix until it becomes manageable and holds together.
Making this no-bake chocolate oat slice is a little act of rebellion against the busy chaos of everyday life. It’s honest, quick, and reminds me that sometimes, simplicity in the kitchen leads to the sweetest moments. When I cut into that firm, chocolatey square, I feel a tiny thrill of satisfaction—no oven, no fuss, just pure, messy joy.
In the end, this recipe isn’t just about the ingredients; it’s about the small, imperfect moments that make cooking feel real. It’s a reminder that sometimes, the best treats are the ones you throw together with what’s on hand, and share with someone who appreciates that honest, homemade touch. No matter the season, this slice keeps a little bit of childhood nostalgia alive in every chewy, chocolatey bite.

Hi, I’m Madison Lane, the cook, recipe creator, and heart behind this kitchen. Food has been part of my life for as long as I can remember. Some of my earliest memories are of standing beside my dad while he cooked, watching him move comfortably around the kitchen, tasting sauces, and explaining why patience mattered just as much as seasoning.
