This recipe feels like a little secret I’ve kept in my back pocket for when I need something sweet but don’t want to deal with the fuss of baking. The honey and chocolate come together in a way that’s both indulgent and unexpectedly simple, almost like a treat you can whip up on a whim. It’s the kind of dessert that feels both comforting and a little rebellious, skipping the oven entirely.
I love how these bars can be thrown together with whatever’s lurking in the pantry, making them perfect for those moments when you crave something rich but don’t want to mess with complicated ingredients or long waits. Plus, the glossy, oozy chocolate topping paired with the chewy, honey-sweetened base has a way of turning ordinary days into small celebrations. They’re honest, unpretentious, and just right for sharing—or keeping all to yourself.
This recipe is inspired by my grandma’s no-bake approach, which feels like a warm hug on busy days. I love how it combines the nostalgic richness of honey with the deep, bittersweet chocolate, all without turning on the stove. It’s a reminder that sometimes the simplest ingredients, treated with a little patience, create the best moments.
The story behind this recipe
This recipe was born out of a lazy afternoon when I realized I had a jar of honey that was about to crystalize and a stash of chocolate I couldn’t resist. I wanted something quick, no fuss, that combined those rich, familiar flavors I grew up loving. It’s one of those spur-of-the-moment discoveries that turned into a little tradition. Every time I make these bars, I think about how simple ingredients can make a moment feel special, no oven required.
Ingredient breakdown: key components
- Chocolate: I prefer a bittersweet bar for depth, but milk chocolate can make it mellower and creamier—think of that silky melt on your tongue.
- Honey: It’s the glue that gives these bars their chewy, sticky texture—use local, floral honey if you can; it brightens the flavor with a whisper of wildflowers.
- Butter: I melt it just enough to blend smoothly—don’t rush this step, or the mixture might seize up or become greasy if too hot.
- Oats: Old-fashioned oats give a hearty chew—skip quick oats for more texture and rustic charm that stays chewy with each bite.
- Cocoa powder: Unsweetened for richness—sift it first to avoid clumps, and if you want a darker flavor, a pinch of espresso powder makes it pop.
- Optional add-ins: Nuts, dried fruit, or a sprinkle of sea salt—think of these as personal touches that make each batch uniquely yours.
- Additional sweeteners: Maple syrup or brown sugar can replace honey for a different flavor twist—just keep in mind they might alter the chewy consistency slightly.
Spotlight on key ingredients
Chocolate:
- I prefer a bittersweet bar for depth, but milk chocolate can make it mellower and creamier—think of that silky melt on your tongue.
- Honey: It’s the glue that gives these bars their chewy, sticky texture—use local, floral honey if you can; it brightens the flavor with a whisper of wildflowers.
Honey:
- It’s the glue that gives these bars their chewy, sticky texture—use local, floral honey if you can; it brightens the flavor with a whisper of wildflowers.
- Oats: Old-fashioned oats give a hearty chew—skip quick oats for more texture and rustic charm that stays chewy with each bite.
Notes for ingredient swaps
- Dairy-Free: Use coconut oil instead of butter for richness. It might add a subtle coconut aroma but keeps it vegan.
- Sweetener Swap: Maple syrup can replace honey for a different, slightly caramelized flavor. Expect a thinner, more liquid mixture.
- Chocolate Type: Dark chocolate bars give a deep, bittersweet taste; milk chocolate will make it creamier and milder—less intense.
- Oats: Rolled oats are best for chew; quick oats will work but result in a softer, less chewy texture.
- Nut Add-ins: Swap in chopped dried fruit or seeds if nuts aren’t your thing—adds crunch, but watch for moisture if using dried fruit.
- Cocoa Powder: Dutch-processed cocoa can be used if you prefer a smoother, mellower chocolate flavor—less bright, more muted.
- Extra Flavor: A splash of vanilla or a pinch of sea salt can heighten the chocolate and honey’s richness—don’t skip these if you like depth.
Equipment & Tools
- Microwave-safe bowl: To melt butter and chocolate evenly without extra dishes.
- 9×9-inch baking pan: To hold and shape the bars during setting.
- Parchment paper: Easy removal and clean slicing.
- Spatula: To spread and press the mixture evenly.
- Sharp knife: To cut the set bars cleanly.
- Rubber scraper: To incorporate oats thoroughly and scrape bowl edges.
Step-by-step guide to no bake bars
- Gather all your ingredients and equipment. Line a 9×9-inch baking pan with parchment paper—this makes removal easier later.
- In a microwave-safe bowl, melt 1 cup of butter (about 45 seconds on high). Once melted, add 1 cup of honey and stir until smooth. The mixture should be warm and slightly frothy.
- Chop 2 cups of bittersweet chocolate finely. Add to the warm butter-honey mixture. Stir gently until the chocolate is fully melted and the mixture is glossy. If it’s not fully melted, microwave in 15-second bursts, stirring in between.
- In a large mixing bowl, combine 3 cups of old-fashioned oats and 1/2 teaspoon of salt. Pour the warm chocolate mixture over the oats. Mix thoroughly until all oats are coated and sticky.
- Transfer the mixture into the prepared pan. Use a spatula to spread and press it evenly into the pan. Compact it firmly—this will help the bars hold together.
- For the topping, melt an additional 1/2 cup of chocolate (microwave in 15-second bursts, stirring in between). Drizzle or spread it evenly over the pressed oat mixture. Add optional toppings like nuts or sea salt if desired.
- Place the pan in the fridge for at least 2 hours, or until firm. If you’re in a rush, pop it in the freezer for about an hour—just watch the edges so it doesn’t freeze too hard.
- Once set, lift the slab out of the pan using the parchment paper. Slice into bars or squares with a sharp knife. Clean the knife between cuts for clean edges.
- Serve immediately or store in an airtight container. These bars keep well in the fridge for up to a week, or freeze for longer storage.
Refrigerate until firm, about 2 hours. Slice carefully with a sharp knife. Serve directly from the fridge or let sit at room temperature for 10 minutes for softer bites.
How to Know It’s Done
- Chocolate mixture is glossy and fully melted, no streaks remain.
- Oat mixture is evenly coated and pressed firmly into the pan.
- Bars are firm and hold shape after refrigeration, with a shiny chocolate top.
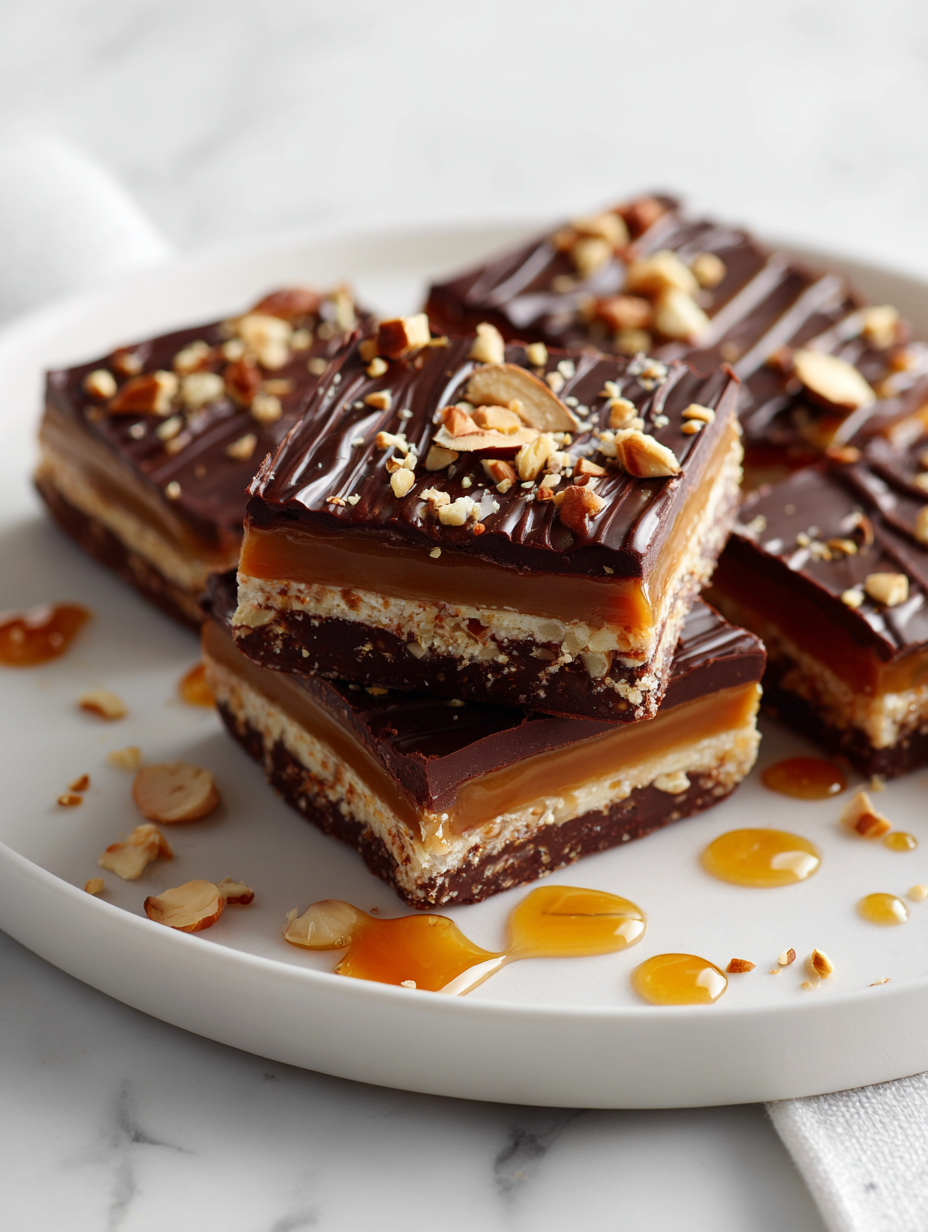
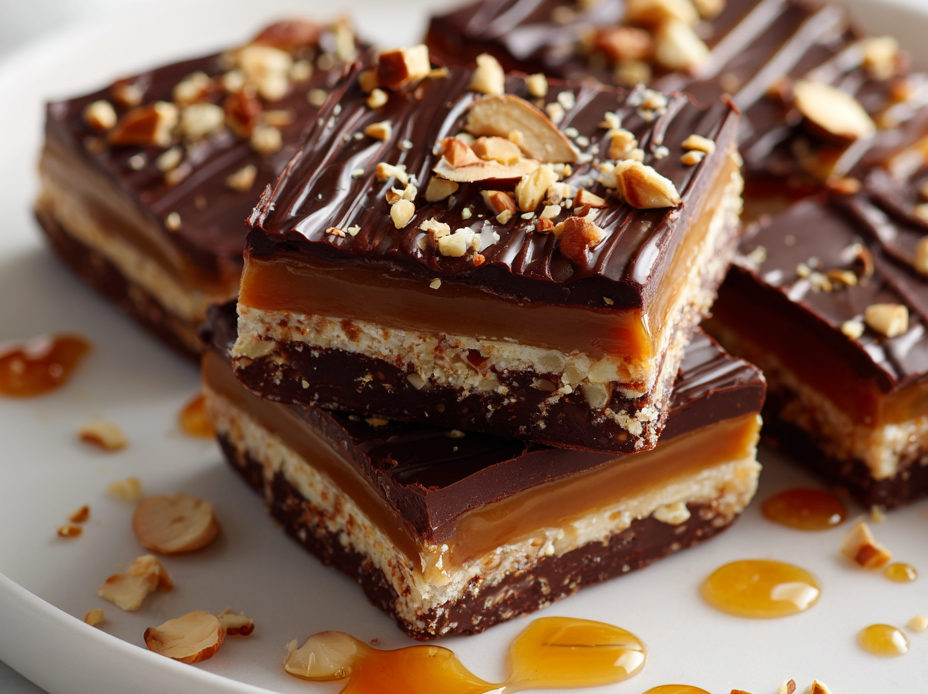
Honey Chocolate No-Bake Bars
Ingredients
Equipment
Method
- Line your 9x9-inch pan with parchment paper, leaving some overhang for easy removal.
- In a microwave-safe bowl, melt the butter in short bursts, about 30 seconds each, until it’s just melted and fragrant.
- Add the honey to the melted butter and stir until the mixture is smooth and slightly frothy.
- Chop the bittersweet chocolate finely and add it to the warm butter-honey mixture. Microwave in 15-second bursts, stirring between each, until the chocolate is fully melted and glossy.
- In a large bowl, combine the oats and salt. Pour the warm chocolate mixture over the oats and stir thoroughly until all the oats are evenly coated and sticky.
- Transfer the mixture into your prepared pan. Use a spatula to press it firmly and evenly into the pan, ensuring a compact, uniform layer.
- For the topping, melt an additional 1/2 cup of chocolate in the microwave, then drizzle or spread it over the pressed oat base for a glossy finish.
- Optional: sprinkle nuts or dried fruit on top before the chocolate sets for added texture and flavor.
- Place the pan in the fridge and chill for at least 2 hours, or until the bars are firm and shiny on top.
- Once set, lift the whole block out of the pan using the parchment overhang. Slice into bars with a sharp knife, wiping the blade clean between cuts for neat edges.
- Serve immediately or store in an airtight container in the fridge. These bars stay chewy and glossy for up to a week.
Pro tips for perfect no bake bars
- Melting: Use low microwave power and short bursts to prevent chocolate from seizing or burning.
- Pressing: Press the oat mixture firmly into the pan for even, tidy bars that hold together well.
- Cooling: Chill the bars until firm, at least 2 hours, for clean cuts and a satisfying texture.
- Drizzling: Melt additional chocolate gently and drizzle for a glossy, professional-looking finish.
- Variations: Add a pinch of sea salt or a splash of vanilla to elevate the flavor profile with minimal effort.
- Mixing: Stir ingredients just until combined; overmixing can make the bars dense and tough.
- Storage: Keep bars refrigerated in an airtight container to maintain their chewy texture and glossy top.
Common mistakes and how to fix them
- FORGOT to check chocolate melting point → Use low microwave power and short bursts.
- DUMPED too much honey in → Slightly warm mixture helps prevent excess stickiness.
- OVER-TORCHED the chocolate → Stir immediately; add a teaspoon of oil if it seizes.
- MISSED pressing firmly → Use the back of a spatula for compact, even layers.
Quick fixes and pantry swaps
- When chocolate seizes, splash in a teaspoon of oil and stir gently.
- If bars crack when slicing, warm the knife slightly for clean cuts.
- Dumped too much honey? Chill the mixture briefly to stiffen before pressing.
- Over-torched chocolate? Patch with a bit of fresh melted chocolate and stir until smooth.
- Splash cold water on the pan edges if mixture sticks during pressing for easy release.
Prep, store, and reheat tips
- Prepare the mixture and press into the pan ahead of time; it firms up better when chilled overnight.
- Store the bars in an airtight container in the fridge for up to a week; their chewy texture stays intact.
- For longer storage, freeze the bars in a single layer, wrapped tightly, for up to three months. Thaw in the fridge before serving.
- Refrigerate or freeze the bars to maintain their glossy chocolate topping; let sit at room temperature for 10 minutes before slicing for optimal softness and shine.
Top questions about no bake bars
1. Can I use cheap chocolate?
Use good-quality chocolate for a rich, glossy finish and better melt. Cheaper bars can become grainy or seize up.
2. What if I don’t have honey?
Honey can be replaced with maple syrup or agave syrup, but expect a slightly different chew and flavor.
3. How do I get the bars to set properly?
Make sure to press the mixture firmly into the pan so the bars hold together well after chilling.
4. How long should I refrigerate them?
Chill the bars for at least 2 hours, or until firm and shiny on top. Longer is fine, even overnight.
5. Can I change the oats?
You can swap oats for crushed graham crackers or rice cereal for a different texture, but it changes the chewiness.
6. What if my chocolate seizes?
If the chocolate seizes or becomes grainy, add a teaspoon of oil and stir gently to smooth it out.
7. How do I get clean slices?
For a softer bite, let the bars sit at room temperature for 10 minutes before slicing after chilling.
8. How can I cut the bars neatly?
Use a sharp knife warmed slightly in hot water for cleaner cuts through firm bars.
9. How should I store these bars?
Store leftovers in an airtight container in the fridge for up to a week or freeze for longer.
10. My bars are too soft—what now?
If the bars are sticky or soft, chill them longer or briefly freeze before slicing to firm up.
These no-bake chocolate honey bars are more than just a quick fix for sweet cravings. They remind me of lazy afternoons in the kitchen, experimenting with simple ingredients that come together surprisingly well. Sharing them feels like passing on a little secret that’s been in my family for generations.
Whenever I make these, I think about how sometimes the simplest treats are the most satisfying. They’re perfect for those busy days or when you just need a little something sweet with minimal fuss. Honestly, they’re a small, imperfect joy that sneaks into the routine and makes it a bit sweeter.

Hi, I’m Madison Lane, the cook, recipe creator, and heart behind this kitchen. Food has been part of my life for as long as I can remember. Some of my earliest memories are of standing beside my dad while he cooked, watching him move comfortably around the kitchen, tasting sauces, and explaining why patience mattered just as much as seasoning.
