This recipe is my go-to for when I need a quick, no-fuss treat that reminds me of childhood afternoons. It’s the kind of sweet that comes together in one bowl, no oven needed, just a little stirring and patience. Honestly, it’s a messy, imperfect process—and that’s part of the charm.
There’s something satisfying about melting chocolate and mixing it with crispy cornflakes—like a small act of rebellion against complicated baking. It’s a comfort food that’s as much about the process as the result, especially when you’re craving something sweet but don’t want to turn on the oven.
These bars are perfect for when you want a quick fix, a snack that’s both nostalgic and totally customizable. Plus, they’re great for sharing—or not. Sometimes, I stash a few away just so I know I’ve got a little secret stash hidden in the fridge.
This recipe is my go-to for when I need a quick, no-fuss treat that reminds me of childhood afternoons. It’s the kind of sweet that comes together in one bowl, no oven needed, just a little stirring and patience. Honestly, it’s a messy, imperfect process—and that’s part of the charm.
The story behind this recipe
This recipe came from a lazy afternoon in my childhood kitchen, where my mom would toss together whatever we had—cornflakes, chocolate, a splash of vanilla—and call it dessert. It’s funny how those simple ingredients stuck with me, especially the crunch of crispy cereal paired with rich, melty chocolate. Over the years, I’ve tweaked the ratios and added a pinch of sea salt, making it more my own, but the core remains a nostalgic throwback. Sometimes, I still make it just to feel that rush of childhood joy, all messy hands and sticky fingers, no fuss needed.
Ingredient breakdown: key components
- Chocolate: I like using good-quality dark chocolate—rich, melts smoothly, and gives a deep cocoa aroma. Swap in milk chocolate if you prefer a sweeter, milder flavor, but be mindful it melts differently.
- Cornflakes: Fresh, crispy cornflakes add that satisfying crunch I crave. If you want a softer bite, try toasted oats or rice cereal, but skip the soggy effect by working quickly.
- Butter: I use unsalted butter for a clean, creamy base that melds everything together. Olive oil can be a dairy-free alternative, but it’ll add a different, slightly fruity note.
- Sweetener: A splash of honey or golden syrup helps everything stick and adds a subtle floral sweetness. Maple syrup works too, but it can darken the chocolate flavor a bit.
- Vanilla: Just a teaspoon of vanilla extract brightens the chocolate and cereal combo. Skip it if you want a more straightforward, no-nonsense bar, or add a dash of sea salt instead for contrast.
- Optional extras: Nuts or dried fruit can be folded in for texture and flavor. Toasted pecans add a smoky crunch, while dried cranberries lend a tart burst—go wild with your favorites!
Spotlight on key ingredients
Chocolate:
- I like using good-quality dark chocolate—rich, melts smoothly, and gives a deep cocoa aroma. Swap in milk chocolate if you prefer a sweeter, milder flavor, but be mindful it melts differently.
- Cornflakes: Fresh, crispy cornflakes add that satisfying crunch I crave. If you want a softer bite, try toasted oats or rice cereal, but skip the soggy effect by working quickly.
Cornflakes:
- The crispy cereal’s texture is vital. They stay crunchy if coated quickly and kept dry. Toasted oats or rice cereal can be alternatives, but they change the crunch quality.
- Cornflakes are delicate; handle them gently during mixing to keep that signature crunch. Soggy cereal is a common pitfall—work swiftly after melting the chocolate.
Notes for ingredient swaps
- Chocolate: I prefer using high-quality dark chocolate for a rich, smooth melt. Swap for milk chocolate if you want a milder, sweeter flavor, but expect a softer, less intense result.
- Cornflakes: Fresh, crispy cornflakes give the best crunch. You can try toasted rice cereal or bran flakes for a different texture, but keep in mind they may change the crunch factor.
- Butter: Unsalted butter provides a clean, creamy base. Olive oil or coconut oil can be used as dairy-free options, though they will add their own subtle flavor notes.
- Sweetener: Honey or golden syrup helps everything stick and adds a floral note. Maple syrup works, but it may darken the chocolate slightly and alter the flavor profile.
- Vanilla: A teaspoon of vanilla extract brightens the overall flavor. For a twist, add a splash of almond extract or skip entirely for a more straightforward chocolate hit.
- Add-ins: Nuts, dried fruit, or seeds can be folded in for extra texture. Toasted pecans or dried cranberries are popular, but feel free to experiment based on your preference.
Equipment & Tools
- Large mixing bowl: To hold and mix the melted chocolate and cereal.
- Saucepan: To melt the chocolate gently over low heat.
- Spatula: To fold ingredients and press mixture into the dish.
- Baking dish: To shape and set the bars.
- Hot water (for knife): To warm the knife for clean cuts.
Step-by-step guide to no bake bars
- Gather your equipment: a large mixing bowl, a saucepan, a spatula, and a baking dish (around 20x20cm or 8×8 inches).
- In the saucepan, melt 200g (7 oz) of dark chocolate over low heat (about 50°C / 122°F). Stir gently, smell the rich cocoa as it melts.
- Once melted and smooth, add 50g (1/4 cup) of unsalted butter and stir until glossy. If the mixture seizes or thickens, warm it slightly more or add a tiny splash of warm milk.
- Pour the melted chocolate and butter into the mixing bowl. Add 150g (5 cups) of crispy cornflakes, gently folding to coat evenly. Be quick to keep the cereal crispy.
- Transfer the mixture into the prepared baking dish. Use the spatula to press it down into an even layer, smoothing the top. You want a compact, firm surface.
- Let the bars set at room temperature for about 30 minutes, or place in the fridge for 15-20 minutes if you’re in a hurry. The chocolate should firm up and crack slightly when pressed.
- Once set, slice into squares or rectangles. For clean cuts, use a hot knife (dip in hot water and wipe dry before slicing).
- Allow the bars to rest for 5 minutes after slicing to firm up before serving. Keep them in an airtight container at room temp for up to 3 days, or refrigerate for longer storage.
- Checkpoints for doneness: the chocolate should be shiny and firm, the edges neat, and the bars holding their shape without crumbling.
Allow the bars to cool and set at room temperature or in the fridge. Slice with a hot knife, then serve directly from the dish or plate individually. Store in an airtight container at room temperature or chilled.
How to Know It’s Done
- Chocolate is fully melted and glossy before mixing.
- Mixture is well combined, cereal coated but not soggy.
- Bars are firm and hold shape after chilling.
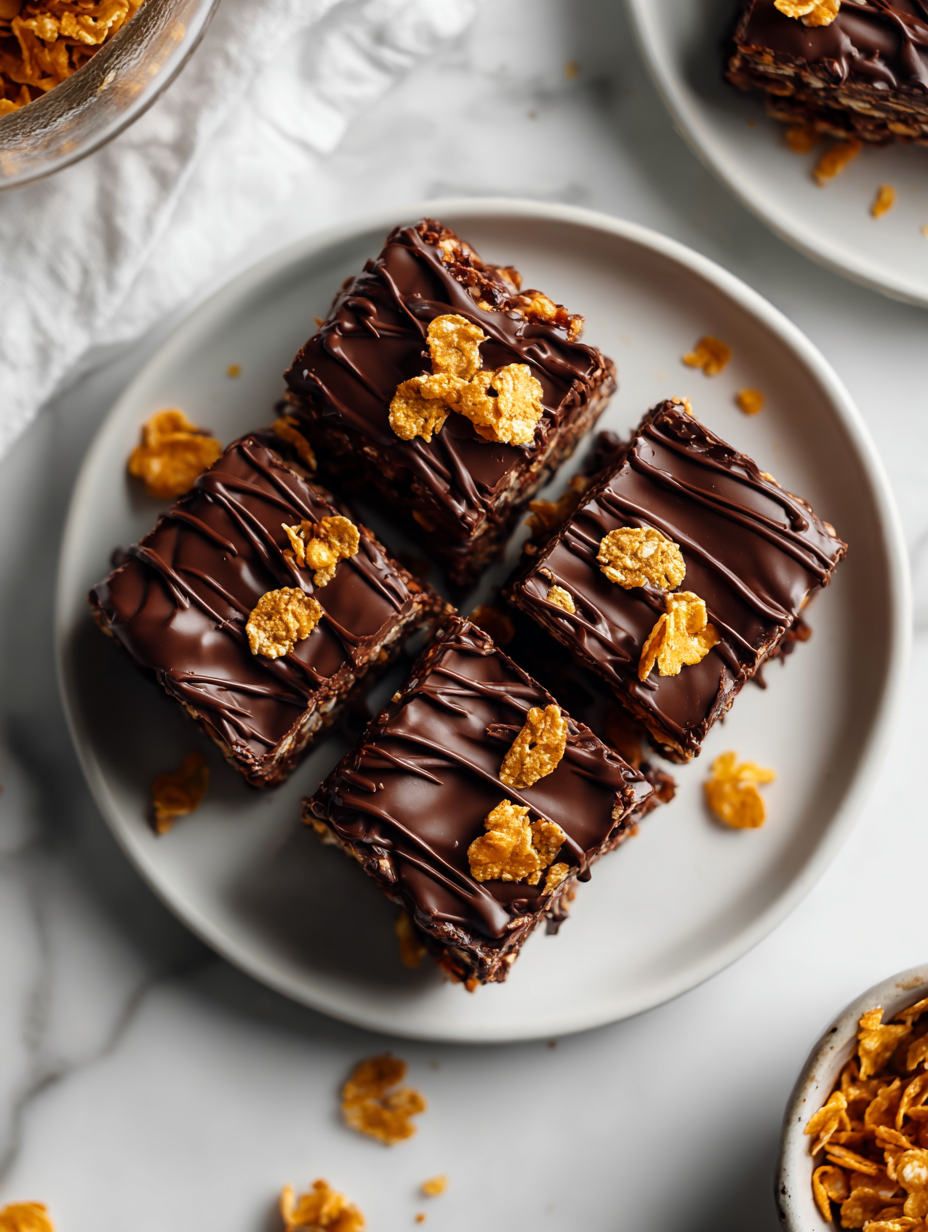
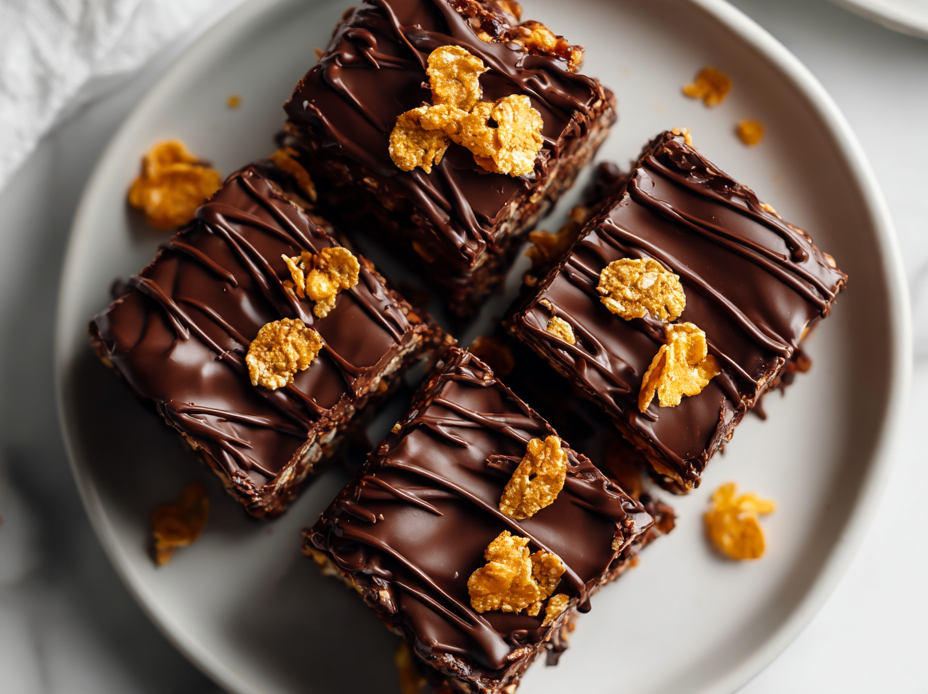
No-Bake Chocolate Cornflake Bars
Ingredients
Equipment
Method
- Chop the dark chocolate into small pieces and set aside.
- In a saucepan over low heat, melt the chocolate gently, stirring constantly until smooth and shiny, and you can smell the rich cocoa aroma.
- Add the butter to the melted chocolate and stir until completely melted and glossy, creating a silky mixture.
- Pour the warm chocolate-butter mixture into a large mixing bowl, then stir in the vanilla extract to brighten the flavor.
- Add the crispy cornflakes to the bowl and fold gently with a spatula, coating each flake evenly while keeping them crispy.
- Transfer the coated cereal mixture into a lined or greased baking dish, pressing down firmly with the back of the spatula to create an even, compact layer.
- Let the mixture set at room temperature for about 30 minutes, or refrigerate for 15-20 minutes until the chocolate is firm and the bars hold their shape.
- Once cooled and firm, use a hot, damp knife to cut into squares or rectangles, wiping the knife clean after each cut for neat edges.
- Allow the bars to rest for a few minutes after cutting to firm up before serving. Enjoy these rich, crunchy treats as a quick snack or dessert.
Pro tips for perfect bars
- Use fresh, crispy cornflakes for maximum crunch.
- Melt chocolate slowly over low heat, stirring constantly.
- Work quickly when mixing to prevent cereal from sogging.
- Chill in the fridge for at least 15 minutes for firm bars.
- Use a hot knife for clean, neat slices.
- Press mixture firmly into the dish to ensure it holds together.
- Add a pinch of sea salt to enhance chocolate flavor.
Common mistakes and how to fix them
- FORGOT to fold in cereal gently → fold carefully to keep crunch intact.
- DUMPED chocolate mixture into dish too quickly → pour slowly and spread evenly.
- OVER-TORCHED chocolate → melt over low heat, stir constantly, remove before burning smell.
- MISSED chilling time → let set fully for clean slices and proper firmness.
Quick Fixes and Pantry Swaps
- When mixture is too thick, splash in a tiny bit of warm milk to loosen.
- Splash in a pinch of salt if chocolate tastes flat or too sweet.
- Patch soggy bars with an extra drizzle of melted chocolate to tighten texture.
- Shield melting chocolate from drafts to prevent seizing during melting process.
- If you forget to chill, pop the tray in the freezer for 5 minutes for quick firm-up.
Prep, store, and reheat tips
- You can prepare the chocolate mixture and press it into the dish up to a day ahead. Keep covered in the fridge to prevent drying out, and the chocolate will stay glossy and inviting.
- Once set, the bars can be stored in an airtight container at room temperature for up to 3 days, or refrigerated for up to a week. The fridge keeps them firm but beware of excess moisture that may soften the cereal.
- Refrigeration enhances the chocolate’s sheen and keeps the bars firm, but they may become a little more brittle. Let them sit at room temp for 10 minutes before serving for optimal texture.
- To reheat or soften slightly, microwave at low power in short bursts (10 seconds), just until the chocolate begins to shimmer and feels slightly softer—watch for melting edges.
Top questions about no bake bars
1. Can I use different types of chocolate?
Use good-quality dark chocolate for a rich, smooth melt. Milk chocolate will be sweeter and softer, but may melt differently.
2. Can I swap out the cereal?
Yes, you can substitute Cornflakes with toasted rice cereal or bran flakes, but expect a different crunch or texture.
3. What about other fats or oils?
Unsalted butter gives a clean, creamy base. Olive or coconut oil can work as dairy-free options, but they add their own flavor.
4. Can I use other sweeteners?
Honey or golden syrup helps everything stick and adds floral sweetness. Maple syrup is an option but may darken the chocolate.
5. Is vanilla essential?
A teaspoon of vanilla brightens the chocolate and cereal. You can skip it or add a pinch of sea salt instead.
6. Can I add extras?
Nuts, dried fruit, or seeds add texture. Toasted pecans or dried cranberries are popular, but customize as you like.
7. How long should I chill the bars?
Chill in the fridge for about 15-20 minutes for a firm set. At room temperature, the bars take longer to set but stay softer.
8. How do I cut the bars cleanly?
Use a hot, damp knife to get clean cuts. Wipe it after each slice for the neatest edges.
9. How should I store the bars?
Store in an airtight container at room temp for up to 3 days or in the fridge for longer. Keep away from moisture.
10. What if the mixture is too thick?
If the mixture is too thick, splash in a tiny bit of warm milk and stir gently to loosen it.
Making these no-bake chocolate cornflake bars brings me back to those chaotic childhood afternoons, where simplicity was king and the kitchen smelled like melted chocolate and vanilla. There’s something grounding about stirring those crispy cereals into warm, silky chocolate—it’s a small act of nostalgia that still feels fresh every time.
Honestly, I keep coming back to this recipe because it’s forgiving and unfussy, perfect for when I need a quick treat or a little reminder of simpler days. Sometimes, the best moments in the kitchen are the messiest and most spontaneous, and these bars are no exception.

Hi, I’m Madison Lane, the cook, recipe creator, and heart behind this kitchen. Food has been part of my life for as long as I can remember. Some of my earliest memories are of standing beside my dad while he cooked, watching him move comfortably around the kitchen, tasting sauces, and explaining why patience mattered just as much as seasoning.
