Making no-bake chocolate biscuit bars is like tapping into a secret stash of childhood joy, but with a grown-up twist. I love how simple it is — no oven, no fuss, just the right mix of sweet, bitter, and salty in every bite. It’s the kind of treat that feels both indulgent and completely doable after a long day.
What really hooks me is how versatile it is. You can swap in different biscuits, toss in a handful of sea salt, or even sprinkle crushed nuts on top. It’s a recipe that invites you to play around, making each batch uniquely yours. Plus, it’s perfect for when you need something quick yet satisfying, especially when the craving hits hard.
Transforming a nostalgic childhood treat into a sophisticated, adult dessert that balances rich chocolate with a hint of sea salt.
The story behind this recipe
- This recipe comes from a moment of chaos in my kitchen—my kids were fighting over the last biscuit, and I just needed something quick to stop the fuss. I grabbed what was available—biscuits, chocolate, and a few odds and ends—throwing them together without much thought. That messy, spontaneous moment turned into a regular standby in my house.
- It’s funny how these accidental recipes stick around, becoming family favorites. I love that it’s imperfect, a little rough around the edges, but utterly satisfying. Every time I make these, I remember that sometimes, the best treats are born out of a little chaos and a lot of love.
- heading: The story behind this recipe
Key ingredients for perfect bars
- Dark chocolate: I prefer a deep, bittersweet bar that melts smoothly and leaves a rich, glossy finish. You might try a milder milk chocolate if you want a sweeter, creamier taste.
- Biscuits: I use digestive or graham crackers—something with a bit of crunch and buttery flavor. For a nuttier twist, try crushed biscuits with added toasted nuts or seeds.
- Butter: I stick to unsalted butter for control, but if you only have salted, reduce the added salt in the recipe. The butter’s creamy richness helps everything stick together and adds a subtle sheen.
- Sweetener: I often add a splash of honey or golden syrup for a touch of extra chewiness and a hint of caramel. Skip it if you prefer a more straightforward chocolate flavor, but it balances bitterness nicely.
- Sea salt: A pinch on top or mixed in heightens the chocolate’s depth and adds a satisfying contrast. For a smoky edge, try smoked sea salt, but don’t overdo it—just a sprinkle.
- Optional extras: I like tossing in crushed nuts or dried fruit for texture and bursts of flavor. Keep it chunky or finely chopped, depending on your mood; it’s your call.
- Additional flavor: A splash of vanilla extract or a sprinkle of cinnamon can add warmth and complexity. I usually keep it simple, but a little spice never hurts.
Spotlight on key ingredients
Dark chocolate:
- I prefer a deep, bittersweet bar that melts smoothly and leaves a rich, glossy finish. You might try a milder milk chocolate if you want a sweeter, creamier taste.
- Biscuits: I use digestive or graham crackers—something with a bit of crunch and buttery flavor. For a nuttier twist, try crushed biscuits with added toasted nuts or seeds.
- Butter: I stick to unsalted butter for control, but if you only have salted, reduce the added salt in the recipe. The butter’s creamy richness helps everything stick together and adds a subtle sheen.
Biscuits:
- They provide the necessary crunch and buttery flavor that contrasts with the smooth chocolate. Feel free to experiment with different types for unique textures.
- Chocolate: Its melting point and glossy finish give the bars their signature look and feel. Using good quality chocolate really makes a difference in flavor and appearance.
- Butter: Adds richness and helps bind the mixture. The slight sheen it imparts makes the bars look tempting and inviting.
Notes for ingredient swaps
- Dairy-Free: Swap regular butter for coconut oil or dairy-free margarine. Expect a slightly different richness and a hint of coconut aroma.
- Vegan Chocolate: Use plant-based dark chocolate. It melts just as smoothly but may have a different bitter-sweet profile.
- Sweetener: Replace honey or golden syrup with maple syrup or agave nectar. Keep in mind these can add a slight floral or caramel note.
- Biscuits: Gluten-free digestive biscuits or graham crackers work well. They might alter the texture slightly—less crisp, more crumbly.
- Nuts & Seeds: Add chopped toasted almonds, hazelnuts, or sunflower seeds for extra crunch. Toasted nuts bring a richer, smoky flavor.
- Salt: Use smoked sea salt for a deeper flavor contrast or skip salt entirely for a more straightforward chocolate hit.
- Flavor Boost: Incorporate a dash of espresso powder or chili flakes to intensify the chocolate’s depth or add a spicy kick.
Equipment & Tools
- 20cm (8-inch) square baking pan: Holds the mixture and shapes the bars.
- Heatproof bowl: Melts the chocolate gently over simmering water.
- Spatula: Stirs melted chocolate and mixes ingredients.
- Sharp knife: Slices the set bars cleanly.
- Parchment paper: Prevents sticking and makes removal easy.
Step-by-step guide to no bake bars
- Gather your equipment: a 20cm (8-inch) square baking pan, a heatproof spatula, a mixing bowl, and a sharp knife for slicing. Line the pan with parchment paper for easy removal.
- Break the biscuits into small, uneven chunks—aim for a variety of sizes, roughly 1-2 cm. This irregularity helps create a richer texture.
- Melt the chocolate: chop your preferred dark chocolate into small pieces. Place in a heatproof bowl over a pot of simmering water (about 80°C/176°F). Stir gently until smooth, about 3-4 minutes. Turn off heat.
- Add butter: cut into small cubes and stir into the melted chocolate. Wait until just melted and glossy, about 1-2 minutes. If it seizes or cools too quickly, gently rewarm over the water bath.
- Pour the chocolate-butter mixture over the biscuits in the bowl. Mix with a spatula until all bits are coated and sticky. The smell should be rich and chocolatey, inviting and warm.
- Transfer this mixture into your prepared pan. Use the spatula to press it down firmly, ensuring an even layer. Tap the pan gently on the counter to settle crumbs and remove air pockets.
- Chill the bars: place in the fridge for at least 2 hours, or until firm. If you’re in a rush, freeze for 30-40 minutes. The bars should look glossy on top and feel solid when gently pressed.
- Finish and cut: once set, lift out the slab using the parchment paper. Use a sharp knife to slice into bars or squares. For cleaner cuts, wipe the knife with hot water between slices.
- Optional: sprinkle a pinch of sea salt or crushed nuts on top before slicing for added flavor and crunch. Serve directly from the fridge for best texture.
Chill the assembled mixture in the fridge for at least 2 hours until firm. Lift out using parchment paper, then slice into squares. Serve immediately or store in an airtight container in the fridge.
How to Know It’s Done
- Chocolate and butter are fully melted and glossy before mixing.
- Mixture is evenly coated and slightly sticky after combining.
- Bars are firm and set after chilling, with a shiny top and clean edges.
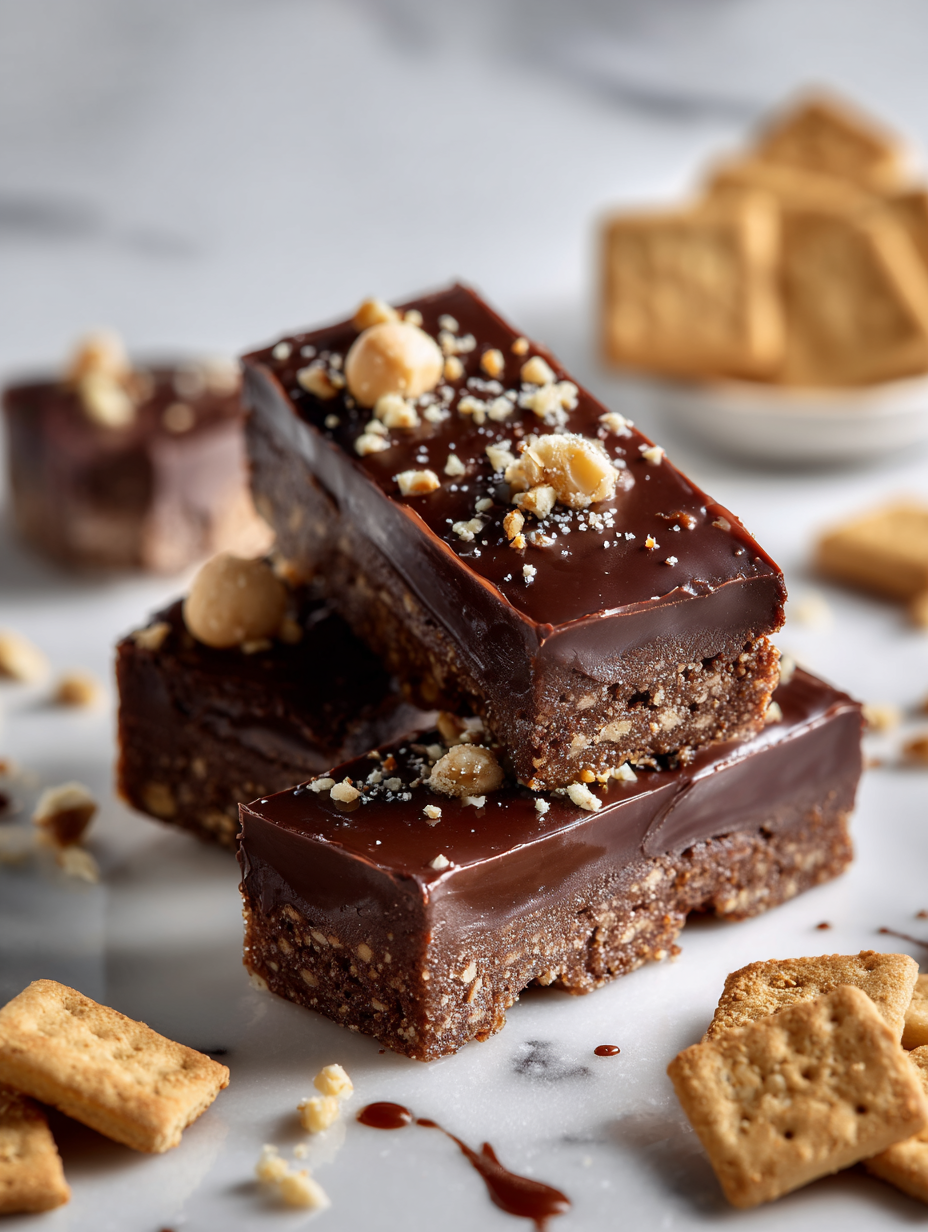
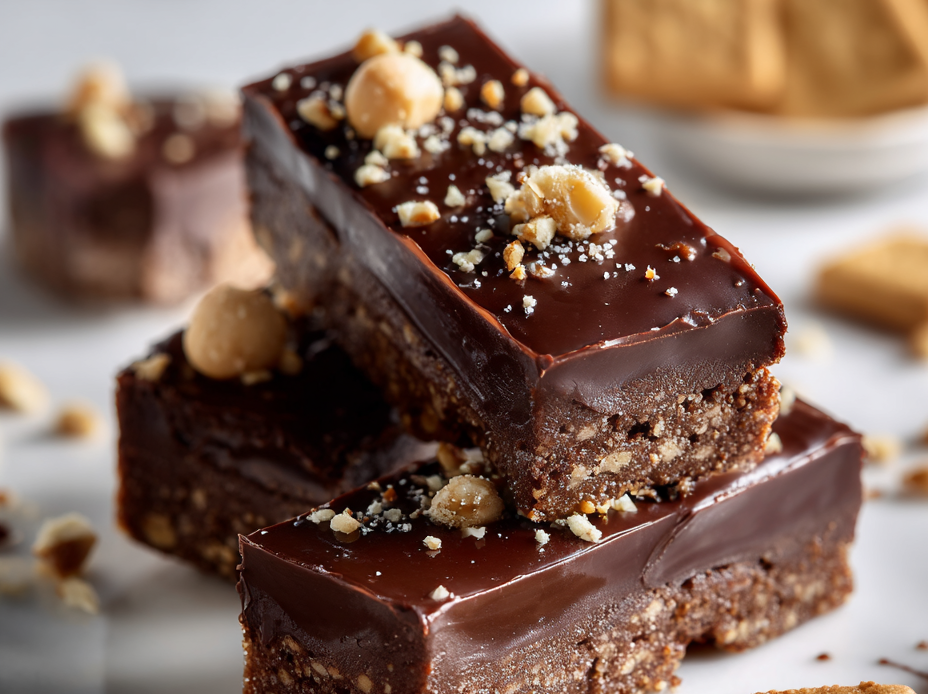
No-Bake Chocolate Biscuit Bars
Ingredients
Equipment
Method
- Line your square pan with parchment paper, leaving some overhang for easy removal.
- Break the biscuits into uneven small chunks, about 1-2 cm, to add texture and variety to the bars.
- Place the chopped dark chocolate into a heatproof bowl.
- Set the bowl over a pot of simmering water (about 80°C/176°F) and stir gently until the chocolate is silky and smooth, about 3-4 minutes.
- Add the butter cubes to the melted chocolate and continue stirring until fully melted and glossy, about 1-2 minutes.
- Pour the glossy chocolate-butter mixture over the broken biscuits in a large bowl.
- Stir gently with a spatula until all biscuit pieces are coated and sticky with the chocolate mixture.
- Transfer the mixture into your prepared pan and press down firmly with the back of the spatula to create an even layer.
- Sprinkle a tiny pinch of sea salt on top for a flavor contrast and optional extra crunch.
- Place the pan in the fridge and chill for at least 2 hours, or until the mixture is firm and shiny on top.
- Once set, lift the block out of the pan using the parchment overhang and cut into squares with a sharp knife.
- Serve immediately or store in an airtight container in the fridge for up to a week. Enjoy these rich, crunchy, and glossy chocolate biscuit bars!
Top Tips for Perfect Bars
- Use high-quality chocolate for a richer, more glossy finish. It melts smoothly and enhances flavor.
- Crush biscuits into uneven pieces for better texture contrast. Avoid uniform crumbs for more character.
- Melt chocolate over a gentle, low simmer to prevent seizing or burning. Stir constantly for a silky result.
- Press the mixture firmly into the pan to avoid air pockets and ensure clean slices after chilling.
- Chill the bars thoroughly—at least 2 hours—until they feel firm and the top is shiny before slicing.
- Use a hot, sharp knife to get clean cuts. Wipe with a damp cloth between slices for neat edges.
- Sprinkle a pinch of sea salt or crushed nuts on top just before chilling for extra flavor and crunch.
Common mistakes and how to fix them
- FORGOT to temper chocolate → Melt slowly over gentle heat, avoid scorching.
- DUMPED in all ingredients at once → Add in stages for smoother mixing and better texture.
- OVER-TORCHED chocolate → Remove from heat immediately; stir until glossy and smooth.
- MISSED chilling time → Ensure at least 2 hours in fridge for proper setting.
Quick fixes and pantry swaps
- If chocolate seizes, splash in a teaspoon of hot water and stir gently.
- When biscuits crumble unevenly, pulse briefly in a food processor for consistency.
- Splash a little more butter if mixture feels too dry and crumbly before pressing.
- Patch cracks by pressing extra biscuit crumbs into the surface before chilling.
- Shield delicate bars with plastic wrap during storage to prevent moisture absorption.
Prep, store, and reheat tips
- Prepare the mixture in advance: melt chocolate and butter, then combine with biscuits; keep in fridge overnight for extra flavor meld.
- Store the bars in an airtight container in the fridge for up to 1 week. They develop a richer chocolate aroma over time.
- For longer storage, freeze the bars wrapped tightly for up to 3 months. Thaw in fridge before slicing for best texture.
- Reheat sliced bars briefly in a low oven (around 150°C/300°F) just until slightly warm and fragrant. Avoid melting completely; the smell should be warm and inviting.
Top questions about no bake bars
1. What kind of chocolate works best?
Use a good quality dark chocolate for a rich, glossy finish that melts smoothly and coats the biscuits evenly.
2. Can I make these gluten-free?
Yes, you can swap in gluten-free biscuits or graham crackers; they might change the texture slightly but still taste great.
3. How long should I chill the bars?
Chill the mixture for at least 2 hours until firm and shiny on top. If in a rush, freeze for 30-40 minutes.
4. Can I use salted butter?
Use unsalted butter for control; if using salted, reduce or skip additional salt in the recipe to avoid over-salting.
5. Can I add other ingredients?
Yes, you can add chopped nuts or dried fruit before pressing into the pan for extra texture and flavor.
6. What if my chocolate seizes?
If the chocolate seizes or becomes grainy, add a teaspoon of hot water and stir gently to smooth it out.
7. How do I get neat slices?
Use a sharp, hot knife to cut the set bars for clean edges. Wipe the blade with a damp cloth between cuts.
8. How should I store the bars?
Storing in an airtight container in the fridge keeps the bars fresh for about a week. Freeze for longer storage.
9. Can I reheat the bars?
You can reheat slices briefly in a low oven or microwave for a warm, gooey treat—just watch they don’t melt completely.
10. How can I enhance the flavor?
For a richer flavor, try adding a pinch of sea salt or a splash of vanilla or coffee extract to the mixture.
These no-bake chocolate biscuit bars are a perfect quick fix when cravings hit and you want something rich yet simple. There’s a certain satisfaction in the glossy finish and how the flavors deepen after a day in the fridge. They remind me that sometimes, the best treats come together without fuss, just a bit of melting, mixing, and patience.
Plus, they’re flexible—swap ingredients, add a pinch of sea salt, or sprinkle crushed nuts on top. Every batch feels a little different, a little more personal. And honestly, nothing beats slicing into a firm, shiny slab and catching that sweet, chocolatey aroma.

Hi, I’m Madison Lane, the cook, recipe creator, and heart behind this kitchen. Food has been part of my life for as long as I can remember. Some of my earliest memories are of standing beside my dad while he cooked, watching him move comfortably around the kitchen, tasting sauces, and explaining why patience mattered just as much as seasoning.
