This no-bake chocolate peanut clusters recipe is like a quick portal to childhood afternoons—sweet, salty, and totally effortless. No oven, no fuss, just melting chocolate and tossing in crunchy nuts, which makes it perfect for those moments when you need a little comfort or just a fast treat to share. It’s that secret weapon for spontaneous gatherings or solo snack attacks when you want something rich but simple.
What I love most is how forgiving it is—no precise timing or fancy equipment needed. It’s a little chaotic, honestly, but that’s part of the charm. You can swap ingredients, double the batch, or sneak in a pinch of sea salt on top. It’s a recipe that feels like a warm hug, no matter how busy or chaotic your kitchen is.
Focusing on how this no-bake treat offers a quick burst of nostalgic comfort, perfect for when you need a sweet fix without turning on the oven or fussing over complicated steps.
Sweet Nostalgia in Every Bite
- Biting into these clusters feels like a tiny rebellion against my usually strict diet — pure, chaotic joy.
- Watching the chocolate melt in my hands takes me back to lazy summer afternoons at my grandma’s house.
- There’s a weird pride in whipping these up in minutes, especially when friends ask for the recipe on the spot.
- Sometimes I toss in a handful of dried fruit just to surprise my taste buds — it’s all about those little tweaks.
- No matter how many I eat, I always feel a weird comfort, like this simple treat is a secret code to my childhood.
The story behind this recipe
- This recipe came together on a chaotic afternoon when I needed something sweet, fast, and satisfying without turning on the oven. I remembered those tiny, messy candy shops from my childhood, where the best treats were the simplest—just chocolate and nuts clumped together. It’s funny how a small handful of ingredients can evoke so much nostalgia, and I wanted to recreate that effortless joy in my own kitchen.
- The idea of throwing everything together with a spoon and no fuss really stuck with me. It’s a little rebellious—no melting pots, no complicated steps, just raw, crunchy, sticky goodness. Every batch feels like a small victory, especially when I’m craving something rich but don’t want to spend ages fussing over a fancy dessert. It’s a recipe born from necessity and a bit of sweet rebellion.
- heading
- story_type
Historical Tidbits of Peanut Clusters
- These chocolate peanut clusters likely originated in mid-20th century American kitchens as a simple, no-fuss treat for busy families.
- The ease of mixing chocolate with nuts and letting it set without baking made it popular during wartime rationing, when oven space was limited.
- Many nostalgic recipes for no-bake treats like these emerged from community bake sales, where quick, satisfying sweets were in high demand.
- This recipe echoes the traditional candy-making methods before commercial chocolates became widely accessible, relying on basic ingredients everyone had at home.
Ingredient breakdown: key components
- Chocolate: I use good quality dark chocolate—melts smoothly and sets with a rich, glossy finish. Skip cheap stuff, it shows.
- Peanuts: Roasted, salted peanuts give that salty crunch I crave, but raw or unsalted work if you prefer less salt. Add a pinch of sea salt on top for a flavor punch.
- Butter: I melt a little butter with the chocolate for extra richness and a silky texture—don’t skip this step if you want that smooth coating.
- Sweetener: Sometimes I toss in a drizzle of honey or a sprinkle of powdered sugar if I want a slightly sweeter, more complex flavor. Keep it subtle, though.
- Add-ins: Dried cranberries or shredded coconut add a chewy or tropical twist—just toss in what makes your heart happy. They ooze with flavor and texture.
- Salt: A tiny pinch of flaky sea salt on top makes the chocolate pop—don’t forget this small step for balance and depth.
- Optional spices: A dash of cinnamon or smoked paprika can add a surprising warm or smoky edge—play around if you’re feeling adventurous.
Spotlight on key ingredients
Chocolate and Peanuts:
- Chocolate: I use good quality dark chocolate—melts smoothly and sets with a glossy finish. Skip cheap stuff, it shows.
- Peanuts: Roasted, salted peanuts give that salty crunch I crave, but raw or unsalted work if you prefer less salt. Add a pinch of sea salt on top for a flavor punch.
- Butter: I melt a little butter with the chocolate for extra richness and a silky texture—don’t skip this step if you want that smooth coating.
Notes for ingredient swaps
- Dairy-Free: Use coconut or soy milk chocolate instead of dairy. It melts just as smoothly but offers a different, tropical flavor.
- Nut Alternatives: Swap peanuts for almonds, cashews, or sunflower seeds. Each brings a unique crunch and flavor profile.
- Sweetener Switch: Replace honey with maple syrup or agave nectar. They add sweetness with a slightly different, richer note.
- Salt-Free: Omit salt for a milder taste or use smoked sea salt for a smoky depth that complements the chocolate.
- Add-ins: Try dried cherries, shredded coconut, or crushed pretzels instead of or alongside peanuts for varied texture and flavor.
- Butter Sub: Use coconut oil or vegan butter for a vegan version and a slightly different mouthfeel and richness.
- Chocolate Type: Dark, milk, or white chocolate can change the flavor profile—go with what suits your mood or dietary needs.
Equipment & Tools
- Heatproof bowl: To melt the chocolate gently over simmering water.
- Saucepan: To hold simmering water for indirect heat.
- Spoon or small scoop: To portion and shape the clusters.
- Parchment paper: To prevent sticking and make cleanup easier.
- Refrigerator: To quickly set and firm up the clusters.
Step-by-step guide to no-bake clusters
- Gather all your ingredients: chocolate, peanuts, butter, and optional add-ins. Line a baking sheet with parchment paper.
- Chop the chocolate into small, uniform pieces for even melting. Measure out your peanuts and any extras.
- In a heatproof bowl, combine the chocolate and butter. Set over a pot of simmering water (about 60°C/140°F).
- Stir gently until the chocolate and butter melt into a smooth, glossy mixture. This takes about 3-5 minutes.
- Remove from heat. Fold in the peanuts and any optional add-ins, ensuring they’re evenly coated.
- Using a spoon or small scoop, drop dollops of the mixture onto the prepared baking sheet, spacing them out.
- Gently press down each cluster if you want a slightly flatter finish. Let them cool at room temperature for 30 minutes.
- For faster setting, transfer the tray to the fridge. Chill for at least 1 hour until firm and set.
- Once hardened, break apart any clusters that are too big. Store in an airtight container at room temperature or in the fridge.
- Enjoy! The chocolate should be shiny, the nuts crunchy, and the clusters firm to the touch.
Let the clusters rest at room temperature or chill in the fridge until firm. Serve directly from storage, breaking apart any larger pieces as needed. They’re best enjoyed within a week for optimal crunch and flavor.
How to Know It’s Done
- Chocolate is fully melted and glossy before mixing.
- Clusters are firm and set after chilling.
- Nuts are evenly coated and crunchy inside.
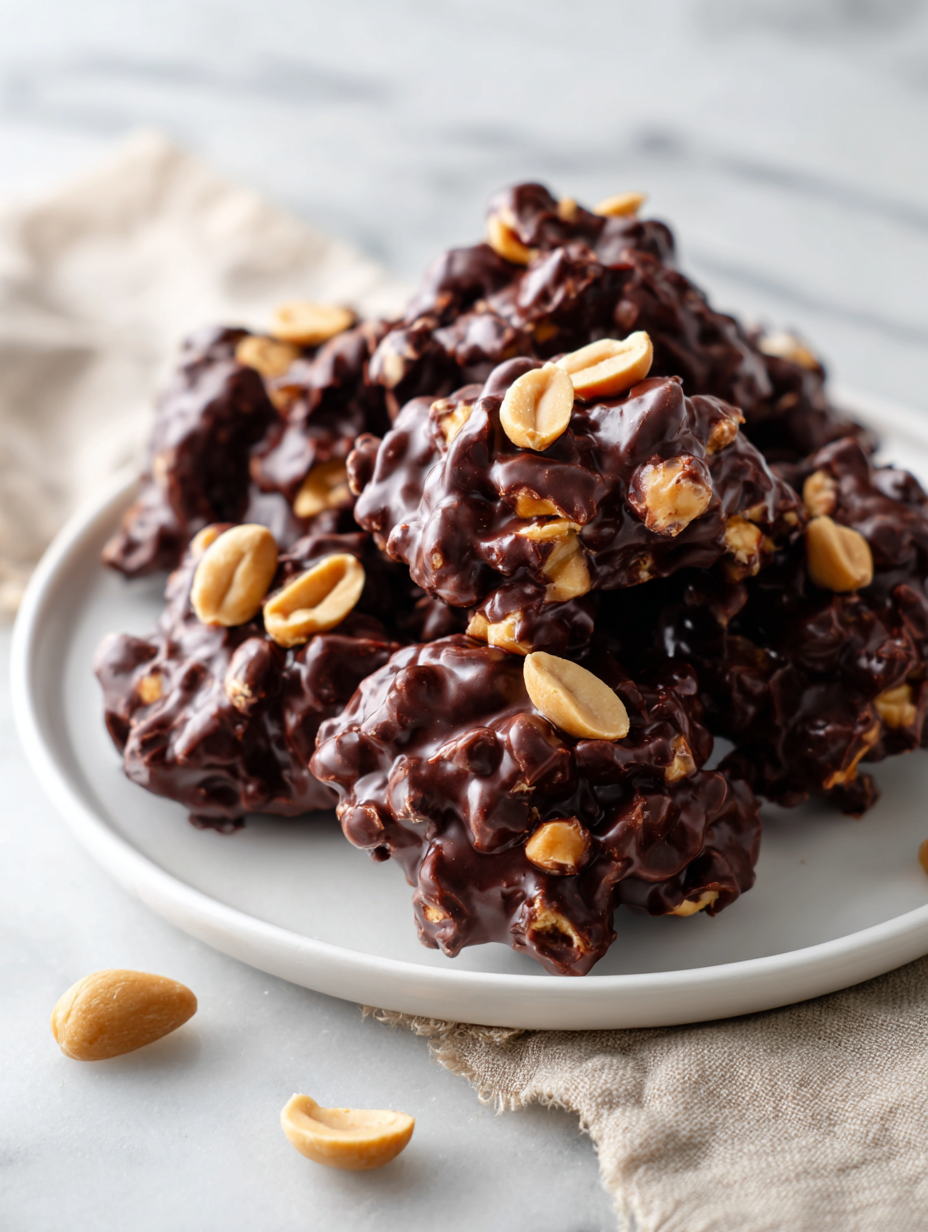
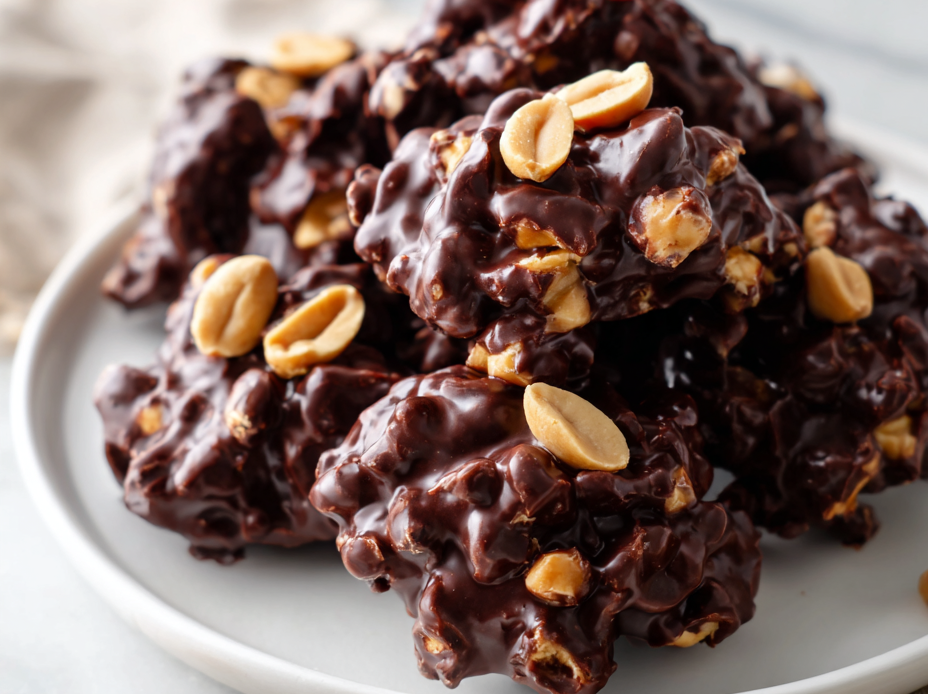
No-Bake Chocolate Peanut Clusters
Ingredients
Equipment
Method
- Line a baking sheet with parchment paper to prepare for setting the clusters.
- Combine the chocolate chips and butter in a heatproof bowl. Place the bowl over a saucepan with simmering water, making sure the bowl doesn't touch the water.
- Stir gently with a spoon until the chocolate and butter melt into a smooth, glossy mixture, about 3-5 minutes. The smell of melting chocolate will fill your kitchen.
- Remove the bowl from heat and fold in the roasted peanuts, ensuring they are thoroughly coated in the melted chocolate.
- Using a spoon or small scoop, drop dollops of the mixture onto the prepared parchment, spacing them evenly. You can press down slightly if you want a flatter cluster.
- Sprinkle a tiny pinch of sea salt on top of each cluster for an extra flavor boost, if desired.
- Let the clusters sit at room temperature for about 30 minutes or until they start to set. You’ll notice the chocolate firms up and becomes shiny.
- For quicker setting, transfer the tray to your refrigerator and chill for at least 1 hour until the clusters are firm and glossy.
- Once fully set, break apart any larger clusters if needed. Store in an airtight container at room temperature or in the fridge for up to a week.
- Enjoy these rich, crunchy bites whenever you crave a nostalgic, no-fuss treat.
Pro tips for perfect clusters
- Use high-quality chocolate for a glossy, smooth finish.
- Roast peanuts beforehand for extra crunch and flavor.
- Melt chocolate gently over low heat to prevent burning.
- Add a pinch of sea salt on top to enhance sweetness.
- Chill the clusters in the fridge for a firm set and shiny appearance.
- Mix ingredients quickly to prevent the chocolate from setting prematurely.
- Use a small cookie scoop for uniform clusters and easy portioning.
Common mistakes and how to fix them
- FORGOT to melt chocolate completely → Gently heat until smooth and glossy.
- DUMPED in too many nuts at once → Fold in gradually for even coating.
- OVER-TORCHED chocolate → Remove from heat immediately to prevent bitterness.
- MISSED the cooling step → Chill clusters until firm for perfect texture.
Quick fixes and pantry swaps
- If chocolate seizes, splash in a tiny bit of hot water and stir gently.
- When nuts are too oily, toast longer until crunchy and fragrant.
- DUMPED in too much salt? Rinse briefly under cold water, then drain and dry.
- Over-melted chocolate? Patch with a spoonful of fresh, melted chocolate to restore gloss.
- Shield delicate clusters from humidity by storing in airtight containers away from steam.
Prep, store, and reheat tips
- You can prepare the clusters a day in advance; keep them covered in an airtight container in the fridge to maintain their glossy finish and crunch.
- Store at room temperature for up to a week, but if it’s warm, the chocolate might soften slightly—refrigeration helps keep them firm.
- Refrigerate for at least an hour to ensure they’re fully set; bring to room temperature for a softer bite before serving, about 10 minutes out of the fridge.
- To reheat, briefly warm in a low oven (around 90°C/200°F) just until slightly melty—avoid microwave melting to prevent sogginess or uneven texture.
- While they keep well, the flavor of the chocolate and nuts can intensify after a day or two, making them even more satisfying.
Top questions about peanut clusters
1. Can I substitute the chocolate type?
Yes, you can use milk or white chocolate, but dark chocolate gives a richer flavor and glossy finish.
2. Can I swap the peanuts for other nuts?
Absolutely, try almonds, cashews, or even sunflower seeds for different crunch and flavor.
3. Can I use peanut butter instead of whole peanuts?
Yes, using natural peanut butter works, but you might need to adjust the mixture with a little more chocolate.
4. How long should I refrigerate the clusters?
Chill the clusters for at least an hour to ensure they set properly and are firm to bite.
5. How should I store the clusters?
Store them in an airtight container at room temperature for up to a week, or freeze for longer keeping.
6. My chocolate is seizing, what do I do?
If the chocolate doesn’t melt smoothly, gently reheat over low heat or add a splash of hot water, stirring constantly.
7. Can I add salt or other toppings?
You can add a pinch of sea salt before setting to enhance flavor, or sprinkle on top after they set.
8. Can I make these in advance?
Yes, you can prepare the mixture ahead of time, but best to add the nuts just before forming the clusters.
9. Why are my clusters soft or sticky?
If your clusters are soft, chill them longer or ensure your chocolate is fully set before storing.
10. How do I get a shiny finish on the chocolate?
For a more intense chocolate flavor, melt the chocolate slowly over low heat to prevent burning and preserve gloss.
These no-bake chocolate peanut clusters are more than just a quick treat; they hold a nostalgic charm that’s hard to match. Whenever I make them, I’m reminded of childhood afternoons filled with simple, messy joys, and that rush of satisfaction when they’re perfectly set and glossy.
They’re perfect for spontaneous sharing or quiet moments of indulgence. No matter how often I whip up a batch, I always find a little happiness in those crunchy, chocolatey bites — a small reminder that sometimes, simple is best.

Hi, I’m Madison Lane, the cook, recipe creator, and heart behind this kitchen. Food has been part of my life for as long as I can remember. Some of my earliest memories are of standing beside my dad while he cooked, watching him move comfortably around the kitchen, tasting sauces, and explaining why patience mattered just as much as seasoning.
