There’s something almost hypnotic about watching scallops transform in a hot pan. The way their edges turn a perfect golden caramel, creating that irresistible crust, makes the effort feel worth it every single time. It’s all about precision—getting that sear just right to balance the shellfish’s natural sweetness with a smoky, savory edge.
I’ve learned over years that the secret isn’t just in the heat, but in patience. No overcrowding, no fussing with the scallops once they hit the pan. This simple technique has become my go-to for a quick yet impressive dish, especially when I want to showcase how a little heat and a perfect sear can elevate something so humble into a highlight.
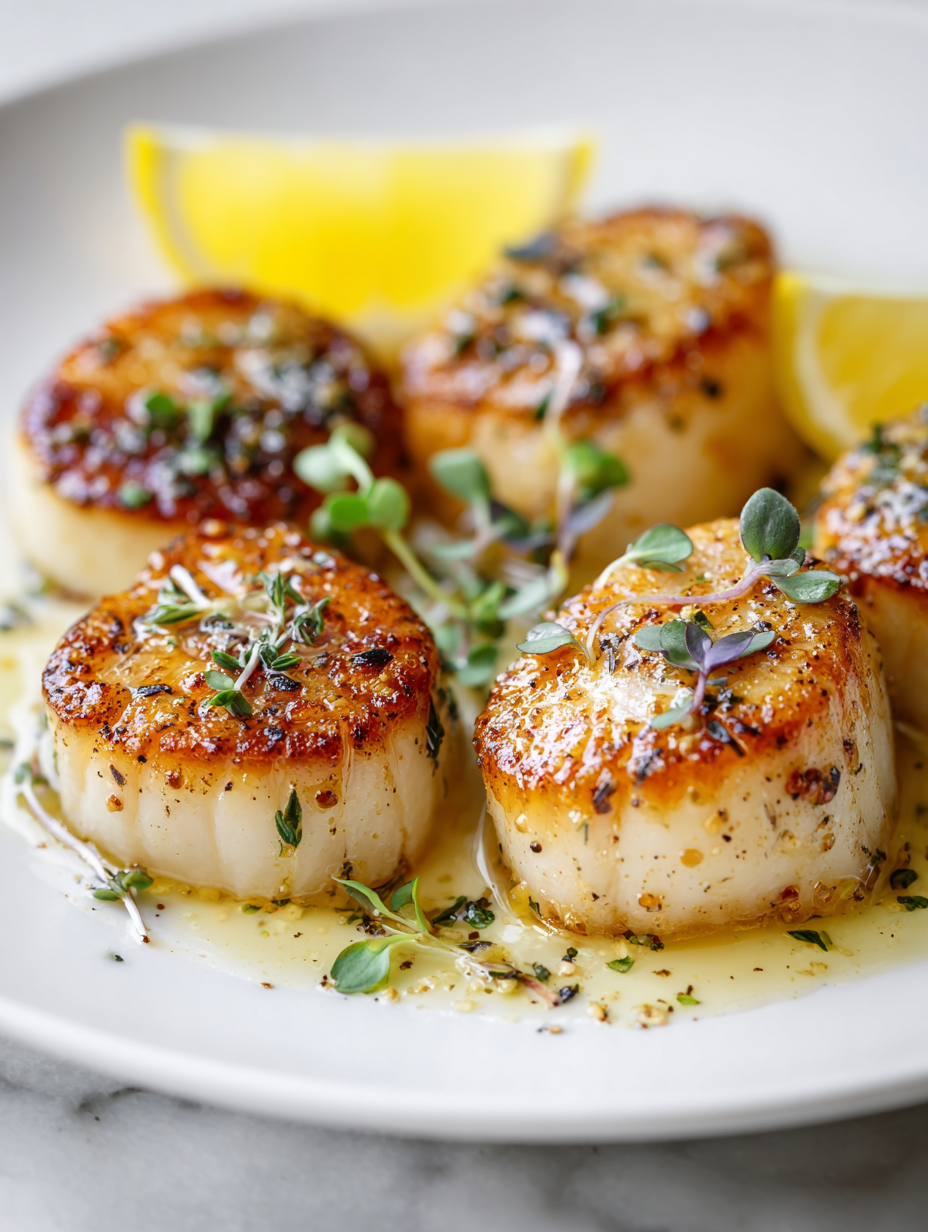
Focusing on how the precise sear creates a caramelized crust that balances the delicate sweetness of scallops, turning a simple ingredient into a textural and flavor masterpiece. This approach reveals the magic in mastering just one step, transforming the ordinary into something extraordinary with minimal fuss.
The magic of a perfect sear
- Watching scallops turn golden with just the right sear is oddly satisfying, like catching a small victory.
- There’s a rush of pride when I get that crust perfectly crisp without overcooking the tender inside.
- I remember the chaos of my first attempt—overcrowding the pan—learning the hard way to give each scallop space.
- Seared scallops remind me of summer nights by the coast, simple ingredients, pure flavors, no fuss needed.
- Every time I cook these, I feel a little more confident in my ability to turn a basic ingredient into something special.
The story behind this recipe
- Seared scallops always remind me of summer seafood trips with my family. We’d find a quiet dock, fry up a batch, and sit watching the sunset shimmer on the water. Those simple, bright flavors stuck with me, and I’ve been trying to recreate that feeling at home ever since.
- One day, I realized that the key wasn’t just the scallops, but the way I cooked them—hot enough to caramelize the edges without losing the tender inside. That moment of perfect crust became my benchmark, and now I chase it every time I cook these. It’s kind of a small victory that makes me feel connected to those lazy, sun-drenched days.
- heading: The story behind this recipe
Historical and Cultural Trivia
- Pan searing scallops became popular in French cuisine, especially in coastal regions where fresh seafood was abundant.
- The technique of searing seafood to develop a crust dates back centuries and was adapted from meat cooking traditions.
- Scallops are considered a delicacy in many cultures, from Japanese sashimi to French coquilles Saint-Jacques, showcasing their global appeal.
- Historically, scallops were seen as humble shellfish until chefs began highlighting their sweet, tender qualities with searing.
- The modern searing method was refined in the late 20th century, emphasizing high heat and minimal oil for perfect crusts.
Ingredient breakdown: key components
- Scallops: I look for ones that are firm and smell sweet, like the ocean. Skip the mushy or fishy-smelling ones.
- Salt: I prefer sea salt for its clean, mineral flavor. It helps enhance the scallops’ natural sweetness without overpowering.
- Pepper: Freshly ground black pepper adds a subtle heat and aroma. Don’t skip it—it’s a simple flavor boost.
- Oil: I use a high-smoke-point oil like grapeseed or clarified butter for that perfect sear—no smoky bitterness here.
- Lemon: A squeeze of bright, zesty lemon just before serving makes everything pop—don’t hold back on the zest.
- Herbs: A few sprigs of thyme or parsley add freshness. I toss them in the pan briefly for aroma, then remove.
- Butter: I finish with a pat of butter for richness—watch it melt quickly and foam, coating the scallops in silky goodness.
Spotlight on key ingredients
Scallops:
- I look for ones that are firm and smell sweet, like the ocean. Skip the mushy or fishy-smelling ones.
- Salt: I prefer sea salt for its clean, mineral flavor. It helps enhance the scallops’ natural sweetness without overpowering.
- Pepper: Freshly ground black pepper adds a subtle heat and aroma. Don’t skip it—it’s a simple flavor boost.
Oil and Lemon:
- Oil: I use a high-smoke-point oil like grapeseed or clarified butter for that perfect sear—no smoky bitterness here.
- Lemon: A squeeze of bright, zesty lemon just before serving makes everything pop—don’t hold back on the zest.
Notes for ingredient swaps
- Seafood Allergy: Substitute scallops with seared firm tofu for a plant-based alternative that still gets a nice crust and absorbs flavors well.
- Oil: Use avocado or light olive oil if grapeseed isn’t available; both have high smoke points and neutral flavors but may alter the crispness slightly.
- Salt: Kosher salt works best for seasoning, but if you only have fine sea salt, use half the amount to avoid over-salting.
- Butter: Clarified butter or ghee can be used for richness without the risk of burning, adding a slightly nutty note.
- Lemon: Lime juice or vinegar-based vinaigrettes can replace lemon for a different bright, acidic punch—try before serving to balance flavors.
- Herbs: Fresh thyme or parsley can be swapped for dill or chives; each adds a different aromatic twist, so choose based on your preference.
- Pepper: White pepper offers a milder heat and less visual contrast, great if you want a subtler spice note.
Equipment & Tools
- Heavy skillet (cast iron preferred): Provides even heat for a perfect sear.
- Tongs: To flip scallops gently without breaking them.
- Small spoon: For basting with melted butter.
- Paper towels: Dry scallops thoroughly for optimal searing.
Step-by-step guide to pan searing
- Equipment & Tools: Use a heavy-bottomed skillet (preferably cast iron) for even heat. Tongs for flipping, a small spoon for basting, and a paper towel for patting dry are essential.
- Prepare scallops: Pat scallops completely dry with paper towels. Season generously with sea salt and freshly ground black pepper.
- Heat the pan: Place the skillet over medium-high heat. Add a thin layer of high-smoke-point oil (about 1-2 tbsp). Wait until the oil shimmers, around 1-2 minutes.
- Sear the scallops: Carefully place scallops in the hot pan, leaving space between each. Sear without moving for 2-3 minutes until the edges turn golden and caramelized.
- Flip and baste: Use tongs to flip scallops gently. Add a small pat of butter (optional) and a sprig of thyme or parsley. Tilt the pan and spoon hot butter over the scallops for 30 seconds.
- Check doneness: The scallops should be opaque in the center and have a deep golden crust. If they feel firm but yield slightly, they’re ready. Total cook time about 4-5 minutes.
- Rest and plate: Transfer scallops to a plate, let rest for 1 minute. Serve immediately with a squeeze of fresh lemon and your favorite sides.
Rest scallops briefly on a warm plate. Finish with a squeeze of lemon, sprinkle of herbs, and a final drizzle of butter if desired. Serve immediately for best texture and flavor.
How to Know It’s Done
- Edges are deep golden and caramelized.
- Scallops are opaque through the center but still tender.
- A slight jiggle with tongs shows firmness without stiffness.
Perfect Pan-Seared Scallops
Ingredients
Equipment
Method
- Pat the scallops dry thoroughly with paper towels to remove excess moisture, which is key for a good sear.
- Season each scallop generously with sea salt and freshly ground black pepper, ensuring all sides are coated evenly.
- Place a heavy skillet over medium-high heat and add the high-smoke-point oil. Wait until the oil shimmers and starts to smoke slightly.
- Carefully add the scallops to the hot pan, making sure to leave space between each to prevent overcrowding. Sear without moving for 2-3 minutes until the edges turn a deep golden brown and caramelized.
- Use tongs to flip each scallop gently, then add a tablespoon of butter and a sprig of herbs to the pan. Tilt the pan slightly and spoon the melted butter over the scallops for about 30 seconds, enhancing flavor and moisture.
- Cook the scallops for another 1-2 minutes until they are opaque through the center but still tender, with a beautifully crisp crust.
- Remove the scallops from the pan and transfer to a serving plate. Squeeze fresh lemon juice over them and zest the lemon for brightness.
- Finish with an additional sprinkle of herbs if desired, and serve immediately while the crust is crispy and the interior tender.
Pro tips for perfect scallops
- Ensure scallops are dry: Pat them thoroughly with paper towels to achieve that perfect, golden crust.
- Use high heat: Wait until the oil shimmers before adding scallops; this prevents sticking and promotes caramelization.
- Leave space: Don’t overcrowd the pan; give each scallop room to sear evenly and develop a crust.
- Flip carefully: Use tongs to turn scallops gently once the edges are golden, about 2-3 minutes in.
- Baste for flavor: Add butter and herbs after flipping; tilt the pan and spoon hot butter over the scallops for extra richness.
- Check doneness: Scallops are ready when opaque through the center and edges are deeply caramelized—about 4-5 minutes total.
- Rest briefly: Let scallops sit for a minute off heat before serving to keep them tender and prevent overcooking.
Common mistakes and how to fix them
- FORGOT to dry scallops thoroughly → Result: uneven sear, fix by patting dry again.
- DUMPED oil in pan → Fix: use just enough to coat; too much causes steaming, not searing.
- OVER-TORCHED the oil → Fix: reduce heat slightly if oil smokes excessively, prevent burnt flavor.
- FAILED to preheat pan properly → Fix: wait until oil shimmers before adding scallops for a crisp crust.
Quick fixes and pantry swaps
- If scallops stick, splash a little water in the pan to loosen them.
- When oil smokes, reduce heat immediately to prevent burning and bitterness.
- Dumped too much oil? Pat scallops dry and start with fresh oil for crispness.
- Overcooked scallops? Rescue with a quick squeeze of lemon and a pat of butter.
- When in doubt, pantry swap: use avocado oil for high heat and a neutral flavor.
Prep, store, and reheat tips
- Prep scallops: Pat them dry and season lightly; this helps achieve a better sear and prevents excess moisture during cooking.
- Store raw scallops: Keep in an airtight container in the coldest part of the fridge for up to 24 hours—use as fresh as possible for best texture.
- Refrigerate cooked scallops: If needed, store in an airtight container for up to 2 days; reheat gently to avoid overcooking and rubberiness.
- Reheating tip: Warm in a hot skillet for just 30 seconds per side, until slightly warmed and crispy on the outside, but still tender inside. Sensory note: watch for a slight crackle and aroma of seared scallops.
Top questions about pan seared scallops
1. How do I pick the best scallops?
Look for scallops that are firm and smell like the ocean—sweet and fresh. Avoid mushy or fishy ones.
2. Why is my scallop not searing properly?
Dry scallops thoroughly with paper towels before cooking. Moisture causes steaming, not searing, which ruins the crust.
3. What oil works best for searing scallops?
Use a high-smoke-point oil like grapeseed or clarified butter. Heat it until it shimmers before adding scallops.
4. How long should I sear scallops?
Cook scallops for about 2-3 minutes per side until edges are deep golden and center is opaque. Don’t overcook, they turn rubbery.
5. When should I flip the scallops?
Flip scallops carefully with tongs once the edges are golden. Add butter and herbs after flipping for extra flavor.
6. Should I rest scallops after cooking?
Rest scallops for a minute after cooking. Serve immediately to enjoy the perfect crust and tender interior.
7. How do I add flavor at the end?
Use fresh lemon juice or zest right before serving. It brightens the rich, caramelized flavors of the scallops.
8. What if my scallops stick to the pan?
If scallops stick, splash a little water into the pan to loosen, then gently lift them with tongs.
9. Why is my oil smoking?
Overheating the oil can cause smoking and burnt flavor. Lower the heat slightly if this happens.
10. How do I reheat cooked scallops?
Reheat scallops gently in a hot skillet for about 30 seconds per side, until just warmed through and crispy.
Seared scallops are one of those dishes that feel fancy but are actually straightforward, once you get the technique down. They remind me of summer evenings, where simple ingredients come together in a flash of heat and color, creating something memorable. Plus, it’s a skill I keep returning to—each perfect sear feels like a small victory in the kitchen.
In the end, this dish isn’t just about the scallops, but about that perfect balance of timing, temperature, and patience. It’s a quick, honest way to elevate a humble shellfish into a highlight of any meal. Sometimes, simple really is best, especially when it’s done with care and attention.

Hi, I’m Madison Lane, the cook, recipe creator, and heart behind this kitchen. Food has been part of my life for as long as I can remember. Some of my earliest memories are of standing beside my dad while he cooked, watching him move comfortably around the kitchen, tasting sauces, and explaining why patience mattered just as much as seasoning.
